 C&C Chess Club
Anastasia's mate — knight and rook in tandem
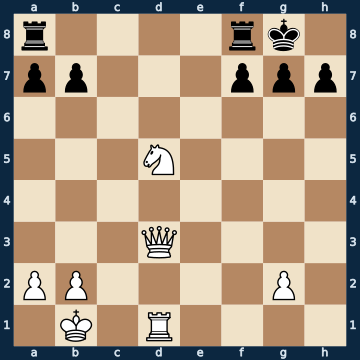
r4rk1/pp3ppp/8/3N4/8/3Q4/PP4P1/1K1R4 w - - 0 1The plan
The most beautiful proof of how much a single well-placed knight is worth. The knight jumps next to the king with check and from there covers BOTH squares the king could later escape to — that is the whole trick, and it decides the position before it even gets sharp. The king has to go to the corner. Then follows the queen sacrifice on the pawn shield: the king MUST capture, because otherwise it stays in check. That has taken it out of the corner and onto the open file, where the rook is waiting for it. The squares beside it are still covered by the knight, and its own pawn blocks the last one. Remember: with a knight well placed, the queen is just small change.
Why this level: Combined play of three pieces with a queen sacrifice; the knight move has to be recognised several moves in advance as the one that will provide the cover.
The solution, move by move
- 1. Ne7+ The key move, and it looks harmless. From here the knight covers the two squares the king will be missing at the end.
- 1… Kh8 Forced — the king has exactly one legal move left.
- 2. Qxh7+ The sacrifice. The king has to accept it, because a check cannot be ignored, and nobody else can capture.
- 2… Kxh7 Again only a single legal move. The king is FORCED out of the corner, rather than stepping out voluntarily.
- 3. Rh1# The rook comes onto the file. The knight has held the escape squares since the first move, and its own pawn blocks the last one.
Play it yourself
In the free app C&C Chess Club you step through the line move by move, tap the sidelines and play the position out against Stockfish — no account, no ads.
More in Mate with the rook
- Staircase mate — two rooks climb up Mate in 3
- The Opera Game — Morphy's final chord Mate in 2
- Back-rank mate — the forgotten air Mate in 1