 C&C Chess Club
The trebuchet — whoever moves loses
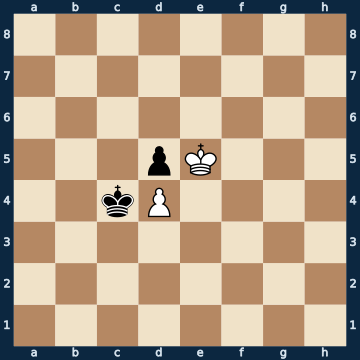
8/8/8/3pK3/2kP4/8/8/8 b - - 0 1The plan
Zugzwang in its purest form. Both kings are stuck in the same bind: each defends his own pawn and attacks the opponent's at the same time, and not a single square does both at once. So whoever HAS to move abandons his pawn. This is measured from both sides: with Black to move White wins, with White to move Black wins — same position, same material, only the right to move is swapped. Both sides have exactly five king moves to choose from, and in both cases all five lose; there is no escape that was merely overlooked. This seesaw is called the trebuchet, and it is the reason there is a whole art of losing a tempo in the pawn endgame: triangulation and distant opposition — both separate lessons in this collection — are nothing other than methods of entering such a position with the OPPONENT to move. Whoever doesn't know the trebuchet doesn't understand what these detours are good for either. At the board that means: before walking into such a contact, count the approach tempi, because a single one decides between the whole point and nothing.
Rule of thumb: here it is not the stronger side that wins, but whoever doesn't currently have to move.
Why this level: Mutual zugzwang in its purest form — the basis for triangulation and distant opposition
The solution, move by move
- 1… Kc3 Black has to move — and no square holds both: the defence of d5 and the pressure on d4. (c5 is off-limits to the king: the d4-pawn guards it.) All five king moves lose; that is measured, not estimated.
- 2. Kxd5 The reward of the zugzwang: the pawn falls, and the white king stands ideally IN FRONT OF his own passed pawn — the rest is the technique of the key squares. The ONLY move, by the way, that holds the win.
- 2… Kd3
- 3. Ke5 King in the lead, the shoulder keeps the pursuer at a distance.
- 3… Kc4
- 4. d5 Only now may the pawn go, and only because the king is ahead of it. Whoever swaps this order here gives away the point — the sideline later shows it.
- 4… Kb5
- 5. d6
- 5… Kb6
- 6. Ke6 The king stays within reach of the pawn and in doing so takes square after square away from the black king. Not a single move serves the attack, all of them serve space.Sideline 6. d7 The pawn runs off alone instead of waiting for the king. That is the most common way to spoil a won passed pawn. 6… Kc7 The only move — and it is enough: the black king reaches the square in front of the pawn. 7. Ke6 Kd8 8. Kd6 STALEMATE. White can never get the blocker away, because his own pawn takes d7 away from the king. First the king, then the pawn.
- 6… Kc6
- 7. d7
- 7… Kc7
- 8. Ke7 The ONLY move of ten. The king covers the queening square — the seesaw has decided.Sideline 8. d8=Q+ The queen at once, even with check — and still the loss of the whole point: the queening square is not yet covered. 8… Kxd8 The king takes the fresh queen, and bare kings stand on the board. That is exactly why in the main line the king goes to e7 first.
- 8… Kb6
- 9. d8=Q+ The queen stands with check. It all began because the opponent was to move one single move too soon.
Play it yourself
In the free app C&C Chess Club you step through the line move by move, tap the sidelines and play the position out against Stockfish — no account, no ads.
More in Pawn endgames
- Key squares — the sixth rank always wins White wins
- The race — promoting with check White wins
- Distant opposition — opposition at a distance White wins
- The queen skewer — curse of the long diagonal White wins
- Blocked pawns — the outflank White wins
- Shouldering — leading with the shoulder White wins