 C&C Chess Club
Blocked pawns — the outflank
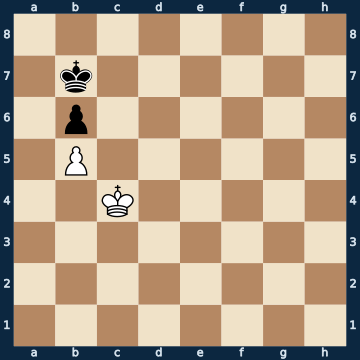
8/1k6/1p6/1P6/2K5/8/8/8 w - - 0 1The plan
Blocked pawns: the black king guards the two entry squares a6 and c6, and the third square beside them isn't even allowed to the white king, because the black pawn covers it. So White never gets in directly. The winning path is the great OUTFLANK: the king marches around the outside via e6 to d7 and falls on the defender's back. That the detour is faster than the direct path is measured — of the six moves in the starting position, exactly two win, and both lead AWAY from the pawn; all four that stay near it are draws. One move later, the same picture: two of five win, and again they are the two outward ones, while any move back toward the pawn costs the point. In the broad overview the rule becomes fully visible: placing the white king in turn on every free square, he wins from 27 squares — and every single one of them lies on the c-file or further out; from the a- and b-file it is a draw without exception. How tight it is is shown by the side-swap: if BLACK were to move, he would hold the draw with his king's counterattack on the white pawn.
Rule of thumb: against blocked pawns, it is not the shortest path that wins but the outer one — whoever clings to his own pawn never gets in.
Why this level: Outflanking with a tempo gain
The solution, move by move
- 1. Kd5 One of only two winning moves of six — and both lead AWAY from the pawn. Every one of the four moves that stay near it lets Black draw with the counterattack Kc7-d6! on b5 (sideline).Sideline 1. Kb4 The king stays by his own pawn instead of going around the outside — one of the four measured drawing moves. 1… Kc7 The counterattack begins: while White hesitates, the black king marches via d6 and c5 toward the b-pawn. 2. Ka3 Kd6 3. Ka2 Kc5 4. Kb2 Kxb5 The pawn falls — a draw. A single wasted tempo has cost the whole point.
- 1… Kc7
- 2. Ke6 Not back to the pawn: the black king holds a6 and c6 in his grip. White takes the detour via e6 and d7 — the defender's arm doesn't reach that far. Here too only two of five moves win, and both go outward.
- 2… Kb8
- 3. Kd6
- 3… Kb7
- 4. Kd7
- 4… Ka8
- 5. Kc6 The break-in from behind: from d7 the king wins square c6, which was unreachable before.
- 5… Ka7
- 6. Kc7 Zugzwang in its purest form: Black has to give up the defence of b6.
- 6… Ka8 He has to — this is his ONLY legal move. That is exactly what the whole outflank aims at: forcing the defender into a position with no choice.
- 7. Kxb6 The reward: the pawn falls, and the white king stands ideally IN FRONT OF his own passed pawn.
- 7… Kb8 Again with no choice: only this one square is free. The defender is now simply being pushed around.
- 8. Ka6
- 8… Kc7
- 9. b6+
- 9… Kc8
- 10. Ka7 The ONLY winning move of four: first the king covers the queening square, then the pawn runs. Whoever pushes first here gives away the whole point.
- 10… Kd7
- 11. b7
- 11… Ke6
- 12. b8=Q
Play it yourself
In the free app C&C Chess Club you step through the line move by move, tap the sidelines and play the position out against Stockfish — no account, no ads.
More in Pawn endgames
- Triangulation — losing a tempo White wins
- Distant opposition — opposition at a distance White wins
- The Reti manoeuvre — one king, two goals Draw
- Key squares — the sixth rank always wins White wins
- Rook pawn — the saving corner Draw
- The trebuchet — whoever moves loses White wins