 C&C Chess Club
Rook pawn — the saving corner
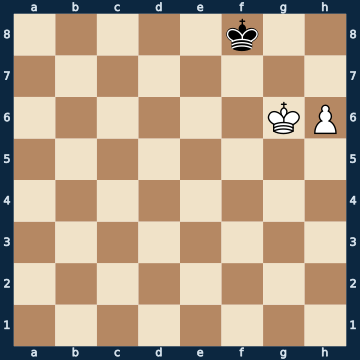
5k2/8/6KP/8/8/8/8/8 b - - 0 1The plan
The rook pawn is the great exception of the pawn endgame: once the defending king reaches the corner, the extra pawn no longer wins. The reason is purely geometric — beside the edge file there is no second side for the attacking king to go around on, and its own pawn eventually takes away the very square it would need to drive the defender out. All that is left is a choice between pushing the pawn and stalemate. Here that is measured: of the three king moves, exactly ONE holds the draw, namely into the corner; the two moves toward the centre, which look like the more active ones, both lose. After that Black has exactly one correct answer every single time, and the line doesn't end with an assertion but with stalemate on the board. The counter-test sharpens the lesson: in the strongest possible attacking setup — king on the sixth rank right in front of its own pawn, the defender directly in front of it — White wins with the b-, the e-, and the g-pawn, while the same setup with the a- or the h-pawn stays dead drawn, there even when the black king still stands two files away. A single file decides the half point.
Rule of thumb: against the rook pawn, the shortest way into the corner saves — and nothing else.
Why this level: The corner saves — the first exception everyone must know
The solution, move by move
- 1… Kg8 The ONLY holding move of three. The king goes into the corner, not into the centre — both moves toward the middle of the board lose, measured.Sideline 1… Ke7 The king marches into the centre, where the centre is supposedly what counts — and loses the game by doing so. Against the rook pawn the corner saves, and nothing else. 2. Kg7 Now the queening square belongs to White, and the black king can never get close again. 2… Ke6 3. h7 Kf5 4. h8=Q The queen stands, without White having had to do anything clever. A single king move in the wrong direction has cost the half point.
- 2. h7+ White pushes on with check and looks like the winner. In reality this takes away his own king's last square from which he could drive the defender out.Sideline 2. Kf6 The detour instead of the push: White leaves the pawn and tries to walk the king around. That changes nothing either. 2… Kh8 And again only the corner. The seemingly active step to f8 would actually lose here — in the middle of a drawn position. 3. Kf7 Kh7 The ONLY move, and it is forced — but it is enough. White stands as well as he possibly can in this endgame and still makes no progress: the king cannot get near the corner.
- 2… Kh8 Again the ONLY move, and again the same one: deeper into the corner. The retreat to f8 loses on the spot, because then h8 is free and the pawn promotes with check (sideline).Sideline 2… Kf8 Even now it still holds: one step out of the corner, and it is all over. 3. h8=Q+ Because h8 is free — the pawn promotes WITH CHECK. With the king on h8, that is exactly impossible; that is the whole defence. 3… Ke7 4. Qh4+
- 3. Kh6 STALEMATE — not asserted, but on the board. Black has no move left: the king covers g7, the pawn covers g8, and capturing the pawn on h7 is impossible because it is defended. Every other white attempt runs into the sand too.
Play it yourself
In the free app C&C Chess Club you step through the line move by move, tap the sidelines and play the position out against Stockfish — no account, no ads.
More in Pawn endgames
- Opposition — the drawing defence Draw
- The Reti manoeuvre — one king, two goals Draw
- Opposition — king in front of the pawn wins White wins
- Triangulation — losing a tempo White wins
- Blocked pawns — the outflank White wins
- Distant opposition — opposition at a distance White wins