 C&C Chess Club
Opposition — the drawing defence
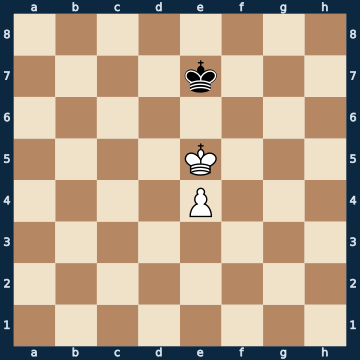
8/4k3/8/4K3/4P3/8/8/8 w - - 0 1The plan
The same structure as in the winning lesson, only this time the pawn already stands BESIDE its king instead of one rank behind — and so White lacks the reserve tempo. How much that one square matters is shown by the counter-test: with the pawn one rank lower, three of the six white moves win; here all four possible moves only hold the draw, and not a single one wins. The defender needs two rules for this — take the opposition as soon as the enemy king approaches, and, if pushed back, retreat STRAIGHT back and stay in front of the pawn. This is not comfortable: measured, the defender has, at each of his five moves, exactly ONE that holds the draw — five out of five are forced. What tips the whole thing over is shown by the sharpest measurement in this lesson: the same position with Black to move is flatly lost, all five king moves lose there. So it is not the material that decides here, but who has to move. In the end the defender stands in front of the pawn and is stalemated — the half point is saved.
Rule of thumb: whoever has the opposition holds; whoever retreats diagonally instead of straight gives it up, and with it the half point.
Why this level: The same lesson from the other side
The solution, move by move
- 1. Kd5
- 1… Kd7 Opposition! The kings face each other with one square between them, White is to move and cannot get past. Measured, it is the ONLY move of six that holds the draw.
- 2. e5
- 2… Ke7 Again the only holding move of five: straight back in front of the pawn. Any sideways dodge loses at once.
- 3. e6
- 3… Ke8 The second rule: STRAIGHT back (Ke8!), not diagonally. That way Black keeps the opposition on both sides — diagonally to f8 loses (sideline).Sideline 3… Kf8 The classic mistake: DIAGONAL retreat instead of straight. Now White wins — 4. Kd6 — the king takes the key square, wins the opposition, and the pawn runs through. Of eight moves only this one wins. 4… Kg7 5. e7 Kf7 6. Kd7 The second and last critical moment: of ten moves only this one wins. The king covers the queening square instead of chasing after the pawn.
- 4. Kd6
- 4… Kd8 Opposition again. White has only the pawn advance left — and that leads to stalemate.
- 5. e7+
- 5… Ke8 The last forced move: of two possible squares, only this one holds. In front of the pawn, not beside it.
- 6. Ke6 STALEMATE — the black king has no square left. That is why the pawn beside the king is only a draw: the last tempo is missing.
Play it yourself
In the free app C&C Chess Club you step through the line move by move, tap the sidelines and play the position out against Stockfish — no account, no ads.
More in Pawn endgames
- Opposition — king in front of the pawn wins White wins
- Rook pawn — the saving corner Draw
- The Reti manoeuvre — one king, two goals Draw
- Triangulation — losing a tempo White wins
- Blocked pawns — the outflank White wins
- Distant opposition — opposition at a distance White wins