 C&C Chess Club
Triangulation — losing a tempo
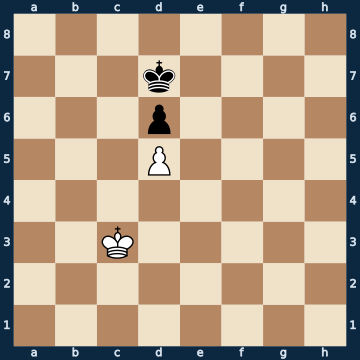
8/3k4/3p4/3P4/8/2K5/8/8 w - - 0 1The plan
WANTING to lose a tempo is the idea that a club player grasps for the first time at this position, and it usually takes a run-up to get there. The two pawns block each other and never move again; that leaves the right to move as the only currency left. Whoever has to give way first with his king cedes ground. White has an advantage that is not obvious at first glance: on his side his king has one more square available than the black king has on his side. That means he can walk a small triangle and arrive, after two moves, back exactly where he started — except that by then the OPPONENT is to move. The black king cannot copy this: he lacks the third square, he has to shuttle between two, and after two moves it is his turn again. That the whole point hangs on this is measured twice on the same position. The decisive pair of kings with BLACK to move: all five black moves lose. The same picture with WHITE to move: all four white moves are drawn. One board, one set of material, one single difference — the right to move. The starting position says it again: with White to move exactly one of eight moves wins, with Black to move it is a draw. The same idea appears twice more in this collection: once quite bare as the seesaw, where whoever has to move simply loses, and once as opposition across the whole width of the board. Three names for one thing.
Rule of thumb: when both kings can only wait, the one who has one more move to waste wins.
Why this level: WANTING to lose a tempo — the idea needs time to sink in
The solution, move by move
- 1. Kb4 The ONLY winning move among eight — the other seven are all only draws. White is aiming at the breakthrough, but pointedly does not go there yet: the sideline shows why the direct path earns nothing.Sideline 1. Kc4 The most direct path, and one of seven moves that throw away the win at once. The king marches stubbornly toward his goal — and arrives there on the wrong beat. 1… Kc7 Black simply mirrors. 2. Kb5 Kb7 The ONLY move: king facing king, White to move. That is exactly the position White wanted to avoid with the triangle. 3. Kc4 Kc7 4. Kb4 The triangle after all, now? Too late — the black king is no longer confined and has room of his own to dodge. 4… Kb6 A draw. Losing a tempo only helps if the opponent has none to spare.
- 1… Kc7 Black has to follow and keep the door shut against the king. Nothing is saved by this: from here on, all five moves he has lose.
- 2. Ka5 THE key move: White goes in the wrong direction. Again the only holding move among seven — advancing directly would now be only a draw, and that is shown as the sideline.Sideline 2. Kb5 The impatient move: White goes straight to where he wants to be. But that means entering the decisive picture with the wrong side to move. 2… Kb7 The ONLY move Black has — and he needs no more than that: the opposition now belongs to him. 3. Ka5 The second attempt to walk the triangle after all. Too late: Black has the same escape option on his side, as long as he isn't squeezed into a corner. 3… Ka7 Again the only move, and again Black finds it without effort. 4. Kb5 Kb7 The same position as two moves before, and again it is WHITE to move — a draw. The triangle has to be walked BEFORE entering the decisive square, not after.
- 2… Kb7 Black has to follow and can do nothing but shuffle back and forth. His pawn is blocked, so he has no move to spare — that is exactly the whole difference between the two kings.
- 3. Kb5 The triangle is closed: the same king position as two moves before, but now BLACK has to move. This picture is measured from both sides — with Black to move, Black loses with all five of his moves; with White to move, all four hold the draw.
- 3… Kc7 Black has to give up the opposition. He has no waiting move; his pawn is blocked and cannot give him one.
- 4. Ka6 The outflanking begins. From here on nothing is fancy any more — the white king simply walks past the black one.
- 4… Kc8
- 5. Kb6
- 5… Kd7
- 6. Kb7
- 6… Kd8
- 7. Kc6
- 7… Ke7
- 8. Kc7
- 8… Kf6
- 9. Kxd6 The reward of the manoeuvre: the pawn falls. All it took to earn this point were two king moves in the apparently wrong direction.
- 9… Kf7
- 10. Kc6
- 10… Kf6
- 11. d6 Only now may the pawn go, and only because his own king is ahead of it. First the king, then the pawn — always.
- 11… Ke6
- 12. d7
- 12… Ke7
- 13. Kc7 The ONLY move among ten: the king covers the queening square. Whoever plays the pawn here has turned a won endgame into a drawn one.
- 13… Ke6
- 14. d8=Q The queen stands. It all began with White deliberately doing nothing for two moves. Rule of thumb: when both can only wait, the one who has one more move to waste wins.
Play it yourself
In the free app C&C Chess Club you step through the line move by move, tap the sidelines and play the position out against Stockfish — no account, no ads.