 C&C Chess Club
Connected passed pawns — advancing under cover
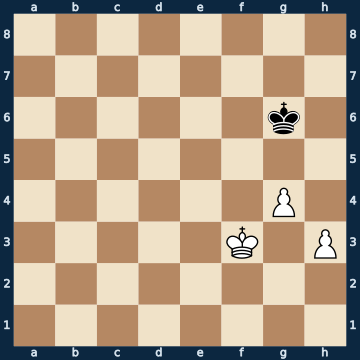
8/8/6k1/8/6P1/5K1P/8/8 w - - 0 1The plan
Two connected passed pawns are the strongest pawn formation there is — but only if you lead them in the right order. The rule reads: the REAR one moves. It takes its place beside the front one, and from then on both together guard every square in front of them; the enemy king finds not a single square left from which to block them. His own king follows on comfortably as the third man. The wrong push, on the other hand, costs the whole point at once: among the nine possible moves in the starting position there is exactly ONE that turns the win into a draw — the advance of the front pawn. It simply gets captured, and the remaining rook pawn can no longer be converted with the enemy king in front of it. The same trap repeats twice in the same line: two moves later exactly one of seven moves again throws away the win, and two moves after that again exactly one of nine — each time a pawn that runs undefended. The counter-test with the same formation one and two files further in gives exactly the same picture, so it is not a quirk of the edge file, it is the rule.
Rule of thumb: with connected passed pawns, the rear one moves first — the front one may only move once it is defended.
Why this level: Advancing connected passed pawns under cover
The solution, move by move
- 1. h4 The REAR one advances: h4 guards g5, g4 guards h5 — every square in front of the pawns is off-limits to the black king. Of nine moves exactly one spoils the win, namely g5 (sideline).Sideline 1. g5 The front pawn runs off — the only one of the nine moves that throws away the win. It is defended by nothing. 1… Kxg5 The only move, but it isn't hard: the pawn is simply captured. 2. Ke4 What is left is a rook pawn, and against that there is the familiar corner defence. 2… Kh6 3. Kf5 Kh7 4. Kf6 Kh8 5. Kf7 Kh7 The only holding move — and Black always finds it: out of the corner the moment the white king tries to occupy it. A draw. A single pawn move at the wrong time has cost the point.
- 1… Kf6
- 2. h5
- 2… Kg5
- 3. Ke4 The pawns hold the king in check all by themselves — now the king comes along as the third man, and the march begins. Here too there would be exactly one spoiler among seven moves: h6, the front pawn going it alone.
- 3… Kh6
- 4. Kf5 Again the king, again not the pawn. g5 with check would now be the one move of nine that allows the draw (sideline) — a check is no progress if it gives away a pawn.Sideline 4. g5+ The same mistake three moves later, this time even with check — and again it is the one move of nine that throws everything away. 4… Kxg5 Again the only move, again a gift: the pawn was undefended, because the white king stands one square too far away. 5. Ke5 Kh6 6. Kf6 Kh7 7. Kf7 Kh8 8. Kf8 Kh7 And again only this one move holds — stepping out of the corner and back in is enough. Remember: a check is no argument if the pawn hangs while you give it.
- 4… Kg7
- 5. g5 And NOW the pawn: its own king stands beside it and defends it. Moving alternately, the pair stays defended at every step.
- 5… Kf7
- 6. h6
- 6… Ke7
- 7. g6
- 7… Kd6
- 8. g7
- 8… Kc5
- 9. g8=Q Unstoppable: against two properly led connected pawns, the king is powerless.
Play it yourself
In the free app C&C Chess Club you step through the line move by move, tap the sidelines and play the position out against Stockfish — no account, no ads.
More in Pawn endgames
- The doubled pawn as a tempo reserve White wins
- The stalemate trap — pawn on the sixth White wins
- Doubled rook pawn — the corner holds two as well Draw
- Rook-pawn race — the corner saves Draw
- Shouldering — leading with the shoulder White wins
- Eat or run — the square backwards White wins