 C&C Chess Club
The saving trade
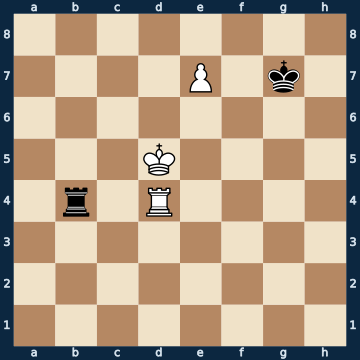
8/4P1k1/8/3K4/1r1R4/8/8/8 b - - 0 1The plan
The same thinking, from the defender's point of view. White has a pawn on the seventh rank and a rook next to it; Black has only its rook and is to move. Whoever becomes active now, swings the rook around or waits with the king, loses — measured, of seventeen moves, calculated two half-moves deep, only one holds, and it is the trade with check. The reason is simple: without rooks the pawn endgame is a draw, because the black king just manages to get in front of the pawn. White then tries to avoid the trade, but the pawn needs defending, and the black king attacks it — sooner or later White has to take the rook after all. In the pawn endgame that follows, one rule applies: the defender places its king IN FRONT OF the pawn, on the queening square, and waits there; it must never dodge to the side. Whoever knows this never gives up in such positions.
Rule of thumb: a trade that leads into a drawn pawn endgame is not a loss of material but the rescue — you just have to know the pawn endgame. The counterpart is called 'When to trade'.
Why this level: When the trade saves you
The solution, move by move
- 1… Rxd4+ The ONLY move that holds, out of seventeen. It comes with check, so White has no time left for the pawn. Two failed attempts stand next to it as sidelines.Sideline 1… Rb8 The natural move: the rook places itself in front of the pawn and holds the queening square. This is exactly what loses. 2. Ke6 The white king marches to the pawn. As soon as it stands next to it, the rook is powerless against the pawn. 2… Kg6 3. Rd8 White defends its own pawn with the rook and promotes: lost. A rook alone never holds up a defended pawn on the seventh rank.Sideline 1… Kf7 The king attacks the pawn — one move too slow, because it arrives without check. 2. e8=Q+ The pawn simply promotes. 2… Kxe8 3. Rxb4 The queen may be captured, then the rook falls: rook against the bare king, lost. The trade on the first move was the only rescue.
- 2. Ke5 White declines the trade and wants to defend the pawn. Understandable — but it costs White the pawn.
- 2… Kf7 The king attacks the pawn. White has to grab it now; one move later the pawn is gone.
- 3. Kxd4 Finally the recapture. From here on it is a pure pawn endgame, and Black has been aiming for exactly this from the first move.
- 3… Ke8 The king places itself IN FRONT OF the pawn. Only this square and capturing hold; every move to the side loses.
- 4. Ke5
- 4… Kf7
- 5. Kd6
- 5… Ke8 The ONLY move that holds, out of five — and the heart of the whole endgame: the king goes back to the queening square. After a move to the side the pawn could no longer be stopped.Sideline 5… Kg7 The reflex to dodge the king instead of going in front of the pawn. In the pawn endgame this is by far the most common mistake — here four moves out of five lose. 6. Kd7 The white king occupies the queening square, 6… Kh8 7. Kd8 and escorts the pawn in. The defender belongs IN FRONT OF the pawn, not beside it.
- 6. Kc7 White has to give up the defence. On the square next to the pawn, Black would be stalemated, and the king gets no further forward.
- 6… Kxe7 The ONLY move that holds — and the end: bare kings, a draw. The pawn on the seventh rank brought White nothing.
Play it yourself
In the free app C&C Chess Club you step through the line move by move, tap the sidelines and play the position out against Stockfish — no account, no ads.
More in Endgame principles
- When to trade White wins
- The king has to come along White wins
- Promotion with a fork Draw
- The bishop only sees half the world White wins
- Saavedra — the queen is too strong White wins
- Activity beats material Draw