 C&C Chess Club
The rook does not win by itself
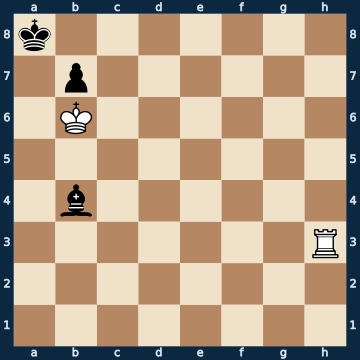
k7/1p6/1K6/8/1b6/7R/8/8 b - - 0 1The plan
A rook against bishop and pawn looks like an extra exchange and therefore like a win. Measured over four hundred random positions with this ratio, three out of four are DRAWS — the rook does not win here by itself, and anyone in a tournament who pushes for the win instead of calculating often gives away more than half a point. The reason is that a rook alone cannot win a minor piece: it needs a MATE, and a mate needs a corner. That is exactly what this is about. The black king stands in the corner, and its own pawn takes away its air — White threatens mate on the back rank. Only a single move holds, and it brings the bishop to a square from which it can interpose on the back rank on the next move. From there the position is watertight: once the bishop covers the corner, the rook has no second idea left, and the white king cannot help without releasing the bishop again.
Rule of thumb: against a minor piece plus a pawn, the rook only wins where there is a mate — secure the corner, and the exchange is worth nothing. With a pawn of its own, on the other hand, the rook wins almost every time.
Why this level: The rook does not win by itself
The solution, move by move
- 1… Bd6 The ONLY move that holds, out of ten — and it looks like nothing at all. White threatens mate in the corner: the king has no square, because its own pawn stands in front of it. So the bishop has to be able to reach the back rank, and from here that takes one move. The other nine moves lose (two sidelines).Sideline 1… Be7 The bishop goes to the long diagonal and appears to cover the back rank. But it covers the wrong square. 2. Rh8+ The check that decides everything. 2… Bd8+ The block is forced — and it comes with check, which does not help at all. 3. Rxd8# Captured, mate. This very mate is the rook's only weapon in this endgame.
- 2. Rh8+ White tries it anyway — the check is its only real threat.
- 2… Bb8 Again the ONLY move, and this is exactly why the bishop stood correctly: it throws itself onto the back rank. The second possible block would be immediate mate (sideline). From here the corner is watertight.Sideline 2… Bf8 The second block on the back rank — and the wrong one: on this square the bishop is not defended. 3. Rxf8# Mate. Only the block right next to the king holds, because the king defends it there.Sideline 2… Bb8 The correct block, once again. 3. Rd8 And here you can see how blunt the rook has become: if it stays on the back rank, Black is STALEMATED — the king has no square, the bishop is pinned, the pawn is fixed. A draw on the spot.
- 3. Rh6 White steps off the back rank, otherwise Black is stalemated (sideline). The rook no longer has any threat at all.
- 3… Ba7+ The bishop may now come out — with check, so that the back rank is never left unguarded. Only four of seven moves hold here: it must not go to the square the rook guards.
- 4. Kc7
- 4… Bb8+ And straight back into the corner. This shuttling is the whole defence.
- 5. Kd8
- 5… Ba7
- 6. Ke8
- 6… Bb8
- 7. Kf8 The white king has arrived at the other end of the board and achieved nothing. Rook against bishop and pawn: a draw.
Play it yourself
In the free app C&C Chess Club you step through the line move by move, tap the sidelines and play the position out against Stockfish — no account, no ads.