 C&C Chess Club
Rook against two minor pieces — a draw, but with a hole
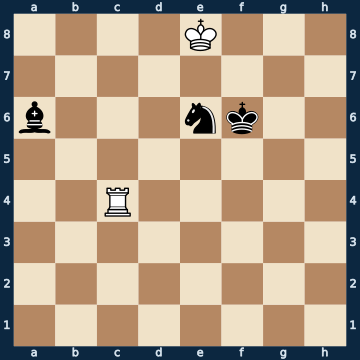
4K3/8/b3nk2/8/2R5/8/8/8 w - - 0 1The plan
Rook against bishop and knight looks like a material loss and is in truth the all-clear of the whole endgame: without pawns this ratio ends in a draw almost every time. Measured over twelve thousand quiet positions with this material, with the rook side to move and no piece hanging on the board, ninety-nine out of a hundred are drawn; for rook against two knights it is ninety-eight out of a hundred. So anyone who trades a rook for two pieces has lost nothing, and anyone with two pieces against a rook has nothing to gain. The rook holds the draw by staying mobile and never stepping into the two pieces' zone of action — that is exactly where all the work lies. Because the price for a single wrong step is total: if the rook is lost, bishop and knight remain against the bare king, and that is a mate. The position here is the rare moment where that becomes visible: the bishop attacks the rook, and of fifteen possible moves exactly one holds the draw. The rook has to move to a square from which it simultaneously covers the square the bishop wants — on any other, check from b5 follows, and the white king then has no hole left. On the wrong side it is even immediate mate. Conversely, for the piece side: it can only win if one of its two pieces stands alone and far from its own king — then the rook picks it up with check.
Rule of thumb: two minor pieces against the rook are a draw as long as both stay near their king and the rook stays near its own — this endgame is decided only by a single careless move.
Why this level: All-clear for the tournament: two pieces against a rook is not a lost endgame
The solution, move by move
- 1. Rb4 The ONLY move that holds, out of fifteen. The bishop attacks the rook, so it has to move — but not just anywhere. Black threatens check from b5: the white king has no escape square left there, because the black king and the knight cover everything that remains to it. Only on b4 does the rook do both things at once: it leaves the bishop's diagonal and at the same time covers the square b5. The square next to it would be immediate mate (first sideline), a check costs the rook (second), and whoever moves the rook merely out of the attack has to throw it in front of the bishop two moves later (third).Sideline 1. Ra4 One square too far. The rook is safe from the bishop, true enough — only from a4 it no longer covers the square b5. 1… Bb5# And that is mate, in the middle of the board and without warning. The white king stands on e8, the bishop takes away d7, the knight takes away d8 and f8, the black king takes away e7 and f7. This very picture is the reason the rook belongs on b4 and nowhere else.Sideline 1. Rf4+ The most tempting move in the position: the rook saves itself from the bishop and gives check while doing so. A check is always the move you see first. 1… Nxf4 And the knight simply takes it. It had been sitting on e6 the whole time with f4 in view — this is exactly what the rule means when it says the rook must never step into the two pieces' zone of action. What is left is bishop and knight against the bare king: won, if laborious.Sideline 1. Rc3 The rook simply retreats out of the attack without taking on any task. Passive, but not actually bad? Actually, it is. 1… Bb5+ The check everything has been warning about. The white king has no square, so only one thing remains. 2. Rc6 The ONLY legal move — the rook has to throw itself in between. A rook burned up as a block is the typical way to die in this endgame. 2… Bxc6# Mate. The difference from the main line is a single square: from b4 the same rook would have captured the bishop, instead of being captured by it.
- 1… Bb5+ Black insists. The check comes, only now it is no longer a threat but an offer.
- 2. Rxb5 Forced — and that was exactly the point. The rook takes the bishop, and that settles it: a knight alone cannot deliver mate, least of all against a rook.
- 2… Nd4 The knight attacks the rook and, in passing, covers the square b5 again. Small pinpricks like this now come more often; none of them succeed.
- 3. Rb4 The rook sidesteps and attacks the knight in the same move. That is the rook side's standard stance: never just dodge, but grab something else in the very act of dodging.
- 3… Ke5 The king defends its knight. It has to — of fourteen black moves, only five hold the draw here, all the others leave the knight alone, and then it falls (fourth sideline).Sideline 3… Nc6 The mirror image, and this time Black gets it wrong. The knight looks for a nice square and leaves its king standing there — three squares apart is already too much here. 4. Rb6 The ONLY winning move out of sixteen. The rook takes up position on the knight's rank; it is not defended, and the black king cannot get there in one move. 4… Ke5 Too late — e5 does not cover c6. There is no move left here that saves the piece. 5. Rxc6 And it is gone. Rook against the bare king is the first mate everyone learns. This is exactly how, and almost the only way, the piece side loses this endgame: a minor piece that wanders away from its own king alone gets picked up with a check or a rank attack.
- 4. Kd7
- 4… Nf5 Back under the protection of its own king. From now on knight and king stay together, and nothing more is needed.
- 5. Rb5+
- 5… Kf6 The rook attacks the knight, the king defends it, and so it goes on until the arbiter fetches the scoresheet. Rook against a single knight with no pawns is no longer an endgame, just a handshake.
Play it yourself
In the free app C&C Chess Club you step through the line move by move, tap the sidelines and play the position out against Stockfish — no account, no ads.