 C&C Chess Club
Two rooks against the queen — only as a pair
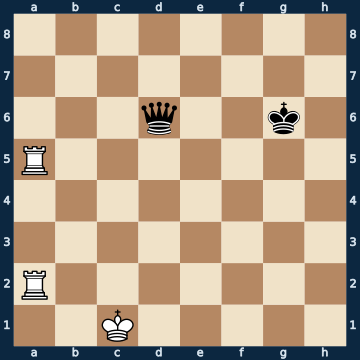
8/8/3q2k1/R7/8/8/R7/2K5 w - - 0 1The plan
Two rooks against the queen is the ratio that arises from every declined queen trade, and almost every club player misjudges it. Measured over sixteen thousand randomly rolled positions with this material, with the rook side to move: just under three out of five are won, a good third are drawn, and in about one in twenty the rook side even loses. The line between these three outcomes is not a question of activity but of mutual protection: where neither of the two rooks is defended, the rook side loses three times as often as where one holds the other. The reason is always the same — an undefended rook is not an opponent for the queen but a target, which she picks up in passing with a single check. Put positively, this means: doubled on one file, two rooks become a battery in which the front one may attack because the back one defends it — and that is exactly the win here, because the black queen stands on the same rank as her own king and gets pinned to him. This pin exists for exactly one move: of twenty-five possible moves only this one wins, twelve give up the draw and twelve lose on the spot. The counter-image stands in the report — the same two rooks, but with no target on the rank, are only a draw, and whoever pulls a rook out of its cover there hands it to the queen in one move.
Rule of thumb: two rooks only beat the queen as a pair — the front one attacks because the back one defends it; the moment one stands alone, it belongs to the queen.
Why this level: Arises from every declined queen trade and is regularly misjudged
The solution, move by move
- 1. Ra6 The ONLY winning move out of twenty-five — and it looks like a blunder. The rook plants itself in the queen's path and is defended only by the back rook, which now has the whole a-file free. That is exactly what makes it untouchable: if the queen captures, the back rook recaptures, and rook and king against the bare king is the first mate everyone learns (third sideline). More important still is the second effect — queen and king stand on the same rank, so the queen is pinned and cannot leave that rank. But on it she defends nothing, and nobody defends her. Every other move gives Black one move of time, and that one move is enough to separate king and queen from their shared rank (first sideline).Sideline 1. Ra7 The rooks stay doubled and advance to the seventh rank — the move almost everyone chooses, and it throws away the whole win. Without an attack on the queen, the doubling is just a pretty formation. 1… Kh5 The king leaves the rank its queen stands on. That removes the pin for good: from now on there is no square left from which a rook hits queen and king at once, and the queen is free to move again. 2. Ra8 Qe7 The queen takes the seventh rank away from the rooks. Far more important is what she no longer has to do: hide. King and queen now stand on neither a shared rank, nor a file, nor a diagonal — there is no longer a square from which a rook hits both at once. 3. Rh8+ White gives check because nothing better comes to mind. But a rook check with no second threat is only a loss of tempo: the king steps aside, and everything stands as before. 3… Kg6 4. Rg8+ Kh7 Draw. The rooks may check as long as they like — they can no longer get at the queen, and without capturing her there is no mate, because she covers every mating square. This is exactly why the first move had to be right.Sideline 1. Rd2 The second rook goes to the centre, where it supposedly stands more actively. In reality it leaves the file on which it defended the front rook — and a draw turns into a lost position. 1… Qc7+ The ONLY winning move for Black, and every other one gives the draw back. The check on the c-file hits the king and at the same time looks diagonally at the undefended rook — the fork on which this ratio always breaks down in practice. 2. Kb2 The king has to get out of check. Interposing helps just as little: from no square does it reach the rook on a5, and all five possible answers lose. 2… Qb6+ Another check that keeps an eye on the rook — the queen approaches with tempo instead of simply grabbing. 3. Kc3 Qxa5+ Rook gone, and with check. Queen against a single rook is won; the rest is technique. A single move off the shared file made the whole difference.
- 1… Qc6+ The only move with which the queen still has anything to say: a check on the open c-file. She stays on her rank while doing so, because she is not allowed to leave it. Note what does NOT work here — a queen trade, a counterattack, a perpetual check: for any of that the queen would need to be free.Sideline 1… Qxa6 The other possibility: Black takes the cheeky-looking rook. At the board this is the most common reaction, because an apparently undefended rook invites capture. 2. Rxa6+ Recaptured with check — and that is exactly why the back rook stood on the same file. What remains is rook and king against the bare king, the basic mate everyone can do. Whoever would have had to give up the queen for the last rook would have held the draw — here she gives it up for the second-to-last.
- 2. Kd2 The king simply steps aside instead of capturing. Capturing would win too, but the sidestep is stronger: the pin remains in place, the queen is still attacked and has not a single saving square left. Whoever has the patience in such positions to leave the attack standing one move longer wins with better-placed pieces.
- 2… Kh7 Black breaks the pin by having the king leave the rank — only that does not save the queen, it merely leaves her attacked without the pin.
- 3. Rxc6 And she is picked up. The queen never found a defended square on her rank, because the battery controlled both ends of it.
- 3… Kh8
- 4. Rc7 Now it shows why two rooks are worth more than a queen: they deliver mate with no help from the king at all. One rook takes the second-to-last rank, the other gives check on the last — the staircase mate, and the king may stay at home.
- 4… Kg8 Forced — the ONLY move Black has left. The rook on the second-to-last rank takes away the king's flight forwards, the corner takes away the rest.
- 5. Ra8# Mate. From the first move to here it was five moves, and everything hangs on the first.
Play it yourself
In the free app C&C Chess Club you step through the line move by move, tap the sidelines and play the position out against Stockfish — no account, no ads.