 C&C Chess Club
The rook behind the passed pawn
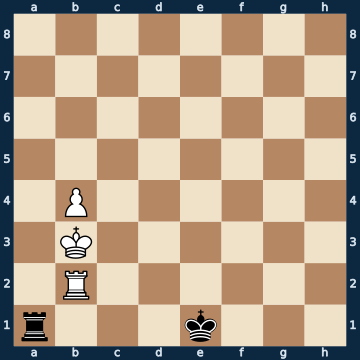
8/8/8/8/1P6/1K6/1R6/r3k3 w - - 0 1The plan
The Tarrasch rule is the oldest rule of thumb in the rook endgame: ROOKS BELONG BEHIND PASSED PAWNS — behind your own as much as behind the opponent's. The reason is room to move. If the rook stands behind its own pawn, its scope on the file grows with every step the pawn takes: from two free squares while the pawn is on the fourth rank, to five once it has reached the seventh. For the rook IN FRONT OF the pawn it is exactly the opposite — its scope shrinks from three squares to none, and in the end it is nothing but a blocking piece. On top of that comes the second thing the rook does from behind almost as a side-effect: it DEFENDS the pawn. Everything here hangs on that. As soon as the defender has to put his rook in front of the pawn, White has eight rook moves to choose from, and exactly ONE of them holds the win — the only one that does not leave the pawn's file. Every other one costs the pawn with check, and the draw is there. For the defender the same rule holds in mirror image: with a pawn on the sixth rank and the strong king beside it, having the rook BEHIND the pawn still holds the draw from eight king squares — with that same rook IN FRONT OF the pawn, from not a single one. The starting position itself is milder, there eight of the twelve moves win.
Rule of thumb: behind the passed pawn — from there the rook pushes it, defends it, and grows stronger with every step it takes.
Why this level: The Tarrasch rule you need for a lifetime
The solution, move by move
- 1. b5 The rook stands BEHIND its own passed pawn — every step the pawn takes enlarges its scope instead of shrinking it. Eight of the twelve moves win here; the four exceptions all simply lose the rook, three to the king on e1 and one to the rook on a1.
- 1… Ra7 Black leaves the back rank and wants to stop the pawn from the front. He has nothing else: if the rook stays behind, the pawn simply runs through.
- 2. b6 The second step. The pawn is defended, because its own rook stands behind it — that is half the rule.
- 2… Rb7 And now the black rook has to go IN FRONT OF the pawn. That pins it down: if it leaves the b-file, the pawn runs through, and otherwise it has nothing to do.
- 3. Ka4 The sharpest point of the whole lesson. The white rook has eight moves here — seven of them throw away the win, because the pawn falls at once with check; only the one move that stays on the b-file holds it. White does not even need it: the king simply marches off (the sideline shows the mistake).Sideline 3. Rc2 The rook leaves the file behind the pawn — looks harmless enough, since it becomes more active after all. It costs the whole point, and the same is true for six other rook moves in this position. 3… Rxb6+ Because the rook BEHIND the passed pawn was also defending it as a side-effect. Now the pawn falls with check. 4. Kc4 Rb8 The black rook stands off at a distance and waits. Without a pawn there is nothing left to get there. 5. Kd5 Rh8 Rook against rook without pawns — a draw. The Tarrasch rule is not a matter of taste: from behind, the rook pushes the pawn AND holds it.
- 3… Kd1 The black king sets off on the long journey. It arrives too late, but it is the only plan Black has left.
- 4. Kb5 The king comes up and now defends the pawn itself. The rook behind it is thereby freed for other tasks.
- 4… Kc1
- 5. Kc6 The king strolls over to the pawn at its leisure. The pinned rook can only watch — that is exactly the curse of the rook IN FRONT OF the pawn.
- 5… Rb8 The rook has to get out of the king's way and slides onto the back rank. It may not go any further from the pawn.
- 6. Rb4 The white rook also steps aside to make room for its own king — and stays on the pawn's file while doing so. Nine of the eighteen moves still win here; the three rook moves within reach of the black king are not among them, because the pawn then falls with check (sideline).Sideline 6. Rd2 The rook has to get out of the black king's way — but it may not leave the b-file while doing so. On d2 it stands safe and useless. 6… Rxb6+ The pawn falls with check again, and the rest is a formality. 7. Kc7 Rb8 The rook gives itself up to take the last pawn with it — the defender's classic simplifying motif. 8. Kxb8 Kxd2 Bare kings. That is why in the main line the rook goes to b4: out of the king's way, but on the file behind the pawn.
- 6… Rc8+
- 7. Kd7 The checks run into nothing: the king finds shelter at its own pawn, and the pawn's next step can no longer be stopped.
- 7… Rb8
- 8. b7 The pawn reaches the seventh rank, defended by its own king. The black rook in front of it now has no free square left on the file — the blockade has become a chain.
- 8… Kd1
- 9. Kc7 The king defends the queening square. Black has nothing left that even holds things up.
- 9… Re8
- 10. b8=Q Remember the Tarrasch rule: rooks belong behind passed pawns — behind your own as much as behind the opponent's.
Play it yourself
In the free app C&C Chess Club you step through the line move by move, tap the sidelines and play the position out against Stockfish — no account, no ads.