 C&C Chess Club
Rook against pawn — the king catches it
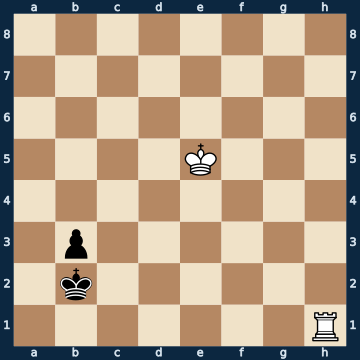
8/8/8/4K3/8/1p6/1k6/7R w - - 0 1The plan
The first question in any race is: does my rook still catch the pawn? The honest answer is — alone it NEVER catches it. From the back rank the rook can only guard the queening square; catching up with the pawn has to be done by the KING. Here it stands just barely close enough, and only ONE move wins: the march via d4 to c3, where the king attacks the pawn. If the pawn advances, the king places itself on c2 directly IN FRONT OF it — that kills the pawn, because its queening square is occupied and defended. Only after that does the rook come and pick it up. How narrow this margin is shows in the sister lesson: with the same king standing one square further back on e6, the whole thing is only a draw.
Rule of thumb: the rook holds the back rank, the king catches the pawn — and it has to take the shortest path.
Why this level: Does the rook catch the pawn? Only one move wins
The solution, move by move
- 1. Kd4 The ONLY winning move — and a king move. Every rook move does hold the queening square, but it gives the pawn a tempo; and even the king can go astray: via d5 it would arrive one move too late (both sidelines).Sideline 1. Rd1 The natural rook move: it covers b1 and looks safe. Only it wins nothing — the rook alone cannot stop a pawn. 1… Ka2 2. Kd5 b2 3. Kc4 b1=Q The pawn promotes, 4. Rxb1 and the rook has to give itself up for the queen. Bare kings, a draw — one rook up and still only half a point. 4… Kxb1Sideline 1. Kd5 Even the right plan can fail on the wrong path: via d5 the king needs one move more than via d4. 1… Ka2 2. Kc4 b2 The only saving move — and this time it is enough, 3. Kc3 b1=Q because the white king no longer reaches c2 in time. The pawn promotes, the rook has to give itself up: a draw.
- 1… Ka2
- 2. Kc3 The king attacks the pawn. Black has only one hope left — forward.
- 2… b2 The breakthrough attempt. Every other move loses the pawn without a fight.
- 3. Kc2 Again the only winning move: the king places itself IN FRONT OF the pawn and takes away its queening square. From here the pawn is nothing but prey — promoting ends in the loss of the queen (sideline).
- 3… Ka3Sideline 3… b1=Q+ Promoting with check looks like salvation — the new queen is, after all, defended by its own king. 4. Rxb1 And yet the rook simply takes it: the black king may not recapture, because on b1 it would stand directly opposite the white king on c2. That is exactly what the king is there for. 4… Ka3
- 4. Rh3+ Only now the rook. The check drives the black king away from defending its pawn.
- 4… Ka4
- 5. Rb3 The rook places itself BEHIND the pawn — the Tarrasch rule applies to the opponent's passed pawns too.
- 5… Ka5
- 6. Rxb2 The pawn falls. What remains is rook and king against the bare king — the basic mate from the category of basic mates.
- 6… Ka6
Play it yourself
In the free app C&C Chess Club you step through the line move by move, tap the sidelines and play the position out against Stockfish — no account, no ads.