 C&C Chess Club
Short side, long side
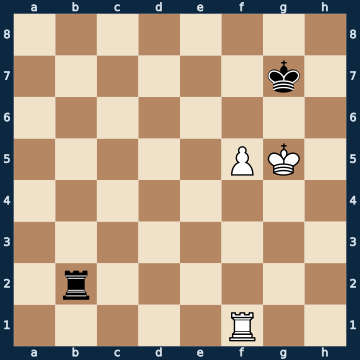
8/6k1/8/5PK1/8/8/1r6/5R2 b - - 0 1The plan
When the defending king is pushed away from the pawn, what decides is the SIDE it retreats to. It belongs on the SHORT side — the narrower half next to the pawn's file — so that the wide half stays free for its own rook. The rook needs that space, because a check from far away cannot be driven off, while a rook checking from close to the enemy king is simply attacked and captured on the next move. How much hangs on this is shown by a measurement of the sharp version — pawn on the seventh rank, the strong king in front of it, the weak one cut off: of the four possible combinations exactly ONE holds, namely king short and rook long, and even that only in ten of two hundred and eighty set-ups. King long with rook short, both short, both long — 1616 set-ups together — lose without exception. This position here is the milder preliminary stage of that: seventeen of the nineteen moves hold the draw, because the king still stands IN FRONT OF the pawn. And that is precisely the first duty — stay in front of the pawn as long as you are allowed to; only once the king is driven away does the side matter. That too can be measured here: to the pawn check the king has five replies, three hold, and the two that lead it onto the edge file and so away from the queening square lose.
Rule of thumb: KING SHORT, ROOK LONG — and stay in front of the pawn as long as you can.
Why this level: The third pillar right after Lucena and Philidor; measured to be the mildest rook lesson of all
The solution, move by move
- 1… Ra2 The rook takes up the LONG side: from there it has the distance it needs for checks the white king cannot get close to. A rook checking from nearby is simply run down.Sideline 1… Rf2 The rook places itself in front of the pawn to hold it back. A grab at nothing: there it stands directly opposite the white rook. It is one of only two moves that lose this position. 2. Rxf2 The trade — and the pawn endgame is a clean win: the white king stands in front of its pawn, the black one in the corner. 2… Kg8 3. Kg6 The king takes the opposition and is about to push the black king out of the way. 3… Kh8 4. Kf7 Kh7 5. f6 The pawn marches. The rook belongs on the LONG side, not in front of the pawn.
- 2. f6+ White pushes forward with check. Now the black king has to decide, and this is the only genuinely sharp moment of the lesson.
- 2… Kf7 Three of the five king moves hold, two lose — they are the two that lead onto the edge file. The king stays IN FRONT OF the pawn; only once it is no longer allowed to stand there does short side versus long side come into it (sideline shows the mistake).Sideline 2… Kh7 The king steps aside instead of staying in front of the pawn. That frees the queening square — and it costs the game. 3. f7 The only winning move — from here on only the checks matter. 3… Ra5+ 4. Kg4 And the white king runs DOWN away from them; his own rook on f1 waits there as a shield. The same checks that in the drawn version go on forever are finite here. 4… Ra4+ 5. Kg3 Ra3+ 6. Kg2 Ra2+ 7. Kg1 The checks are used up, promotion follows. That is why the rule says KING SHORT — and not: king anywhere.
- 3. Rb1 White looks for a plan and reshuffles the rook. That is no progress: as long as the black king stands in front of the pawn, the pawn gets no further.
- 3… Rc2 The black rook stays on the long side and keeps its distance. Exactly where hardly matters — it simply must not go near the white king.
- 4. Ra1 Another waiting move. White wants to set his own king marching.
- 4… Rc5+ The check from the long side. White cannot block it — his own rook would hang itself in doing so — so the king has to move, and it has four squares left.
- 5. Kh6 The only one of the four that still leads forward. The other three go backward and are driven further away check by check; that can be seen in the sideline, and it is the real point of the long side.Sideline 5. Kg4 If the king retreats backward, the long side really shows itself: the rook follows it with check after check. 5… Rc4+ Four files of distance — the white king cannot get near the rook without allowing the check, and the rook must not come any closer either. 6. Kg3 Rc3+ Always the same picture. White has six moves each time, and every one of them is just one more step away from his own pawn. 7. Kg2 Rc2+ The king has reached the edge of the board and is as far from the pawn as it can be. 8. Kg1 Rc4 The rook stops checking and takes up its waiting post again. White has gained nothing: the black king still stands in front of the pawn, the rook still on the long side.
- 5… Rc8 The rook goes behind the pawn and from there guards the queening square. What is notable is everything that loses here: EVERY king move except the capture, and among the rook moves the two to the short side — there the rook stands next to the white king and simply falls.
- 6. Ra7+ The last try: the check is meant to drive the black king away from the pawn.
- 6… Kxf6 The ONLY move — and the simplest of all: the king takes the pawn. Bare rooks, a draw. Rule of thumb: KING SHORT, ROOK LONG, and stay in front of the pawn as long as you can.
Play it yourself
In the free app C&C Chess Club you step through the line move by move, tap the sidelines and play the position out against Stockfish — no account, no ads.
More in Rook endgames
- Vancura — draw against the rook pawn Draw
- Rook against pawn — the king catches it White wins
- Philidor — the drawing defence Draw
- Rook against pawn — one square too far Draw
- The rook behind the passed pawn White wins
- Cutting off on the file White wins