 C&C Chess Club
Philidor — the drawing defence
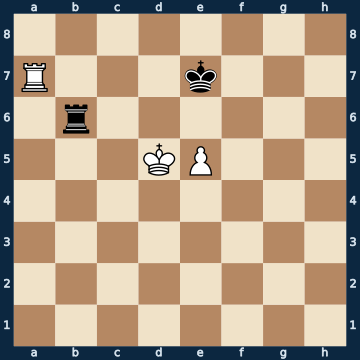
8/R3k3/1r6/3KP3/8/8/8/8 b - - 0 1The plan
Philidor is the most important drawing defence in all of rook endgames, and it consists of two steps in a fixed order. Step one: as long as the enemy pawn has not yet reached the third rank from the back, the rook holds exactly that rank occupied across the board and denies the enemy king entry. Without its king the pawn cannot advance a single step; the defender shuffles the rook back and forth on the rank and waits. Step two comes the moment the attacker pushes the pawn forward anyway: then the barrier has lost its job, and the rook goes at once all the way back and checks from the back rank. Unpunished, because the advanced pawn no longer shields its own king from anything — it finds no roof against the checks. The switching moment is measured precisely: before the advance, holding the rank is the whole defence, and afterwards all three moves that keep the rook on it are among the losing ones. The condition is your own king, and that too is measured: it must stand in front of the pawn. In the position after the pawn's advance it is lost from every single one of the twenty-four squares on the first three ranks — that is, from everywhere the king stands behind the pawn instead of in front of it. The same material — rook and pawn against rook — appears right next door in the most famous winning position in this collection; the whole difference is who stands in front of the pawn, the attacker or the defender.
Rule of thumb: king in front of the pawn, rook on the third rank — and only once the pawn advances, all the way back and check.
Why this level: THE drawing defence, required knowledge
The solution, move by move
- 1… Kd8 White gives check, so Black has only four moves here at all. All three king moves hold the draw; the fourth, interposing the rook, simply loses it. The king stays in front of the pawn — that is the one condition of the whole method.
- 2. e6 White pushes the pawn forward to clear the way for his own king. He has no reason for this beyond one thing: as long as the rook holds the rank, his king cannot get past it.
- 2… Rb1 The signal move: AT ONCE, all the way back. From here the rank has lost its purpose, and the position turns around — of the thirteen moves seven still hold the draw, and among the six that lose are exactly the three that stubbornly keep the rook on the rank. One of them is shown as a sideline.Sideline 2… Rc6 The most instructive mistake: the rook stays on the rank that had carried it so far. But it was only worth something as long as the pawn had not yet stood on it — now it is worthless. 3. Ra8+ And costly too: the rook has no cover back there any more. White starts a series of checks on the back rank. 3… Ke7 4. Ra7+ Kf8 5. Ra8+ Kg7 6. Rg8+ The sacrifice the whole series was aiming at — the black king is lured away from its rook. 6… Kxg8 It has to take. 7. Kxc6 The ONLY move, and it picks up the rook. What is left is a pawn on the sixth rank with the king in front of it, and the black king stands in the wrong corner. Remember: once the pawn advances, the rook goes to the back — at once, not later.Sideline 2… Kc8 The second great mistake: the king steps aside and gives up the square in front of the pawn. Of the six ruinous moves, this is the only king move — the rest are rook moves. 3. e7 And it is already lost: the pawn steps onto the seventh rank, and the king can never find its way back in front of it. 3… Kb8 4. Ra5 Rb1 5. e8=Q+ The queen stands with check. The defending king ALWAYS belongs in front of the pawn — a single step to the side has cost the half point.
- 3. e7+ Forward with check — the pawn steps onto the seventh rank. This looks dangerous and is in fact already the beginning of the end of its winning chances.
- 3… Ke8 The ONLY move: the king places itself in front of the pawn, on the queening square itself. Stepping aside loses at once. The king in front of the pawn is not merely advisable here, it is literally the only salvation.
- 4. Ra2 White clears the rank for his own king — but the black rook has long been at the back, just waiting for this.
- 4… Kxe7 The pawn that pushed ahead even falls. It could no longer be held, because the white king was supposed to defend it and escape the checks at the same time, and both at once is not possible.
- 5. Rc2 Rook against rook, bare kings in sight — a draw. Two steps, that was all it took: first hold the rank, then check from behind.
Play it yourself
In the free app C&C Chess Club you step through the line move by move, tap the sidelines and play the position out against Stockfish — no account, no ads.
More in Rook endgames
- The rook behind the passed pawn White wins
- Vancura — draw against the rook pawn Draw
- Lucena — the winning position White wins
- Short side, long side Draw
- Rook against pawn — the king catches it White wins
- Rook against pawn — one square too far Draw