 C&C Chess Club
Building the bridge — Lucena, second method
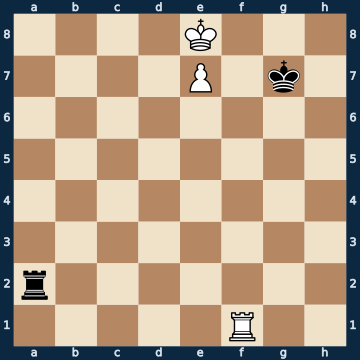
4K3/4P1k1/8/8/8/8/r7/5R2 w - - 0 1The plan
The BRIDGE is the second Lucena method: the rook builds a rail on the fourth rank, behind which your own king takes cover from the rook checks. But this position has a precondition that appears in no textbook diagram. The black king clings to the pawn and takes away the white king's flight squares f7 and f8. That is why the famous rook move to the fourth rank is only a DRAW here: Black gives check after check from the long side until his rook reaches the pawn's file with tempo and picks up the pawn. Only a preliminary check drives the black king to the edge — after that it no longer stands in the way, and the rail can be built in a safe spot. From there everything runs as in the book: the king steps out, Black checks from behind, the king walks TOWARDS the checks and works its way down to its own rook, and on the last check the rook interposes crosswise — defended by its own king, which is why the rook trade ends with the promotion. In this bare version a king march wins too, but it takes twice as long and has drawing traps along the way; the bridge always works, even with more material on the board.
Rule of thumb: first drive the king off the pawn's file with a check, then rook to the fourth rank, king out — and against the last check, the rook crosswise as a rail.
Why this level: Lucena, second method — complete with the trap in front of it
The solution, move by move
- 1. Rg1+ The preliminary check is COMPULSORY here. The black king has to leave g7, because from there it covers f7 and f8 and takes away every hiding place from the white king. Both immediate 1.Rf4? and immediate 1.Kd7? are only draws — look at both sidelines!Sideline 1. Rf4 The famous bridge move — but one move too early here. Because the black king still stands on g7 and covers f7/f8, this is only a DRAW. 1… Ra8+ The only move that holds, but it is enough: an immediate check from the long side, giving the opponent no breathing space at all. 2. Kd7 Forced — the white king has no other square at all, because f7 and f8 are covered by the black king. 2… Ra7+ Again the only move. Black has to keep checking without a pause. 3. Kd6 Ra6+ And on. The rook on f4 does nothing at all against these side checks — it stands on the wrong rank. 4. Kc5 Ra5+ 5. Kb4 Re5 The point of the defence: WITH TEMPO onto the e-file, and the pawn on e7 falls. The rook on f4 does not defend it, after all.Sideline 1. Kd7 The most natural move in the world — and the win is already gone. 1… Ra7+ Only this! The side check from the long side is the only rescue; 1...Rd2+? would even lose. 2. Kd6 Ra6+ And on — any pause would be fatal. 3. Kc5 Ra5+ 4. Kb6 Re5 With tempo onto the e-file, the pawn falls. The same refutation as after 1.Rf4?.
- 1… Kh7 Off to the edge. Tougher is 1...Kf6, the king runs to the pawn — that fails to 2.Kf8! (sideline).Sideline 1… Kf6 The toughest try: the king runs to the pawn instead of to the edge. 2. Kf8 The king defends the pawn from behind and the queening square along with it — the black king arrives too late. 2… Ra8+ 3. e8=Q The check was only a last straw: the new queen simply interposes. 3… Rxe8+ 4. Kxe8 Rook traded for rook — king and rook against the bare king, that is a basic mate.
- 2. Rg4 The rail. The rook takes the fourth rank and cuts the king off further. NOW it is far enough from the black king — on f4 it would not have been.Sideline 2. Kf7 The fast route: the king covers the queening square itself from f7, and e8=Q simply threatens. This wins too — and only works because the black king no longer stands on g7 after 1.Rg1+!. 2… Rf2+ Black can only give check after check and drive the white king ahead of it. 3. Ke6 Re2+ 4. Kd6 Rd2+ 5. Kc7 Rc2+ 6. Kd7 WATCH OUT, GO BACK! Measured: of the six king moves, only the three to the RIGHT win. 6.Kb6?, 6.Kb7? and 6.Kb8? are all three only draws — the refutation stands as a sideline below. The path wins, but it takes about twice as long as the bridge, and you can still lose it along the way. (6. Kb6 To the left — and the whole win is gone. The same holds for 6.Kb7? and 6.Kb8?: the king loses its grip on the queening square. 6… Re2 The ONLY move that holds — out of sixteen. The rook goes behind the pawn, which is now undefended. 7. Kc7 Rxe7+ The pawn falls with check, rook against rook remains: a draw.)
- 2… Ra1 Black puts the rook at checking distance. On 3...Rd2 (keeping d7 occupied) there follows 3.Kf7! — this square has become free since the black king went to h7. That is exactly what the preliminary check was for.Sideline 2… Kh6 The toughest try after 2.Rg4: the king marches up to the rail and tries to pick it up. 3. Kd7 White does not let itself be disturbed and steps out. 3… Kh5 Now the rook on g4 hangs — but the march was exactly one move too slow. 4. e8=Q+ WITH CHECK! The black king on h5 stands on the diagonal of the queening square e8, so White moves first. The rook may simply fall. 4… Kxg4 5. Qe6+ Queen against rook, plus a bare king on the edge: won.
- 3. Kd7 The king steps out and clears the queening square for the pawn.
- 3… Rd1+ Now the storm of checks begins — that is the whole supply of counterplay Black has.
- 4. Ke6 TOWARDS the checks, not away from them. The king works its way down to its own rook on the fourth rank.
- 4… Re1+
- 5. Kd6
- 5… Rd1+
- 6. Ke5 The king stands on the fifth rank — directly above the rail. From here on everything is ready.
- 6… Re1+
- 7. Re4 THE BRIDGE. The rook places itself crosswise and catches the check — and it stands defended, because its own king is right beside it on e5. That is exactly why it had to go to the fourth rank beforehand.
- 7… Rxe4+ Black has to capture, otherwise the pawn promotes next move.
- 8. Kxe4 The only move — and a welcome one: with the rook trade, the last source of checks has dried up.
- 8… Kg7
- 9. e8=Q The promotion. Remember: preliminary check, rook to the fourth, king out, rook crosswise.
Play it yourself
In the free app C&C Chess Club you step through the line move by move, tap the sidelines and play the position out against Stockfish — no account, no ads.