 C&C Chess Club
The rook needs distance
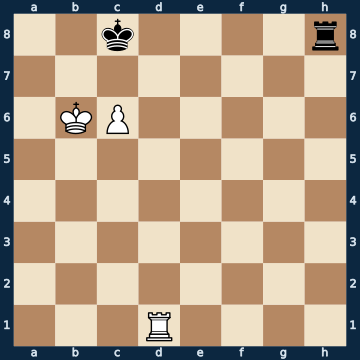
2k4r/8/1KP5/8/8/8/8/3R4 b - - 0 1The plan
The pawn already stands on the sixth rank, so Philidor's rank defence is over — now all that matters is whether the black rook has effective checks. Checks are only effective from a distance: if the rook stands close to the white king, the king simply runs it down, the checks dry up, and White makes progress at leisure. The tablebase draws the line here razor-sharp — Rh4, Rh3 and Rh2 hold the draw, Rh5, Rh6+ and Rh7 lose: the rook needs at least two ranks of distance from the white king. The reflex of placing the rook next to your own king for shelter is thus exactly the losing move: if the rook stays with its own king it has no checks left, has to retreat to the back rank and gets overtaken there — mate, because its own king blocks its way to the saving corner. If the rook instead stands well back, every time there is a check from a safe distance that drives the white king away from the pawn; here it even ends in a rook sacrifice that stalemates. There is only one thing to watch: do not run onto the rank or file of the white rook — Rh1 loses purely because the white rook stands on d1 and can capture. And the rule holds for the c-, d- and e-pawn; with the a- and b-pawn the white king has too little room at the edge, there even the passive defence on the back rank holds.
Rule of thumb: with the pawn on the sixth, the rook belongs at the back — at least two ranks below the enemy king, never beside it.
Why this level: The rook needs distance — disproves a common reflex
The solution, move by move
- 1… Rh4 The key move. Only Rh4, Rh3 and Rh2 hold the draw; Rh5, Rh6+ and Rh7 lose. The rook needs distance so that its checks really drive the white king away. Rh1 would hang the rook here — the white rook stands on d1.Sideline 1… Rh7 The natural defensive move: the rook covers the seventh rank, stops c7 and stays with its own king. That is exactly what loses — from h7 it has no checks left. 2. Rg1 The white rook goes to the open file and threatens Rg8 mate. Black has no counter-check and has to defend passively. 2… Rh8 3. Ra1 Switching to the other side decides. The black rook cannot reach a8, because his own king on c8 is in the way. 3… Rg8 4. Ra8# Mate. The pawn on c6 takes b7 and d7, the white king takes the rest — and the black rook watches from g8.Sideline 1… Rh5 A single square too far forward. Rh4 holds the draw, Rh5 loses — that is how sharp the distance rule is. 2. Ra1 White places the rook on the edge and threatens Ra8+. From h5 Black has no check in between. 2… Kd8 3. Ra8+ Ke7 The only move — after Kc7 or Kd7 the pawn on c6 covers the escape squares. The black king is driven away from the pawn instead of being able to blockade it. 4. Rg8 The black king is cut off from the pawn, the rook stands too close for effective checks — both together lose. 4… Rh6 5. Kb7 Kf7 6. Rd8 The white rook shields the d-file, after which king and pawn march to c7 and c8.
- 2. c7 White's sharpest try: the pawn goes to the seventh, the black king is pinned to c8 and must not stir.Sideline 2. Rg1 White's toughest try: the rook wants to go to g8 and drive the black king away. 2… Rb4+ The only move that holds the draw. The check comes first — exactly what the rook stood on the fourth rank for. 3. Kc5 White attacks the rook and gains a tempo, but nothing more than that. 3… Rh4 Back to a safe distance. The rook stays two ranks below the white king, and the game starts over. 4. Kb6 Rb4+ The check again, the king has to move away again. White gets no further and can only repeat.
- 2… Rb4+ That is exactly why the rook stood at the back. The check comes from four ranks away — the white king cannot run the rook down and has to leave the pawn or contort itself.
- 3. Kc6 The only square that still defends the pawn and keeps the black king penned in. Any other king square is simply met by Kxc7.
- 3… Rb6+ The outcome: a rook sacrifice. If White takes, Black is stalemated, because his own pawn on c7 takes b8 and d8 away from the black king, the white king covers b7 and c7, and the rook on d1 covers d7.
- 4. Kxb6 Stalemate — a draw. White did not have to take, but after 4.Kd5 Kxc7! the pawn falls and rook against rook is a dead draw.Sideline 4. Kd5 White declines the sacrifice and avoids the stalemate. 4… Kxc7 Then the pawn simply falls. Rook against rook is a dead draw — the reward for the check from b4 driving the king away from the pawn.
Play it yourself
In the free app C&C Chess Club you step through the line move by move, tap the sidelines and play the position out against Stockfish — no account, no ads.
More in Rook endgames
- Frontal defence — the rook in front of the pawn Draw
- The rook in front of its own pawn Draw
- Building the bridge — Lucena, second method White wins
- Rook and two connected pawns — the most common win White wins
- Cutting off on the file White wins
- Two passed pawns beat the rook — the sixth rank decides White wins