 C&C Chess Club
Rook and two connected pawns — the most common win
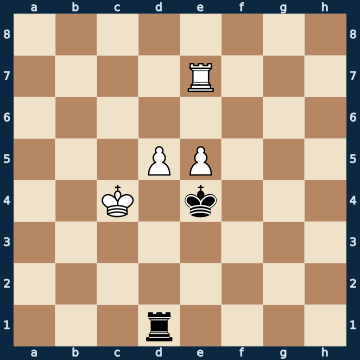
8/4R3/8/3PP3/2K1k3/8/8/3r4 w - - 0 1The plan
Two connected pawns against a rook are almost always won — the danger comes not from the opponent but from advancing at the wrong moment yourself. The enemy rook stands behind the pawns just waiting for one of them to break away: the one left behind then has one defender fewer and falls. So before every pawn move, count who attacks the one LEFT BEHIND and who defends it — only the pawn after which the arithmetic still works out may move. Once the right one has moved, the second follows; side by side or in a staircase they defend each other, and the enemy king finds no blockading square left. Your own rook stays within reach of the two queening squares and from there defends the foremost pawn — a trip to the other side of the board throws the win away. The enemy rook's checks are annoying but harmless: your own king marches up the file next to its foremost pawn until it gets close enough to the checking rook itself to attack it — then the checks are over. Promoting too early is a mistake: if the new queen is captured at once and your own rook is then left in front of the last pawn, it is only a draw. At the end the same picture always appears — the rook has to give itself up for one of the two pawns, the other promotes; that is exactly what having two is for.
Rule of thumb: count first, then push — and let the king walk up the file next to the foremost pawn.
Why this level: The most common type of won rook endgame in practice
The solution, move by move
- 1. d6 The ONLY winning move of the position — of sixteen moves the other fifteen only draw. Both pawns can seemingly move, since both advance squares are defended by the neighbouring pawn. What decides, though, is the pawn LEFT BEHIND. If the d-pawn advances, the e-pawn stays put: the enemy king attacks it, your own rook defends it from behind — the arithmetic works out. If instead the e-pawn advances, the d-pawn comes under double fire (rook from behind, king from the side) and is only defended once. That is exactly why the choice of pawn, not the pawn move itself, decides here.Sideline 1. e6 The natural twin of the right move — and it throws away the whole point. The advance square is defended, so the move looks just as sound as the other one. Only this time the d-pawn stays behind, and rook and king attack it together. 1… Rxd5 The point: the rook captures, and recapturing is impossible, because the black king defends the rook. White is left with rook and a single pawn — and his rook stands IN FRONT OF that pawn, exactly the faulty position from the lesson 'the rook in front of its own pawn'. 2. Kc3 Rd8 The black rook places itself in front of the pawn on the eighth rank. From there it never moves away again, and the white rook cannot vacate its queening square without losing the pawn. 3. Kc4 Rh8 The rook shuttles on the eighth rank and waits. White gets through nowhere — a draw. A single pawn move cost the win.
- 1… Rc1+ The usual resistance: check from behind. White now has three legal replies, and all three win — the series of checks is no problem as long as you do not dodge it by blocking with a pawn or the rook.
- 2. Kb3 The king steps aside and lets itself be pushed. All that matters is that it stays near the pawns; on the queenside it also gets shelter against checks on the c- and b-file at the same time.
- 2… Rb1+
- 3. Kc2 Check again, and again every one of the six legal replies wins. Notice: the checks only cost Black time, because they cannot touch the pawns.
- 3… Ra1
- 4. e6 Now the second pawn may advance, and only now: the two stand side by side in a staircase again and defend each other. Ten of fifteen moves win here — the five failures are all rook moves that lead the rook away from the pawns (even the move to the d-file, correct later, would still be premature here).
- 4… Ra2+ Black keeps checking, because otherwise he has to watch the pawns advance one after the other.
- 5. Kb3 Five legal replies, all of them win. The king deliberately stays on the b-file: from there it will later cover the advance squares on the c-file.
- 5… Rd2 Finally the rook places itself behind the foremost pawn and threatens to stop it. That is Black's last real idea.
- 6. d7 The second key moment: only TWO of fourteen moves still win. The pawn has to advance, and at once. The natural approach of bringing up the king throws away the win, because the pawn then gets captured — see the sideline.Sideline 6. Kc4 The move almost everyone would make: bring up the king before pushing the pawn further. Here it throws away the win, because at this moment the pawn is only defended once and gets picked up by the rook behind it. 6… Rxd6 The only move that saves Black — but it does save him. That is exactly why the rook stood behind the pawns for the whole game. 7. Re8 Rc6+ Check from the side; after that the rook settles on the seventh rank and blocks the last pawn from the front. 8. Kb5 Rc7 The rook stands in front of the pawn, the white rook too — White has no lever left. A draw.
- 6… Ke5
- 7. Re8 The rook takes possession of the queening square of the REAR pawn and at the same time defends the front one. Careful: promoting would now be the mistake — all four promotion pieces only lead to a draw, because after the exchange the rook gets stuck in front of its own last pawn. That too is shown as a sideline.Sideline 7. d8=Q The queen is there, so grab it? No. The pawn does stand on the seventh rank, but the queening square is not defended. All four promotion pieces lead to the same draw. 7… Rxd8 Forced and devastating at the same time: the newly born queen falls at once, and what remains is rook and one pawn against rook — with the white rook IN FRONT OF its own pawn. 8. Kc4 Rd6 The black rook places itself in front of it. From here it attacks the pawn and blocks it at the same time. 9. Kc5 Rxe6 Because the white rook can only defend the pawn from the front, the trade cannot be avoided. 10. Rxe6+ Kxe6 Bare kings. That is why in the main line the rook is placed on the queening square first and only then does promotion happen, not the other way around.
- 7… Rd3+
- 8. Kc4 And now the march: the king walks up the c-file next to its own pawn. It answers every check by taking one step closer to the rook.
- 8… Rd4+
- 9. Kc5
- 9… Rd5+
- 10. Kc6 You can see the pattern: the rook on the d-file always has to go one rank higher, the king follows it on the neighbouring file. That cannot go on forever.
- 10… Rd6+
- 11. Kc7 The end. The king attacks the rook, there is no more check left on the d-file. Black now only has the choice of giving up the rook for the advanced pawn or moving it away and letting the promotion happen — both are cleanly lost, see the two closing variations.
- 11… Rxd7+ The only practical chance: give up the rook for one of the two pawns. Against ONE pawn that would be the rescue.Sideline 11… Rd1 The rook dodges instead of sacrificing itself. 12. d8=Q Now promotion is allowed, because the queening square is defended by its own king. Queen and rook against rook — the game is over.
- 12. Kxd7 Not against two: White keeps rook and pawn against the bare king. That is exactly why two connected pawns win and one does not — one catches the rook, the other promotes.
Play it yourself
In the free app C&C Chess Club you step through the line move by move, tap the sidelines and play the position out against Stockfish — no account, no ads.
More in Rook endgames
- The rook in front of its own pawn Draw
- Two passed pawns beat the rook — the sixth rank decides White wins
- The rook needs distance Draw
- When Vancura tips over — two files too close White wins
- Frontal defence — the rook in front of the pawn Draw
- Rook and bishop against rook — the Philidor position White wins