 C&C Chess Club
When Vancura tips over — two files too close
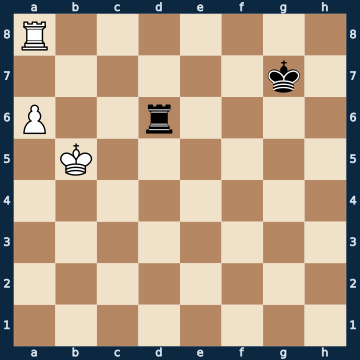
R7/6k1/P2r4/1K6/8/8/8/8 b - - 0 1The plan
This position is the drawn position of the Vancura lesson — with a single difference: the black rook stands on d6 instead of f6, two files closer to the pawn. That costs the half point. Because the Vancura defence hangs on a single move: the side check on the fifth rank that drives the white king away from the pawn. From f6 this check is safe, because the king cannot get close to the rook. From d6 it is answered with a king move that attacks the rook at the same time — and after that the rook is pushed onto the a-file in front of the pawn, where it becomes a mere spectator. White then wins in three steps: bring the king up and drive the rook off the blockading square, free his own rook from the corner and cut off the black king, and finally block the side checks with his own rook. One thing to watch: the pawn must not advance, because on a7 it walls in its own rook and gives away the whole point.
Rule of thumb: Vancura needs distance — the rook must stand at least four files away from the rook pawn, or the king catches it with the side check.
Why this level: When Vancura tips over — needs the rule AND its limit
The solution, move by move
- 1… Rd5+ The natural move and at the same time the toughest — Black wants to do exactly what saves the game in the drawn lesson: drive the king away from the pawn with a side check and then besiege the pawn from the side. Only the rook is two files too close for that. There is nothing better left; even the delayed Rf6 comes one move too late (sideline 1).Sideline 1… Rf6 The way back into the Vancura formation — and it arrives exactly one move too late. The same arrangement of pieces is a draw when it is BLACK to move, and won when it is White to move. Black used up his move with the rook move and may no longer follow up with Rf5+. As long as the white king stood one rank further down, Rf6 (or Re6) was the saving move — after that, no longer. 2. Rc8 The rook leaves the corner with tempo. Three white moves would still draw here, among them the clumsy a6-a7. 2… Rf7 Black has to block the seventh rank, or the white rook comes to the seventh with check and the pawn runs. 3. Rc6 The quiet key move: the rook places itself next to the pawn and defends it from the side. From here the pawn is free, and the black rook has not a single useful task left. 3… Kh8 4. Kb6 The king comes up. Black can only shuffle the king back and forth now. 4… Kg8 5. Rc8+ Check — and the black king loses the protection of its own rook on f7. 5… Kh7 6. Rc7 The double attack on the seventh rank. The black rook is tied to nothing and simply cannot be defended any more. 6… Kh8 7. Rxf7 Rook won. That is exactly why the Vancura formation has to be in place BEFORE the white king arrives.Sideline 1… Rd1 The second obvious plan: behind the pawn on a1. Against a pawn on a6 that is not enough — the rook then stands IN FRONT OF the pawn, not behind it, and White has all the time in the world. 2. Rc8 The same freeing move again. The rook comes out of the corner, the pawn stays defended by the king. 2… Ra1 3. Kb6 The king marches forward. Black cannot stop it, because his own rook on a1 only looks at the pawn. 3… Kf7 4. Kb7 Rb1+ The usual side check from behind — here from the b-file. 5. Ka7 The king hides in front of the pawn. Looks odd, but it is the standard position: from a7 it defends the pawn and is safe from checks on the a-file. 5… Ra1 6. Rc6 And that is the bridge: the rook places itself on the sixth rank. From there it can block every b-check. 6… Ke7 7. Kb7 Rb1+ 8. Rb6 Blocked — and that is the end of it. After Rxb6 Kxb6 the pawn runs through, otherwise a6-a7 and a7-a8 follow.
- 2. Kc6 The difference in one move: the king does not get out of the check's way, it moves AGAINST the rook. From f5 the rook would have been out of reach — from d5 it stands under attack after this move. That is exactly the Vancura boundary.
- 2… Ra5 Forced in spirit: the rook has to move and wants to keep the pawn under fire. But now it stands IN FRONT OF the pawn on the a-file — the passive position that almost always loses in the rook-pawn endgame.
- 3. Ra7+ The rook first, then the pawn. Here the pawn must under no circumstances run: 3.a7 would wall in its own rook in the corner and give the draw back (sideline 3). The check drives the black king onto the back rank.Sideline 3. a7 The tempting mistake: the pawn runs. That walls in the white rook on a8 forever — exactly the position from the lesson 'the rook in front of its own pawn'. Measured: of fourteen white moves six win, and a6-a7 is one of the eight that only draw any more. 3… Ra3 The rook moves off the a-file. On a5 it would have to guard the pawn and be tied down; on the third rank it is free and can check from behind. 4. Rh8 White has nothing better than getting rid of the rook with check. Anything else lets it starve in the corner. 4… Kxh8 Black captures and stands at once bare against a pawn, which he can, if needed, pick up with the rook. 5. Kb7 Kg8 6. a8=Q+ Promotion with check — and still nothing. 6… Rxa8 The only move, but an easy one: the rook picks up the queen. That is exactly why it stood on the third rank and not on a5. 7. Kxa8 Bare kings. The pawn on the seventh rank was not worth half a point, because its own rook stood on the queening square.
- 3… Kg8
- 4. Kb6 The king attacks the rook — that is the punishment for the blockade in front of the pawn. Black has to go down the a-file and loses all connection to the action while doing so.
- 4… Ra3 From far away Black wants at least to give side checks. That is the last idea of the defence.
- 5. Re7 Now the white rook may leave the a-file: the pawn is defended by its own king. Instead, the rook places itself crosswise and cuts off the black king. All that matters is avoiding the square next to the king.
- 5… Kf8
- 6. Re5 The key move of the conversion — the rook goes to the fifth rank and becomes a shield. If a side check comes now, it can be blocked. Six of White's twenty-one moves would still throw away the win here, among them again the hasty a6-a7.
- 6… Rb3+ The only counterplay: check from the side. On any other move the pawn marches through unhindered.
- 7. Rb5 The bridge. The rook blocks the check and offers a trade at the same time. If Black captures, a cleanly won pawn endgame results (sideline 4); if he does not capture, the rook is lost.
- 7… Kg8 Black sidesteps — and leaves the rook standing. He can no longer save it: every rook move gives up the a-file and the pawn runs through.Sideline 7… Rxb5+ Accepting the trade offer is the other half of the bridge — and just as lost. 8. Kxb5 The only move, but it is easy to find. From here on only the race decides, and Black has long since lost it. 8… Ke7 9. Kb6 Kd7 10. Kb7 The king takes possession of the queening square. From here it is all a formality. 10… Kd6 11. a7 Kd7 12. a8=Q Queen. That is why Black must not capture in the main move and still loses the rook — both paths end the same way.
- 8. Rxb3 Rook won, and the game is decided. Two squares of rook distance at the start were the whole difference.
Play it yourself
In the free app C&C Chess Club you step through the line move by move, tap the sidelines and play the position out against Stockfish — no account, no ads.
More in Rook endgames
- Two passed pawns beat the rook — the sixth rank decides White wins
- Rook and bishop against rook — the Philidor position White wins
- Rook and two connected pawns — the most common win White wins
- Rook and bishop against rook — how to hold the draw Draw
- The rook in front of its own pawn Draw
- Rook and knight against rook — the king must get to the centre Draw