 C&C Chess Club
The rook in front of its own pawn
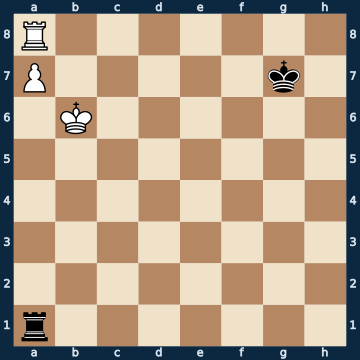
R7/P5k1/1K6/8/8/8/8/r7 b - - 0 1The plan
White has a pawn on the seventh rank and still does not win: his own rook stands on the queening square and is condemned to watch there — it cannot leave without giving up the pawn. This is the flip side of the Tarrasch rule from the lesson 'the rook behind the passed pawn': a rook IN FRONT OF its own passed pawn is not a protector but a prisoner. The position is held together only by the white king, which stands next to the pawn and defends it — which is why capturing the pawn at once would be a mistake. The whole task of the defence is therefore to drive this king away with checks from behind, and AT ONCE: on every quiet move White frees his rook into the far corner, and then the pawn promotes. The rook shuttles between the a- and b-files and drives the king down rank by rank. If the king gets too close to the rook in the process, the series of checks is over — then the rook switches up the a-file to a safe distance and attacks the now undefended pawn. Its own king has only a single duty: to guard the corner, so that the white rook cannot escape there.
Rule of thumb: the rook in front of its own passed pawn is a prisoner — drive away the defending king, and the pawn falls by itself.
Why this level: The flip side of the Tarrasch rule
The solution, move by move
- 1… Rb1+ The only move of the position — and what matters is that it gives CHECK. White has to move the king and never gets around to freeing his rook with Rg8+ or Rh8. This is exactly what every quiet move fails on here.Sideline 1… Kf7 The seemingly natural king move to the centre loses at once. On g7 the king covered f8, g8 and h8 — on f7 it gives up h8. 2. Rh8 And already the rook is out, in the far corner, where neither the black king nor the black rook can trap it. The pawn stays poisoned throughout: Rxa7 Kxa7 leaves White with rook against bare king. 2… Rb1+ The checks now come too late — the white rook no longer needs the square a8, so the king may calmly go for a walk. 3. Kc5 Rc1+ 4. Kd4 Rd1+ 5. Ke3 Re1+ 6. Kf2 Kg7 Black has to defend his own rook and so walks into the deflection. 7. Rg8+ The standard sacrifice: the rook clears the queening square with check. 7… Kxg8 8. a8=Q+ Queen against rook — the game is decided.Sideline 1… Re1 Standing in for every quiet rook move: the rook leaves the a- and b-file without giving check. That gives White a free move — and he only needs one. 2. Rg8+ The rook clears the queening square with check, the king has to capture. 2… Kxg8 3. a8=Q+ Promotion with check, queen against rook. That is exactly why Black MUST give check on the first move rather than merely watch.
- 2. Ka5 Wherever it goes — all five king moves hold the draw, but all of them take the king away from the pawn it was still defending on b6.
- 2… Ra1+ Again the only move: the rook follows the king along its file and keeps checking. It may not leave the a- and b-file, or it loses its connection to the pawn on a7.
- 3. Kb4
- 3… Rb1+
- 4. Ka3
- 4… Ra1+ The last check of the series. After it the white king stands on the second rank — five ranks from the pawn and without any defence for a7.
- 5. Kb2 White deliberately places himself next to your rook: another check on b1 or a2 would now simply be captured. The series of checks is over.
- 5… Ra4 The second key moment — the switch. There are no checks left, and the rook on a1 is even attacked; so up the a-file, out of the king's reach (a2 and a3 would be covered) and attacking the now undefended pawn. Ra5 and Ra6 hold just as well, a4 is the natural safe distance.Sideline 5… Rb1+ The reflex of simply continuing to check loses outright: this close to its own rook, the king is no longer prey but the hunter. 6. Kxb1 Rook gone, the pawn promotes. That is exactly why Ra4 on the eighth half-move is the switch from giving checks to attacking the pawn.
- 6. Rb8 White's last try: the rook finally leaves a8 and threatens a8=Q. Too late — the king stands far too far away to recapture on a7.
- 6… Rxa7 Now and only now. A single move of waiting and the pawn becomes a queen; and because the king on b2 no longer defends the pawn, capturing costs nothing any more.Sideline 6… Ra6 One move of hesitation is enough for White. The rook has vacated a8, the queening square is free. 7. a8=Q Now it works after all — and the trade on a8 does not help, because White recaptures with the rook. 7… Rxa8 8. Rxa8 Rook against bare king, won. That is why the pawn has to fall the instant the rook is freed.
- 7. Rb3 White still tries to cut off the rook on the third rank — a harmless attempt, rook against rook is nothing without pawns.
- 7… Ra4
- 8. Ra3
- 8… Rxa3
- 9. Kxa3 Bare kings, a draw. The pawn on the seventh rank did not bring White half a point, because his rook was stuck on the queening square for the whole game.
Play it yourself
In the free app C&C Chess Club you step through the line move by move, tap the sidelines and play the position out against Stockfish — no account, no ads.
More in Rook endgames
- The rook needs distance Draw
- Rook and two connected pawns — the most common win White wins
- Frontal defence — the rook in front of the pawn Draw
- Two passed pawns beat the rook — the sixth rank decides White wins
- Building the bridge — Lucena, second method White wins
- When Vancura tips over — two files too close White wins