 C&C Chess Club
Two passed pawns beat the rook — the sixth rank decides
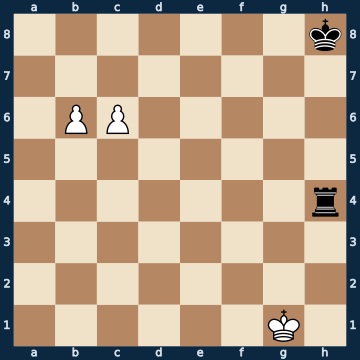
7k/8/1PP5/8/7r/8/8/6K1 b - - 0 1The plan
Two connected passed pawns that have jointly reached the sixth rank are stronger than a rook, as soon as the enemy king stands too far away. The reason is a matter of arithmetic: the rook can only ever guard ONE queening square. If one pawn advances to the seventh rank, the rook has to deal with it; then its neighbour advances too and attacks, from the side, precisely the square the rook is currently standing on. In the end the rook has no choice but to give itself up for one pawn, and the other runs through. Checks do not help the defender, because the pawns do not need their own king at all — it may happily stand at the other end of the board. Conversely, the attacker must not play a single waiting move: every quiet move hands the rook a pawn, and a single pawn is worth nothing against a rook any more. One rank earlier, with the pair on the fifth, the picture turns completely around — there the rook holds, and the pawns cannot cross the threshold without help from their king. The files hardly matter, the rule holds on the edge too; only a pair in the middle of the board rarely gets its chance, because there the defending king can never be far enough away.
Rule of thumb: two connected pawns on the sixth rank are worth more than a rook — but only as long as they keep running without a break.
Why this level: The sixth-rank rule against two pawns
The solution, move by move
- 1… Rg4+ The practical reflex: give check first and see what happens. Against two pawns on the sixth rank this is the most common self-deception — checks cost White nothing, because his king is not needed for the win at all.
- 2. Kf2 White may put the king wherever he likes: f1, f2 and h2 hold the win just as well. The king never comes anywhere near its pawns in this lesson.
- 2… Rf4+
- 3. Kg3 And here the series of checks ends by itself: the king walks towards the rook and attacks it on f4. Whoever plays the defender has now used up two tempi and gained nothing.
- 3… Rc4 Finally the right idea — the rook takes aim at the front pawn and threatens to capture it. Only it is already too late for that.Sideline 3… Rf8 The second natural try at defence: the rook places itself IN FRONT OF the pawns on the eighth rank, to guard the queening squares directly. It loses just the same, only the reason shows up faster. 4. b7 The pawn advances and, in doing so, attacks the square c8 as well — so the rook has to sidestep to the b-file. 4… Rb8 Now the rook stands cleanly in front of the one pawn. And that is exactly the trap. 5. c7 The neighbouring pawn attacks the blockading rook. It cannot stay on the blockading square b8, and it may not run away either. 5… Rxb7 So the exchange of rook for pawn after all. 6. c8=Q+ And the second pawn promotes with check. The rook in front of the pawns is not a bolt but a target.
- 4. b7 The key moment. Only the two pawn moves win, all five king moves actually lose — after every waiting move the pawn on c6 falls, and a single pawn against the rook is lost. This is exactly what the rule means by 'keep running without a break'.Sideline 4. Kf3 The most instructive mistake: White makes a quiet move, because the position after all wins 'by itself'. But it only wins on tempo. All five king moves lose here. 4… Rxc6 One pawn gone — and with it the rule stops applying. A single pawn on the sixth rank without its king is nothing against a rook. 5. b7 The last pawn still sets off, but now the rook is free. 5… Rb6 The rook plants itself in front of the pawn and picks it up at its leisure; afterwards Black wins with rook against bare king. Hence: not a single waiting move.
- 4… Rb4 The rook switches behind the front pawn and so keeps the square b8 under control. One pawn is stopped that way — the second is not.Sideline 4… Rxc6 The wrong pawn. The rook grabs the one that has fallen behind — perfectly correct if you only count material, only it no longer guards a single queening square that way. 5. b8=Q+ The other one runs through, with check. Whoever wants to capture one of two pawns on the sixth rank must always take the one FURTHER ADVANCED.
- 5. c7 That is the whole point: the second pawn advances too, and the rook cannot guard b8 and c8 at the same time. All it has left is the choice of which pawn to take.
- 5… Rxb7 The rook gives itself up for one pawn. This is not desperation but the toughest defence — every alternative lets the other pawn promote at once.Sideline 5… Rc4 The attempt to switch to the other file instead of the exchange: the rook now covers c8 — and gives up b8 in return. 6. b8=Q+ One rook, two queening squares: that does not add up. That is why capturing on b7 is in fact the best defence in the main line.
- 6. c8=Q+ The only move that still wins, and it wins at once. What matters is the check: the queen meets the king on the eighth rank, so Black never gets around to doing anything against it. Underpromoting to a rook would only be a draw, and any king move instead of promoting loses outright, because Rxc7 follows.
Play it yourself
In the free app C&C Chess Club you step through the line move by move, tap the sidelines and play the position out against Stockfish — no account, no ads.
More in Rook endgames
- Rook and two connected pawns — the most common win White wins
- When Vancura tips over — two files too close White wins
- The rook in front of its own pawn Draw
- Rook and bishop against rook — the Philidor position White wins
- The rook needs distance Draw
- Rook and bishop against rook — how to hold the draw Draw