 C&C Chess Club
Rook and bishop against rook — how to hold the draw
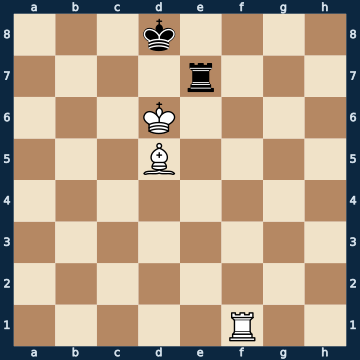
3k4/4r3/3K4/3B4/8/8/8/5R2 b - - 0 1The plan
The same position as in lesson 1 — only Black is to move, and so it is a draw. One tempo separates the whole point from the half point here. Black is saved by a single move: Rd7+, the check right in front of the white king's nose. White cannot capture the rook, because his own king defends it — the two kings may not touch each other. After that comes the famous defence on the second rank — from Black's point of view that is the seventh: the rook stays exactly there, goes to the far end, and does not let the white king across. If the white king comes back into opposition, Rd7+ follows again at once. Two things are deadly and have to be second nature: the rook must not go to the back rank (there it gets overloaded and mate follows), and the king must never move away from its rook, because the rook lives only off its defence. Anyone who does not know this loses this endgame in practice on a regular basis — that is exactly what the attacker is playing for.
Rule of thumb: rook on the second rank, king next to the rook, and always meet the opposition with a check.
Why this level: The same position, the defending side — one tempo separates the two
The solution, move by move
- 1… Rd7+ The ONLY saving move, 1 of 16. And it is a rook offer that White may not accept: Kxd7 would stand directly opposite the black king on d8 and is therefore simply illegal. White has only four moves left at all, all of them king moves.Sideline 1… Re8 The club player's reflex: put the rook on the back rank, in front of your own king. That loses in two moves. 2. Ra1 The rook switches to the open a-file and threatens Ra8 mate. The king cannot get out: the bishop covers b7, the white king covers c7, d7 and e7. And after Kc8 Ra8 is still mate — its own rook on e8 cannot get across to a8, because its own king is in the way. That is the curse of the back rank. 2… Rh8 So the rook has to clear the back rank and gives up a8 completely. 3. Ra8# Mate. That is why in this endgame the rook never belongs on the back rank, always on the second.Sideline 1… Re2 The second reflex: keep the rook far away, to give checks from behind. That loses too, because there are no checks — the bishop covers e6, and the rook alone cannot hold the back rank. 2. Ra1 Switching to the open file again. Black has to avoid the mate on a8. 2… Rc2 3. Ra7 And now the winning set-up from lesson 1 stands on the board: white rook on the seventh rank, king in opposition, bishop in the centre, black king in the middle of the back rank. From here White wins with the technique from there. 3… Rc1 4. Rf7 White calmly regroups the rook and carries out the technique from lesson 1. Black can only watch.
- 2. Kc6 White has to move the king and so gives up the opposition.
- 2… Rh7 The rook goes to the far end of its rank. That is the defence on the second rank: there it is safe from bishop and king and still does not let the white king onto the seventh.
- 3. Kd6 White tries the opposition once more — and so confronts Black with a single move again.
- 3… Rd7+ Again the only move that holds, and again the same point. Remember: only the check from the front helps against the opposition.Sideline 3… Rh6+ The wrong check. It looks like the same device, but it is the opposite: this rook stands undefended and far from its own king. 4. Be6 White simply interposes the bishop. The check has fizzled out, the rook stands on h6 doing nothing, and White has even improved the bishop. 4… Ke8 The king runs, but the connection between king and rook is torn apart — and without it there is no defence. 5. Rc1 Kf8 6. Rg1 White calmly regroups and catches the king at the edge. Hence: check only from the square your own king defends.
- 4. Ke6 This time the king sidesteps to the right.
- 4… Kc7 Now the king may come out: the middle of the back rank is the dangerous square, and with the white king on e6 the way to c7 is clear. The king stays next to its rook while doing so — that is a condition.
- 5. Rc1+ White drives it back again with check, because that check is exactly what the attack lives on.
- 5… Kd8 The only move, and the reason is defence: only from d8 does the king defend its rook on d7. After Kb8 or Kb6 the white king simply picks up the rook with Kxd7.
- 6. Ra1 White places the rook on the open a-file and threatens mate on a8 — exactly the threat that kills Black in the first sideline.
- 6… Re7+ The same device as at the start, just one file further along: check from the square directly in front of the white king, defended by its own king on d8. The rook stays on its second rank while doing so.
- 7. Kd6 Back into opposition, for the third time.
- 7… Rd7+ And for the third time the same single move. Whoever knows this one move holds this endgame.
- 8. Ke6 Repetition of position. White has tried everything and got nowhere — a draw.
Play it yourself
In the free app C&C Chess Club you step through the line move by move, tap the sidelines and play the position out against Stockfish — no account, no ads.
More in Rook endgames
- Rook and bishop against rook — the Philidor position White wins
- Rook and knight against rook — the king must get to the centre Draw
- When Vancura tips over — two files too close White wins
- Rook against bishop — the right corner Draw
- Two passed pawns beat the rook — the sixth rank decides White wins
- Rook against knight — the two must not be parted Draw