 C&C Chess Club
Rook and bishop against rook — the Philidor position
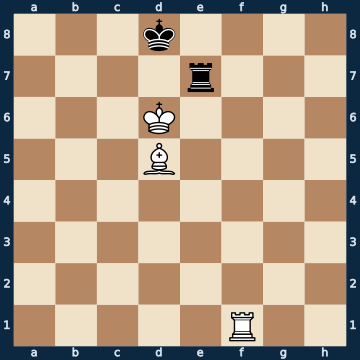
3k4/4r3/3K4/3B4/8/8/8/5R2 w - - 0 1The plan
Rook and bishop against rook is normally a draw — this position is not. It comes from Philidor in 1749 and is the most famous winning position in the whole endgame. Three things make it up: the black king stands in the middle of the back rank, the white king stands opposite it two squares away in opposition, and the black rook finds no safe square. Exactly this combination is the death zone: a series of measurements across roughly 90,000 positions shows that here, with the attacker to move, four out of five positions are lost, while in the centre almost everything stays a draw. But it is won only with a single move, the check on f8 — every quiet move hands Black the tempo for Rd7+ and so the draw (lesson 2). After that the same pattern always plays out: the rook occupies the seventh rank, switches to the other side of the board and builds a wall there on the b-file that the black king gets stuck against. The bishop calmly finds the diagonal from which it gives check and takes away the king's escape squares; the mate itself is delivered on a square the bishop does not even cover, because the rook gives the mate.
Rule of thumb: king in the middle of the back rank and the opponent in opposition — that is Philidor, and only the check wins there.
Why this level: The dispute of tournament practice, winning side
The solution, move by move
- 1. Rf8+ The ONLY winning move, 1 of 29. Everything else is a draw, and the reason is the tempo: if Black had the move, he would play Rd7+ and hold (lesson 2). The check takes that exact move away from him.Sideline 1. Kc6 The quiet king move looks sensible and throws everything away. White loses the tempo — and a tempo is the whole point here. 1… Rh7 The rook goes to the far end of the seventh rank. That is the defence from lesson 2: the rook holds its second rank, and the white king cannot get past it. 2. Kd6 Rd7+ As soon as the white king goes back into opposition, this check comes — and the rook on d7 is untouchable, because its own king defends it. 3. Ke6 Rh7 And again from the start. White gets no further: a draw.Sideline 1. Rf7 The second obvious move: the rook wants to go straight to the seventh rank. Only it stands next to the black rook there. 1… Rxf7 The only move that holds — and it is enough. The trade is the defender's standard rescue in this endgame. 2. Bxf7 Bishop against nothing, a draw for lack of material. The rook trade is always the emergency brake: remember it.
- 1… Re8 Forced — the king has no square, so the rook has to interpose. That takes it off the seventh rank, where it stood well.
- 2. Rf7 The rook takes the seventh rank. This is the winning set-up: king in opposition, rook on the seventh, bishop in the centre. The black king can no longer leave the back rank.
- 2… Re2 Black looks for distance for checks from behind. Everything is lost — it is only a question of stubbornness now.
- 3. Rh7 The rook sidesteps but stays on the seventh rank. Black has no checks: Re6+ fails to the bishop, which covers e6.
- 3… Re1
- 4. Rb7 Now to the other side of the board. On the b-file the rook is far from the black king and yet on the file where the decisive check comes later.
- 4… Rc1
- 5. Bb3 The bishop leaves the black rook's line of fire and keeps the long diagonal. Quiet moves like this are allowed as long as the rook controls the seventh rank and the b-file.
- 5… Kc8 The natural attempt to flee — and it speeds up the end. Rc3 is tougher, and then Philidor's original move order follows (first sideline).Sideline 5… Rc3 The toughest move — and from here on Philidor's original 1749 move order runs, move for move exactly as it stands in the textbooks. 6. Be6 The bishop goes to e6 and pre-emptively takes the squares c8 and d7 away from the king. Black now has a check — and that is exactly what White was waiting for. 6… Rd3+ 7. Bd5 The famous move and the ONLY winning move: the bishop goes back and blocks the check. Every king move dissolves the stranglehold and makes a draw. White has gained a move by this — Black has to take his rook back to c3. 7… Rc3 8. Rd7+ Now the check. The king is driven from the middle of the back rank towards the edge. 8… Kc8 9. Rh7 A waiting move on the seventh rank. Black has no useful moves left and has to go further into the corner with the king. 9… Kb8 10. Rb7+ Check again, one square further again. 10… Kc8 11. Rb4 The key move: the wall on the b-file, far from the king. The same move as in the main line. 11… Kd8 12. Bc4 The bishop places itself on the diagonal from which it will reach e6 with check. 12… Kc8 13. Be6+ The check that forces the king back onto the mating square. 13… Kd8 Forced, every other square is covered. 14. Rb8+ And the check on the back rank. 14… Rc8 The only move — the rook has to interpose. 15. Rxc8# Mate in 15 moves. That is how long it takes if Black finds the toughest moves. This too is far from the fifty-move rule.
- 6. Rb4 The key move of the endgame. The rook withdraws far along the b-file: the b-file is the wall the black king can never get past, and from b4 the black rook can no longer bother it.
- 6… Kd8
- 7. Rh4 A waiting move. White hands the move back to Black and calmly brings the bishop to a4, without anything changing in the stranglehold.
- 7… Re1
- 8. Ba4 The bishop heads for d7. From there it gives check and drives the king onto the square where it will be mated.
- 8… Kc8
- 9. Rb4 Back to the b-file. Now everything is ready.
- 9… Rc1
- 10. Bd7+ The decisive check. Black may not capture, the bishop is defended by the king on d6.
- 10… Kd8 Forced: b8 and the whole b-file are covered by the rook, c7, d7 and e7 by the white king. d8 is a dark square — of all things a colour the bishop never sets foot on. It still gets mated there, because the rook delivers the mate and the bishop only covers the escape squares.
- 11. Rb8+ The check on the back rank, against which there is only one move left.
- 11… Rc8 The only move: e8 is covered by the rook, c7, d7 and e7 by the king. So the rook has to sacrifice itself.
- 12. Rxc8# Mate. Twelve moves from the starting position — the fifty-move rule was never in danger.
Play it yourself
In the free app C&C Chess Club you step through the line move by move, tap the sidelines and play the position out against Stockfish — no account, no ads.
More in Rook endgames
- When Vancura tips over — two files too close White wins
- Rook and bishop against rook — how to hold the draw Draw
- Two passed pawns beat the rook — the sixth rank decides White wins
- Rook and knight against rook — the king must get to the centre Draw
- Rook and two connected pawns — the most common win White wins
- Rook against bishop — the right corner Draw