 C&C Chess Club
Rook against bishop — the right corner
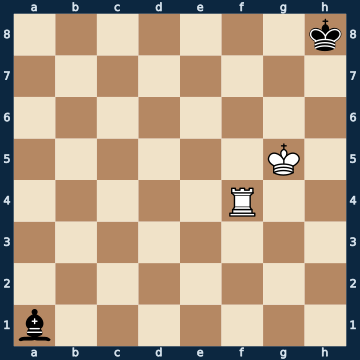
7k/8/8/6K1/5R2/8/8/b7 b - - 0 1The plan
Rook against bishop is a draw — with a single but deadly exception. The board has two light and two dark corners, and the defender may only go into the corners his bishop does NOT cover. In the corner of his own bishop's colour there is a mate: the rook cuts off the king, the bishop eventually has to throw itself in front of its own king, and the rook captures it with mate. Here the black king stands in exactly this wrong corner, and only a single move saves the game — it must get out at once. After that the task is simple: avoid the edge, stay out of the rook's way, and lead the king right across the board to the other side. The bishop meanwhile stays on the long diagonal but avoids every square the rook currently covers. At the end the king may even go into a corner — the light one, because the bishop is dark, and on light squares nobody can mate him.
Rule of thumb: count your bishop's colour, and you know which two corners kill you — and which two save you.
Why this level: The safe corner against the bishop
The solution, move by move
- 1… Kg7 The ONLY move — eight others lose. The king stands on h8, and h8 is dark like his own bishop: that is the corner of death. Whoever does not leave it at once gets mated (first sideline). Even g8 and h7 no longer help, only g7.Sideline 1… Kg8 The natural move out of the corner — and it loses. On g8 the king lets the white king through to g6, and then it is strangled. 2. Kg6 The opposition position. The black king may only shuttle between h8 and f8, everything else is occupied or covered. 2… Bb2 3. Rb4 The rook attacks the bishop and drives it up the diagonal — ever closer to its own king, which is exactly the problem. 3… Be5 4. Re4 Attacking again. The bishop has only one square left where it does not fall at once. 4… Bg7 5. Re8+ The decisive check. The bishop MUST interpose, because there are no king moves left any more. 5… Bf8 The only move — and the beginning of the end. The bishop now stands in front of its own king and is pinned. 6. Rd8 Quiet and deadly: the rook takes the square g8 away from the king. 6… Kh8 Zugzwang, the king has to go into the corner. 7. Rxf8# Mate. The rook captures the pinned bishop, and the king has no square left in the dark corner. This exact picture is what makes the wrong corner dangerous.
- 2. Kh5
- 2… Bc3 Now the king has no move at all any more: h8, g8 and h7 all three lose. What remains are bishop moves, and of those too only the ones on the long diagonal hold. The square d4 is taboo as long as the rook stands on the fourth rank — it would simply take the bishop (second sideline).Sideline 2… Bd4 The square looks ideal — in the middle of the long diagonal, close to its own king. Only the rook stands on the same rank. 3. Rxd4 And simply takes it. The bishop has to stay on the diagonal, but it may never step onto a square the rook currently sees. 3… Kf6 4. Re4 Rook and king against the bare king — the basic mate, won. One single careless bishop move has cost the half point. 4… Kf5 5. Re8 Kf6 6. Kg4
- 3. Rf2
- 3… Bd4 The rook has vacated the fourth rank, so the bishop may now go to its best square. From the middle of the long diagonal it shields its own king and is itself attacked by nothing.
- 4. Rg2+
- 4… Kf7 The check forces the king to decide, and four of five squares hold. Only the one loses: back into the dark corner (third sideline). Moving away is always right.Sideline 4… Kh8 Back into the corner — the reflex that loses this endgame. Four other king moves hold the draw with ease. 5. Kh6 The white king comes along at once. In the dark corner the black king has only h8 and h7 left, and the attacker covers both squares one after the other. 5… Bf6 6. Kg6 Bg7 7. Kf7 Bh6 8. Rg4 The rook takes over the h-file. Now the king is pinned down in the corner and the bishop has to find moves on its own. 8… Kh7 9. Rh4 Kh8 The only move, and it produces the position from the first sideline: the rook swings over to the e-file, gives check, the bishop has to interpose in front of the king and is captured with mate. 10. Kg6
- 5. Kh6
- 5… Ke7 From here the position is objectively boring — and that is exactly the good news. Once the king is out of the wrong corner, almost every sensible move holds.
- 6. Rg7+
- 6… Kd6 The king marches on to the left under the checks. The rook can drive it but not stop it, and the bishop stands out of its reach.
- 7. Rg6+
- 7… Kc7
- 8. Rg7+
- 8… Kb8 The king has reached the other side of the board. Ahead of it lies a8 — a light corner, where a dark bishop can never deliver mate.
- 9. Kg5
- 9… Ka8 And that is why the king may go into the corner here without any worry. The same move that would have lost on h8 is completely safe on a8. That is the whole difference between half a point and a whole one.
Play it yourself
In the free app C&C Chess Club you step through the line move by move, tap the sidelines and play the position out against Stockfish — no account, no ads.
More in Rook endgames
- Rook and knight against rook — the king must get to the centre Draw
- Rook against knight — the two must not be parted Draw
- Rook and bishop against rook — how to hold the draw Draw
- Three against two on the same flank — how the defender holds Draw
- Rook and bishop against rook — the Philidor position White wins
- The outside passed pawn — when the rook may let it go White wins