 C&C Chess Club
The outside passed pawn — when the rook may let it go
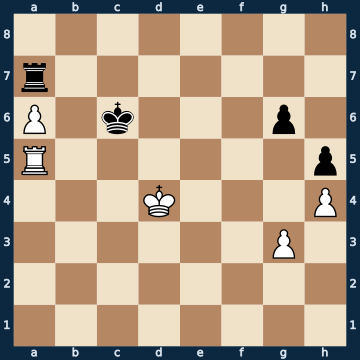
8/r7/P1k3p1/R6p/3K3P/6P1/8/8 w - - 0 1The plan
This is what it looks like once the Tarrasch rule has done its work: the white rook stands BEHIND its outside passed pawn, the black one clings in front of it. The difference between the two rooks is the whole point. The white one has pushed the pawn from behind and in doing so kept the choice of where to go next; the black one has only one job left, namely to watch, and that is why White is effectively playing with an extra rook. The black king has meanwhile been lured to the queenside and cut off from its own pawns — they now stand with no defence at all. That means the passed pawn's job is done, and it may even be given up: the rook lets it go and gathers the harvest on the other side. That it hangs there unpunished is the fine point of this lesson — the pawn is poisoned. The black rook stands on the a-file and the black king on the sixth rank; whoever reaches for the pawn in this set-up lands the rook exactly on the rank the check is about to strike, and loses it. The pawn hangs twice in this lesson, and twice reaching for it costs the rook — both are worked out exactly and stand there as sidelines.
Rule of thumb: the outside passed pawn ties down the enemy rook; by the time it falls, it has long since done its job.
Why this level: Cashing in an outside passed pawn — one step above its drawn twin
The solution, move by move
- 1. Rg5 The turn to the harvest. The rook leaves its passed pawn and attacks the first pawn — a6 now hangs undefended. The move only works because the pawn is poisoned: grabbing it fails to the check on the sixth rank (first sideline).
- 1… Ra8 Black leaves the poisoned pawn alone and goes back into the corner. The rook stays what it has been the whole game: a prisoner of the a-file.Sideline 1… Rxa6 The obvious grab at the passed pawn — 2. Rxg6+ — and the black king already stands in check. The rook on a6 was only ever safe as long as its own king shielded it on the sixth rank. 2… Kc7 The king has to leave the rank, 3. Rxa6 and the rook falls. This is exactly why Black has to leave the pawn alone — the outside passed pawn is poisoned right to the end.
- 2. Rxg6+ The harvest, and with check. That a check comes here is the reason the whole plan works.
- 2… Kc7 The king has to leave the sixth rank; Black has nothing to set against it.
- 3. Rh6 The rook takes its time and lines up next to the second pawn. Here too a6 is still taboo — the second sideline shows the same point a second time, this time tablebase-exact.
- 3… Kb8Sideline 3… Rxa6 Two moves later, the same temptation — and the same answer. Here White does not even need a check any more: his rook already stands on the sixth rank. 4. Rxa6 The rook falls, and with it the game. With seven and six pieces this line lies entirely within the tablebase and is therefore exact, not merely engine-backed.
- 4. Rxh5 The second pawn falls. Rook and three pawns against the bare rook — and the black rook has done nothing the whole time but shuttle between a7 and a8. That is the price of the outside passed pawn. From here on seven pieces stand on the board, and the tablebase decides: won.
Play it yourself
In the free app C&C Chess Club you step through the line move by move, tap the sidelines and play the position out against Stockfish — no account, no ads.
More in Rook endgames
- Three against two on the same flank — how the defender holds Draw
- Rook against knight — the two must not be parted Draw
- Rook against bishop — the right corner Draw
- Rook and knight against rook — the king must get to the centre Draw
- Rook and bishop against rook — how to hold the draw Draw
- Rook and bishop against rook — the Philidor position White wins