 C&C Chess Club
Rook and knight against rook — the king must get to the centre
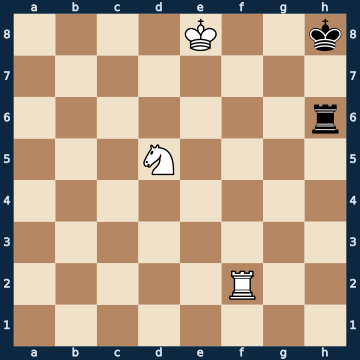
4K2k/8/7r/3N4/8/8/5R2/8 b - - 0 1The plan
Rook and knight against rook is almost always a draw. It is still lost all the time, though — and always in the same way: the king gets pushed to the edge and from there into the corner. The tablebase has something very clear to say about this. Measured under pressure, with the defending king anywhere outside the edge ranks and files, not a single one of 150,000 positions was lost; all 1,316 losses found stood on the edge, two thirds of them in the corner itself. The reason is the knight: it covers exactly the escape squares the rook alone is missing, but the two of them only weave a mating net at the edge of the board. The whole defence follows from that — the king runs to the centre, and it runs AT ONCE, here only 1...Kg7 holds, all fifteen other moves lose. Its own rook, meanwhile, stays AWAY from the king: side by side at the edge, 3.1 percent are lost; with seven squares of distance, not a single one of 17,823.
Rule of thumb: king to the centre at once, rook far away — the edge and the corner are the only places this endgame is ever lost at all.
Why this level: Holding rook and knight against rook
The solution, move by move
- 1… Kg7 The ONLY move — one of sixteen. The king has to get out of the corner, and at this exact moment. Every rook move loses because it costs a tempo, and the other two king moves lose too, because they stay on the edge (all three sidelines). It is not the rook that saves this position, but the direction the king marches in.Sideline 1… Kh7 The king sets off — but in the wrong direction. On h7 it stays on the edge, and the edge is the only place this endgame is ever lost. 2. Kf7 The ONLY winning move, one of twenty-seven. No check, no attack — the king simply places itself so that it takes away g6, g7 and g8. That traps the black king. 2… Kh8 3. Nf6 And that is the net: king on f7 and knight on f6 together cover every square around h8. Two pieces are enough for that — which is why the rook stays free for the mate. 3… Rh3 The rook looks for checks. There are none. 4. Rg2 The rook takes the g-file away from the black rook. After that Black is out of useful moves: all his moves lose at once. 4… Rg3 5. Rh2+ Rh3 Forced — the ONLY move, because otherwise Rh8 mates. The rook throws itself in between, and that is all Black can still do. 6. Rxh3# Mate. Half a point, thrown away with a single king move in the wrong direction.Sideline 1… Rg6 The most instructive mistake: a completely sensible-looking rook move. It is even the toughest defence there is — White needs the longest for it afterwards. And yet it is lost, because it does not move the king. For 1...Kg7 there was exactly one tempo, and that one tempo is now gone. 2. Ne7 The ONLY winning move. The knight attacks the rook and covers g8 in the same move — Black has to save the rook and again does not get around to moving the king. 2… Rb6 3. Kf7 Again the ONLY winning move, and again a quiet one. The king occupies f7 and takes the squares g7 and g8 away from the opposing king. 3… Kh7 The king is finally allowed to move — but only to the edge. It has left the corner, not the prison. 4. Rh2+ Rh6 Forced: the rook has to go back in front of its king, or it is mate at once. That is exactly the price of the rook having to work next to its own king. 5. Ra2 A waiting move. White has all the time in the world, Black none. 5… Rb6 6. Nd5 Rb7+ 7. Kf6 The ONLY winning move — and the picture is the same as at the start, only now with Black on the edge and no way out. White calmly drives the king back into the corner and mates.Sideline 1… Kg8 The most common mistake of all, because it looks so harmless: the king leaves the corner — but only one square, and the back rank is edge too. That is not a breakout, it is a change of seat. 2. Rg2+ The rook occupies the g-file and pushes the king back. Exactly that was not possible after 1...Kg7!. 2… Kh8 3. Kf7 The white king comes up. From here on the same machine runs as in the first sideline, only slower. 3… Rh7+ Black defends with rook checks. They hold White up for ten moves and change nothing — checks do not replace escape squares. 4. Kf8 Rg7 5. Rh2+ Rh7 The ONLY move. The rook has to go back in front of its own king, or mate follows on the h-file. 6. Rf2 Rd7 7. Ne7 The knight enters the net. From e7 it covers g8 and g6 — the two squares the black king needs. 7… Rd8+ 8. Kf7 The ONLY winning move. The white king goes back to where it takes the last squares away from the black king. 8… Rd6 9. Ng6+ The knight check that decides everything: it covers h8 and forces the king onto h7. 9… Kh7 10. Rh2# Mate — the standard picture of this endgame. King and knight take away every square at the edge from the enemy king, the rook delivers mate. This picture does not exist in the centre, and that is why the first move was 1...Kg7.
- 2. Rf7+ White blocks the way. The check looks unpleasant, but it drives the king exactly where it wants to go anyway — downward.
- 2… Kg6 Again the ONLY move, this time one of only three possible. Back to the back rank (Kg8 or Kh8) would still be too close to the corner. The king goes forward, not sideways.
- 3. Nf4+ The knight tries to bar the way.
- 3… Kg5 Black has only this one move at all — and it is exactly the right one. The king is now off the edge, and from here the defence gets easier half-move by half-move: here nine moves still hold, three moves later it is seventeen.
- 4. Kd7 White brings up his king. Too late — the black king has left the edge and simply steps out of the white king's way.
- 4… Kg4 The king keeps walking. Its own rook stands far away on h6 and stays there: it is meant to take no square away from the king and not to walk into knight forks.
- 5. Kc7
- 5… Kf3 Now it is no longer running away but a stroll to the centre. There is nothing to defend, because without an edge there is no mating net.
- 6. Nd5+
- 6… Ke4 The king stands in the centre. From here, rook and knight against rook is what it objectively is: a dead draw.
- 7. Nc3+
- 7… Kd4 Knight checks are harmless in the centre — the king always has several squares, because nothing hems it in.
- 8. Nb5+
- 8… Kd5 The drawn picture. White can give as many checks as he likes; as long as the black king stands in the centre, no net forms. That was the whole point from the first move on.
Play it yourself
In the free app C&C Chess Club you step through the line move by move, tap the sidelines and play the position out against Stockfish — no account, no ads.
More in Rook endgames
- Rook and bishop against rook — how to hold the draw Draw
- Rook against bishop — the right corner Draw
- Rook and bishop against rook — the Philidor position White wins
- Rook against knight — the two must not be parted Draw
- When Vancura tips over — two files too close White wins
- Three against two on the same flank — how the defender holds Draw