 C&C Chess Club
Rook against knight — the two must not be parted
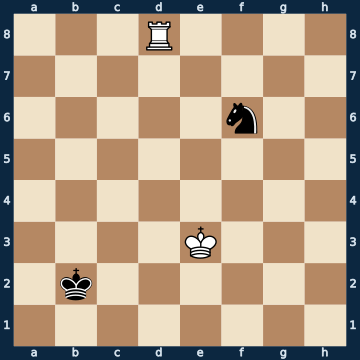
3R4/8/5n2/8/8/4K3/1k6/8 b - - 0 1The plan
Rook against knight is a draw, but only on one condition: knight and king must stand together. A knight alone is defenceless — it cannot shield itself, it needs two moves to cover the distance the rook covers in one, and on every second square it stands on the same file or rank as its own king and gets shot down. Here the two stand far apart, and only a single move saves the game. What matters is the direction: it is not the knight that runs to the king, it is the KING that runs to the knight. Only once the king is close enough may the knight hop too, and then always to a square directly next to the king, where it stands defended. Together the two are a wall a rook can do nothing against — the attacker can only give check and eventually has to give it up.
Rule of thumb: the knight cannot run away — go and fetch it with the king, then place it next to the king.
Why this level: Knight and king must not be parted
The solution, move by move
- 1… Kc3 The ONLY move out of sixteen. No knight move helps, because wherever the knight jumps it stays alone and gets caught (first and second sideline). The remaining king moves lose too, because they are half a step too slow. The king has to set off by the shortest path.Sideline 1… Nd5+ The most active move: check, the centre, and the knight comes to meet its own king. Only it stands on the rook's line while doing so. 2. Rxd5 Gone. An undefended knight may never step onto a square the rook covers — and the rook covers an entire file and an entire rank. 2… Kc3 3. Rd4 Rook against bare king. The rest is the basic mate. 3… Kc2 4. Rc4+ Kb3 5. Kd3Sideline 1… Ng8 The knight flees into the corner of the back rank, far from the white king. There it looks safe — and in truth it is lost. 2. Rb8+ The series of checks. The rook chases the black king, and the king has to run because it cannot shield the knight. 2… Kc3 3. Rc8+ Kb4 4. Rb8+ Kc5 5. Rc8+ Kd6 6. Rd8+ The last check brings the king onto the line the rook needs next — exactly the skewer motif. 6… Ke7 7. Rxg8 And the knight falls. It stood eight squares away from its own king; a rook needs only a few checks for that.
- 2. Rc8+
- 2… Kb4 Again no alternative: of three squares only this one holds. The check seemingly threw the king back, but in fact it drove it forward — every step towards the knight counts.
- 3. Rc6
- 3… Nd7 And now the knight, likewise the only one of thirteen moves. The rook attacks it on the sixth rank, and only d7 is a square from which it links up with its own king a few moves later.
- 4. Kd4
- 4… Kb5 The king continues towards the knight, even though this brings it closer to the white king. Only two moves hold here, both leading in the same direction.
- 5. Rc7
- 5… Nb6 The knight is driven off again and, as the only move that holds, places itself directly beside its king. From here the two are connected — and from here the position can no longer be won.
- 6. Rb7
- 6… Ka5 The king steps back and still stays within reach of the knight. Three moves hold, all three keep the connection.
- 7. Kc5
- 7… Na4+ The finest move of the lesson, and again the only one. The knight goes to the edge with check — voluntarily to a bad square, because there it stands defended by its own king. Every other knight move loses at once, two of them even by mate in the next move (third sideline).Sideline 7… Nd7+ The knight goes forward with check instead of to the edge — looks active, but is the losing move: d7 lies on the rook's line. 8. Rxd7 Captured. And because the black king is already stuck to the edge, mate follows at once. 8… Ka6 9. Rh7 Ka5 The only move, and it helps nothing. 10. Ra7# Mate on the edge of the board. On a4 instead of d7 the same knight would have held the game — the only difference is that there it stands next to its own king.
- 8. Kc4
- 8… Ka6 The king stays with the knight. Going away would mean giving it up.
- 9. Rb1
- 9… Nb6+ And to finish, once more the only move: the knight returns to its king's side with check. Exactly this back-and-forth between two squares next to its own king is the whole defence — the rook can never get in between (fourth sideline shows what a breakout costs).Sideline 9… Nc5 The knight jumps away from the king instead of towards it — and lands right next to the white king. 10. Kxc5 Captured by the king. You do not even need the rook for that. 10… Ka7 11. Kc6 Ka8 12. Kc7 Ka7 13. Ra1# Mate. The knight was the one piece holding the draw together, and it lost that connection because it hopped away from its own king for one move.
Play it yourself
In the free app C&C Chess Club you step through the line move by move, tap the sidelines and play the position out against Stockfish — no account, no ads.
More in Rook endgames
- Rook against bishop — the right corner Draw
- Three against two on the same flank — how the defender holds Draw
- Rook and knight against rook — the king must get to the centre Draw
- The outside passed pawn — when the rook may let it go White wins
- Rook and bishop against rook — how to hold the draw Draw
- Rook and bishop against rook — the Philidor position White wins