 C&C Chess Club
Three against two on the same flank — how the defender holds
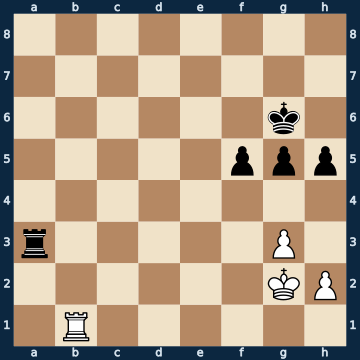
8/8/6k1/5ppp/8/r5P1/6KP/1R6 w - - 0 1The plan
Rook and three pawns against rook and two pawns, all on the same flank — the most common rook endgame in tournament practice, and objectively a draw. The extra pawn is no use, because three against two cannot be forced into a passed pawn as long as the defender does three things. First: the rook goes forward, to the seventh rank behind the enemy pawns — from there it ties them down instead of guarding at home. Second: the king stays with its own pawn and in the corner; any trip towards the centre costs the pawn and the game. Third: if the opponent pushes a pawn, it gets traded — one pair fewer, and the fortress is finally sealed. What the calculation has brought to light is the ranking of these three rules: the only real danger here is the KING. After the in-between check, only two of six replies hold, and the same wrong step loses again later — while even the passive rook move still holds the draw.
Rule of thumb: three against two is a draw — rook forward, king with its pawn, and trade off at the first advance.
Why this level: The most common rook endgame in practice — the piece count doesn't make it harder, just bigger
The solution, move by move
- 1. Rb7 The rook first. From the seventh rank it ties down the enemy pawns instead of watching its own from behind. Staying at home still holds here too — Rf1, Rg1 and Rb2 are all measured to be within the draw window — but it leaves the whole game to the opponent.
- 1… Ra2+ The in-between check. It looks harmless and is the sharpest moment of the game.
- 2. Kg1 The key move: only two of six replies hold — the king has to stay on g1 or h1, that is, with its h-pawn. Kf1 and Kf3 both lose (sideline), Kh3 is mated in two, and interposing the rook on b2 also ends in mate.Sideline 2. Kf1 The move that really loses this position: the king gets 'out of the way' of the check and leaves its h-pawn behind while doing so. The oracle then gives Black a good eight pawns' worth of advantage. (Kf3 is even worse, over ten pawns, and Kh3 and Rb2 get mated.) 2… Rxh2 The pawn falls without a fight — and with three passed pawns against one, the defence is over.
- 2… h4 Black looks for the breakthrough on the edge — the only way to turn the majority into a passed pawn.
- 3. gxh4 And right now comes the trade. After the recapture only seven pieces remain on the board — from here every further move of this lesson is tablebase-exact, not just engine-backed.
- 3… gxh4
- 4. Rb4 The rook forward again: from the fourth rank it attacks the passed pawn and cuts off the king. The king, meanwhile, still may not go for a walk — Kf1 loses here too (sideline).Sideline 4. Kf1 The same mistake a second time, now in the tablebase zone: the king lets go of its pawn. Of the seventeen moves in this position, eleven hold the draw — this one is not among them. 4… Rxh2 The h-pawn falls again, and this time it is exact: won for Black. 5. Kg1 Ra2 Two connected passed pawns and an active rook against the bare rook — there is no fortress against that any more.
- 4… h3
- 5. Rb3 And now behind it. The rook behind the enemy passed pawn — the same Tarrasch rule as in the outside-passed-pawn lesson, just seen from the defender's side.
- 5… f4
- 6. Rxh3 The first extra pawn falls.
- 6… f3
- 7. Rxf3 And the second. The pawn advantage has come to nothing.
- 7… Ra1+ The last try: Black wants to trade rooks and hopes for the pawn endgame.
- 8. Rf1
- 8… Rxf1+
- 9. Kxf1 A draw — and White even ends up a pawn up. That changes nothing either: the black king stands in front of the rook pawn in time. That is exactly the lesson of the whole piece: in the rook endgame, activity and king position count, not pawns.
Play it yourself
In the free app C&C Chess Club you step through the line move by move, tap the sidelines and play the position out against Stockfish — no account, no ads.
More in Rook endgames
- Rook against knight — the two must not be parted Draw
- The outside passed pawn — when the rook may let it go White wins
- Rook against bishop — the right corner Draw
- Rook and knight against rook — the king must get to the centre Draw
- Rook and bishop against rook — how to hold the draw Draw
- Rook and bishop against rook — the Philidor position White wins