 C&C Chess Club
Corresponding squares (Lasker-Reichhelm 1901)
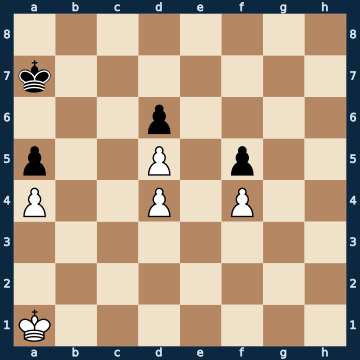
8/k7/3p4/p2P1p2/P2P1P2/8/8/K7 w - - 0 1The plan
The most famous manoeuvring position in endgame history — a position in which both sides together have ZERO pawn moves: all three pawn pairs stand blocked, only the king march decides. White threatens to break in at two widely separated spots: on the kingside against the undefended pawn, on the queenside behind the chain. The black king can cover both entry squares — but only one after the other, and so it is not WHERE he stands that decides, but WHEN. That is exactly what corresponding squares regulate: to every square the attacking king enters belongs a specific square the defender MUST occupy; miss it even once, and White gets through. The pairs are a map, not a rule of thumb — and whoever knows them sees at once that the first move does not belong in the centre, but on a single square at the edge, because only from there does the chain of correspondences work out. From there White shuttles back and forth until Black has to commit to one side, and then marches to the other. Opposition and triangulation, both separate lessons in this collection, are the same idea in miniature; here it is built out so far that mere counting no longer carries it.
Rule of thumb: don't count moves, remember the pairs of squares — the defender is lost the moment he misses his matching square.
Why this level: Lasker-Reichhelm: pairs of squares instead of counting, 46 half-moves
The solution, move by move
- 1. Kb1 The most famous king move in the endgame — and, by everything the study has taught since 1901, the only winning move. White enters the square that corresponds to b7. One square over and the pairing no longer holds, and Black draws (sideline).Sideline 1. Kb2 One square over — and the win is gone. The move looks more natural than the right one, since it heads toward the centre; but it destroys the correspondence before it has even begun. 1… Ka8 Black dodges into the corner and takes over the correspondence by doing so: from here on HE has the map on his side. 2. Kb3 Ka7 3. Kc3 Kb7 4. Kb2 Kc8 Black holds off both breakthroughs and gives up neither side: a draw. The difference between a whole point and half a point was a single king square on the first move.Sideline 1. Ka2 The second square over — and again the win is gone. b1 is the ONE square that corresponds to b7; a1 and a2 belong to others, and those are free for Black. 1… Kb8 Black doesn't need to calculate: he simply mirrors. As long as White doesn't enter a corresponding square, Black always has a waiting square left. 2. Ka1 Kb7 3. Ka2 Kb8 White tries it on the other side — too late, the black king is back in time. 4. Kb3 Kc7 Both entry squares stay guarded: a draw. Only 1.Kb1! keeps the correspondence intact.
- 1… Kb7
- 2. Kc1
- 2… Kc7
- 3. Kd1
- 3… Kd7
- 4. Kc2 Black has to guard the queenside — and by doing exactly that moves away from the kingside. The shuttling forces him to choose.
- 4… Kc8
- 5. Kd2
- 5… Kd8
- 6. Kc3
- 6… Kc7
- 7. Kd3 Now the switch of sides: the queenside has tied down the black king, so White marches to the right. The tempi won through correspondence are exactly enough.
- 7… Kb6
- 8. Ke2
- 8… Kc7
- 9. Kf3
- 9… Kd7
- 10. Kg3
- 10… Ke7
- 11. Kh4 The march around the outside — the black king arrives one step too late. That one step was exactly the reward of the first move.
- 11… Kf6
- 12. Kh5
- 12… Kf7
- 13. Kg5
- 13… Kg7
- 14. Kxf5 Broken through: the first pawn falls, after pure king play and without a single pawn ever having moved.
- 14… Kf7
- 15. Kg5
- 15… Kg7
- 16. f5 Only now does the blockade dissolve — White's own passed pawn runs, escorted by the king. From here it is technique.
- 16… Kf7
- 17. f6
- 17… Kf8
- 18. Kf4
- 18… Kg8
- 19. Kg4
- 19… Kf8
- 20. Kg5
- 20… Kf7
- 21. Kf5
- 21… Kf8
- 22. Ke6
- 22… Ke8
- 23. Kxd6 And finally the second pawn falls too: White has harvested on BOTH wings. That was exactly the threat Black could never cover on both sides at once.
- 23… Kf7
Play it yourself
In the free app C&C Chess Club you step through the line move by move, tap the sidelines and play the position out against Stockfish — no account, no ads.