 C&C Chess Club
Queen and pawn against queen — the rook pawn isn't enough
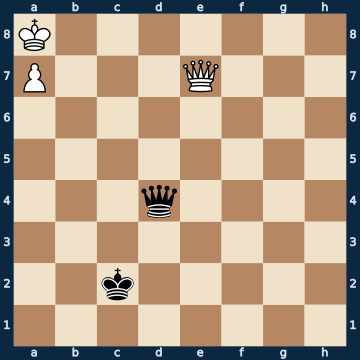
K7/P3Q3/8/8/3q4/8/2k5/8 b - - 0 1The plan
The counterpart to the bishop pawn, and the difference is measured: on the four central files the attacker wins in nearly nine of ten positions, with the rook pawn only in barely six of ten — nearly a third are drawn, and in a good tenth the attacker even loses. The reason is on the board. Your own king in front of your own rook pawn is not a strength but a cage: it has only two neighbouring squares left, and if the defender occupies them, it cannot move at all any more. The whole defence therefore consists of a single picture — the queen places itself diagonally in front of the pawn, attacks it, and at the same time takes away both escape squares from the king. From then on the attacker is only allowed to give check, and the defender can answer every check with a counter-offer until the queens are off the board. And even if the pawn does promote, it is too late: the new queen stands undefended and is traded off at once. It is only important not to greedily chase after the pawn — it is poisoned.
Rule of thumb: with the rook pawn, the attacking king gets in his own way — queen in front of the pawn, and the cage is shut.
Why this level: And the case where it isn't enough
The solution, move by move
- 1… Qb6 The ONLY move that holds — thirty-four others lose. The queen places itself diagonally in front of the pawn: it attacks the pawn and at the same time covers the only two squares the white king has at all. From now on White is practically paralysed.Sideline 1… Qxa7+ The reflex: the pawn is the whole issue after all, so away with it — and with check to boot. 2. Kxa7 The pawn was defended by the king. Queen against bare king, lost. That is exactly why the rook pawn is dangerous: it lures.Sideline 1… Qd8+ Rightly thought, wrongly carried out: the queen wants to cover the queening square and places itself with check on the back rank. 2. Qxd8 Only the white queen already stands there on the same rank. The square diagonally in front of the pawn is the only one that can do both: cover it and stand safely.
- 2. Qf8 White tries to drive the black queen off this square.
- 2… Qc7 The queen moves one square over and keeps both in view: the pawn and the queening square.
- 3. Qh8
- 3… Qf7 And again. That is the whole job — staying where you cage the king.
- 4. Qg8 White offers the queen trade, because nothing else comes to mind.
- 4… Qxg8+ Black takes with check. The pawn alone holds no danger for him.
- 5. Kb7 The ONLY move — and the only legal one too. That is exactly the cage: the king had only this one square.
- 5… Qh8
- 6. a8=Q The ONLY move that still holds the draw. The pawn MUST promote now, while the king still covers the square; any hesitation loses (third sideline).Sideline 6. Kb6 Instead of promoting at once, the king goes for a walk — he wants to defend the pawn better first. 6… Qc8 And it's already over: the queen occupies the queening square. The pawn can never get through again, 7. Kb5 Qb7+ and the white king stands out in the open facing a queen. That is exactly why the pawn has to promote at the very moment the king still covers the square.
- 6… Qxa8+ The new queen stands undefended beside its king, so it falls with check.
- 7. Kxa8 The ONLY move — and bare kings. The rook pawn was only ever worth half a point.
Play it yourself
In the free app C&C Chess Club you step through the line move by move, tap the sidelines and play the position out against Stockfish — no account, no ads.
More in Queen endgames
- Queen and pawn against queen — the bishop pawn wins White wins
- Queen and pawn against queen — the knight pawn jams Draw
- Queen against rook and knight — no way through Draw
- Perpetual check — the only rescue for the weaker side Draw
- Queen against two connected pawns — the wall on the seventh Draw
- Queen against two bishops — won, but not within fifty moves White wins