 C&C Chess Club
Queen and pawn against queen — the knight pawn jams
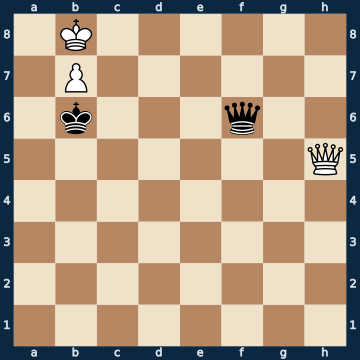
1K6/1P6/1k3q2/7Q/8/8/8/8 w - - 0 1The plan
The second problem case besides the rook pawn, and the more unpleasant one. Measured, the knight pawn sits exactly between the extremes: on the central files the attacker wins nearly nine of ten positions, here only two of three — and in almost one in ten he even loses himself. The reason is the same as with the rook pawn, only a shade less extreme. Your own king in front of your own pawn has hardly any squares, and the back rank behind it is open. If the enemy king also stands nearby, a genuine mating net forms: the enemy queen reaches the last rank, and your own pawn blocks the escape square. In the starting picture exactly one move of twenty-three is still a draw; of the twenty-two others, sixteen are decided on the spot, eight of those even by mate next move. After that only one thing helps: lead the king right across the board out of the danger zone and abandon the pawn to its fate. The defender, for his part, must not doze off either — he has to keep the promotion under permanent watch.
Rule of thumb: with the knight pawn the attacker is threatened with mate on the back rank — the king has to move away from his own pawn, not toward it.
Why this level: The same material, a different type of pawn
The solution, move by move
- 1. Kc8 The ONLY move that holds the draw — twenty-two others lose. The white king stands between his own pawn and the enemy king and is practically mated: almost every queen move allows mate on the back rank (first sideline), and retreating into the corner is only two moves slower (second sideline).Sideline 1. Qh8 Standing in for almost any queen move: the queen goes to the back rank to prepare the promotion. 1… Qxh8# And is captured — with mate. His own pawn takes away the king's escape square, the enemy king covers the queen. That is the cage.Sideline 1. Ka8 The king dodges into the corner. That looks like safety and is the opposite. 1… Qa1+ The queen comes to the a-file, the king has to go back, 2. Kb8 Qg7 and now Black calmly builds the mating net. The white king hasn't got a single square. 3. Qd5 Qh8+ 4. Qg8 Qxg8# Mate. Against the knight pawn the attacker not infrequently loses the very game he thought he was winning.
- 1… Qf8+ Black keeps driving the king on — and has to be precise himself while doing it: only four of his twenty-six moves hold the draw, all the rest let the pawn through (third sideline).Sideline 1… Qd8+ The obvious check, which also covers the queening square — and the queen stands undefended right next to the king. 2. Kxd8 Gone. Even the defender only has a handful of correct moves in this position.
- 2. Kd7 Again the ONLY move. The king has to go forward into the open; there's no going back any more.
- 2… Qg8
- 3. Ke7
- 3… Qb8 Now the black queen places itself behind the pawn, on the queening square. From there she never leaves again.
- 4. Kf7 The white king keeps going. He is by now so far from the pawn that he can never accompany it again.
- 4… Qd8
- 5. Kg7
- 5… Qb8
- 6. Kh7
- 6… Qf8 The black queen shuttles between two squares that both cover the queening square. The defence needs nothing more than that.
- 7. Kg6
- 7… Qg8+ One last check. White has left the cage and lost the pawn for it: a draw.
- 8. Kh6
Play it yourself
In the free app C&C Chess Club you step through the line move by move, tap the sidelines and play the position out against Stockfish — no account, no ads.
More in Queen endgames
- Queen and pawn against queen — the rook pawn isn't enough Draw
- Perpetual check — the only rescue for the weaker side Draw
- Queen and pawn against queen — the bishop pawn wins White wins
- Queen against two bishops — won, but not within fifty moves White wins
- Queen against rook and knight — no way through Draw
- Queen against two knights — the king step decides White wins