 C&C Chess Club
Perpetual check — the only rescue for the weaker side
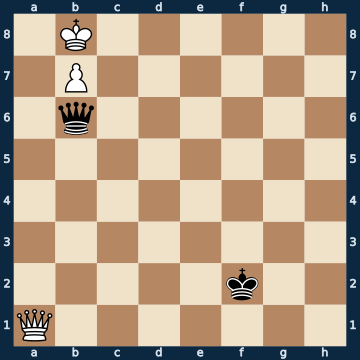
1K6/1P6/1q6/8/8/8/5k2/Q7 b - - 0 1The plan
In the queen endgame the eternal check series is the standard rescue for the weaker side — but it is not a stopgap, it is a technique with a clear condition. The right check is always the one that also keeps an eye on the queening square; all the others give the opponent a free move and lose. In the starting position this is brutally clear: of twenty-five moves exactly one holds, and even after that the defender repeatedly faces a position with exactly one correct move. The mechanism behind it is easy to remember. The queen looks for a diagonal that runs through the queening square, and swings back and forth on it: sometimes with check, sometimes quietly, but never in a way that leaves the diagonal. Two things are forbidden — capturing the pawn while it is defended by the king, and giving some pretty check that gives up the coverage. And when the opponent offers the queen, it is taken: queen against queen is a draw, even if a pawn promotes.
Rule of thumb: perpetual check only saves you if every check also covers the queening square — a check into the blue loses.
Why this level: Perpetual check as the only rescue; exactly one move holds
The solution, move by move
- 1… Qd6+ The ONLY move that holds — twenty-four lose. The queen goes with check onto the diagonal that runs through the queening square. Capturing the pawn costs the queen (first sideline).Sideline 1… Qxb7+ Greed: the pawn is the whole danger, so away with it — and even with check. 2. Kxb7 It was defended by the king. Queen against bare king, lost.
- 2. Ka8 The king dodges; it has three squares, all equally good.
- 2… Qd5 Again the ONLY move, and this time without check. The queen stays on the diagonal and from there covers the square on which the pawn wants to become a queen. The obvious check from the back rank loses at once (second sideline).Sideline 2… Qd8+ The check from the back rank covers the queening square too, after all — it looks just as good as the quiet move of the main line. 3. b8=Q Except White promotes anyway, since he still has his first queen. 3… Qxb8+ Black has to take, 4. Kxb8 and the king recaptures. One queen against a bare king — lost. The quiet move in the main line covers the same square without offering its own queen.
- 3. Ka7 White tries it with the other square.
- 3… Qc5+ And again the ONLY move — the same diagonal, one square further, again with check.
- 4. Ka8
- 4… Qd5 The ONLY move. You can see the pattern: the queen lives on this one diagonal and never leaves it.
- 5. Qd4+ The best try White has: a check that attacks the black queen at the same time.
- 5… Qxd4 The ONLY move — and it is easy to miss because it looks so harmless. Dodging costs the queen (third sideline).Sideline 5… Kg3 Dodging the check is the natural reflex — and a mistake here. 6. Qxd5 Because the check was also an attack on the queen. Taking was compulsory, however inconspicuous it looked.
- 6. b8=Q The ONLY move that still keeps White in the draw. The pawn must promote at once, otherwise the black queen catches it.
- 6… Qd5+ Queen against queen. Black keeps giving check and needs nothing else at all any more.
- 7. Ka7
- 7… Qa2+ A draw. The pawn has indeed become a queen — that changes nothing, because both sides now have the same thing.
Play it yourself
In the free app C&C Chess Club you step through the line move by move, tap the sidelines and play the position out against Stockfish — no account, no ads.
More in Queen endgames
- Queen and pawn against queen — the knight pawn jams Draw
- Queen against two bishops — won, but not within fifty moves White wins
- Queen and pawn against queen — the rook pawn isn't enough Draw
- Queen against two knights — the king step decides White wins
- Queen and pawn against queen — the bishop pawn wins White wins
- Queen against rook and bishop — both on a knife's edge Draw