 C&C Chess Club
Queen against two knights — the king step decides
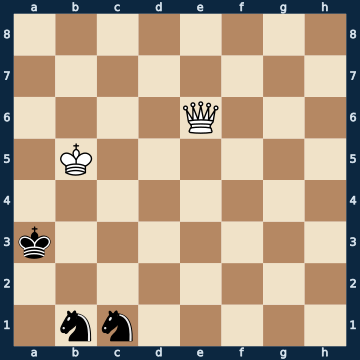
8/8/4Q3/1K6/8/k7/8/1nn5 w - - 0 1The plan
Two knights near their own king are a surprisingly tough defence against the bare queen: if both knights stand close to their king, every fourth position ends in a draw — reckoned over arbitrary positions, only every fifteenth. The queen alone achieves nothing there — it can check as much as it likes, but as long as the knights defend each other, there is no fork. Only the king itself breaks the fortress, and only from a single square. In the starting position exactly one move out of thirty-one wins, and it is a king step; every queen move and every other king square is a draw. After that a picture emerges that has to be seen to be believed: the knights get in each other's way. Every knight move takes a square away from the other, its own king gets walled in, and in the end the queen mates without having captured a single piece.
Rule of thumb: against two knights it is not the queen that helps but the king — and it has to go to the one correct square, not the next best one.
Why this level: The king step decides
The solution, move by move
- 1. Kc4 The ONLY winning move out of thirty-one. The king steps exactly one square closer — not onto the diagonal, not onto the rank, but onto the square that takes away the black king's exits. One square over is a draw (first sideline), and every queen check even more so (second sideline).Sideline 1. Kc5 One square over — the king gets just as close and still achieves nothing. 1… Kb2 The black king now has squares it did not have in the main line. 2. Qg8 Kc3 3. Qh8+ White can check as much as it likes: without the king on the correct square there is no zugzwang, and without zugzwang no fork. A draw. 3… Kb3Sideline 1. Qd6+ The active move: check, and the queen attacks both knights at once. 1… Kb3 The king simply covers them. That is exactly the point with two knights — they never stand alone for long. 2. Qf8 Kc3 3. Qh8+ Kb3 The queen turns in circles. Without the king step the position is a draw.
- 1… Kb2 The king seeks the open; its knights stay behind.
- 2. Qf6+ From here the queen gets to work: every check takes a square from the king, and it is pushed back towards its own knights.
- 2… Kc2
- 3. Qg6+
- 3… Kb2
- 4. Qg2+ The decisive check — the king has to go into the corner, right next to its pieces.
- 4… Ka1
- 5. Qh2 A quiet move. Now Black has only knight moves left, and that is exactly what everything was heading towards.
- 5… Na3+ The knight comes out with check and in doing so takes a square away from its own king.
- 6. Kb4
- 6… Nb1
- 7. Qc2 The queen places itself so that both knights look pinned — the king can no longer stir.
- 7… Na2+
- 8. Ka4
- 8… Nac3+ Zugzwang in its purest form: every knight move makes it worse.
- 9. Kb3
- 9… Nd5 The last knight move — and it hands over the square the queen has been waiting for.
- 10. Qb2# Mate, without a single piece having been captured. It was not the knights that fell, but their king.
Play it yourself
In the free app C&C Chess Club you step through the line move by move, tap the sidelines and play the position out against Stockfish — no account, no ads.
More in Queen endgames
- Queen against two bishops — won, but not within fifty moves White wins
- Queen against rook and bishop — both on a knife's edge Draw
- Perpetual check — the only rescue for the weaker side Draw
- Perpetual check or mate — the king marches behind the queen White wins
- Queen and pawn against queen — the knight pawn jams Draw
- The more advanced pawn — why the trade is the weapon White wins