 C&C Chess Club
Queen against rook and knight — no way through
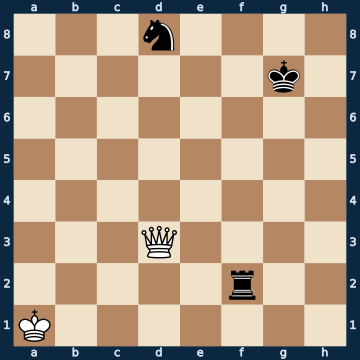
3n4/6k1/8/8/8/3Q4/5r2/K7 b - - 0 1The plan
Of all the material distributions in which the queen faces two pieces, rook plus a minor piece is the toughest: measured over random positions, every fifth ends in a draw, and when the pieces stand together by their own king, practically every one does. The reason is simple. King, rook and knight can line up three-strong so that each piece is defended by another. Then there is no fork left for the queen, and without a fork there is nothing to be had against two pieces. The whole defensive work consists of building this bond and never breaking it up again: the rook next to the king, the knight under the protection of both. Whoever instead sends a piece wandering off alone loses it to the first double-check motif. The attacker, for its part, should know that there is nothing to win here — and should not tear open its own position trying.
Rule of thumb: rook and a minor piece hold the queen off as long as they cover each other and their own king — the first lone move costs the game.
Why this level: Together they hold; the first lone move costs the piece
The solution, move by move
- 1… Rf8 The ONLY move out of twenty-four. The rook places itself next to its own king and from there covers the knight. From now on every piece holds together with every other. Any other rook move leaves the knight alone and loses it at once (sidelines).Sideline 1… Rf5 The active rook move into the centre of the board. It looks good and loses outright — the knight now stands alone. 2. Qd7+ The check draws the king away from its knight, 2… Kg8 3. Qxd8+ and it falls. Queen against rook is won.
- 2. Qd4+ A check that achieves nothing — the bond holds.
- 2… Kg8
- 3. Kb2 White tries it with the king. It has the longest way to go of all the pieces.
- 3… Nf7 The knight moves into the protection of rook and king. Now all three defend each other, and the queen finds a fork nowhere.Sideline 3… Nc6 The same holds later too: the knight wants to become active and in doing so leaves the protection of its comrades. 4. Qd5+ Another check with a double attack — 4… Kh8 5. Qxc6 — and again the knight is gone. Staying in the bond here means doing absolutely nothing.
- 4. Kc3
- 4… Kh7 The king waits. That is all the defence needs to do.
- 5. Qd5 The queen scans the diagonals but finds no square from which it attacks two pieces at once.
- 5… Kg7
- 6. Qe6
- 6… Kg8
- 7. Qd7 Nothing works from behind either: the square is covered by rook and knight.
- 7… Kh8 The bond stands unchanged, the white king is still far away. A draw — and nothing changes that from here on.
Play it yourself
In the free app C&C Chess Club you step through the line move by move, tap the sidelines and play the position out against Stockfish — no account, no ads.
More in Queen endgames
- Queen against two connected pawns — the wall on the seventh Draw
- Queen and pawn against queen — the bishop pawn wins White wins
- Queen against pawn on the sixth — this is where the exceptions end White wins
- Queen and pawn against queen — the rook pawn isn't enough Draw
- Queen against rook pawn — the corner saves Draw
- Queen and pawn against queen — the knight pawn jams Draw