 C&C Chess Club
Queen against rook pawn — the corner saves
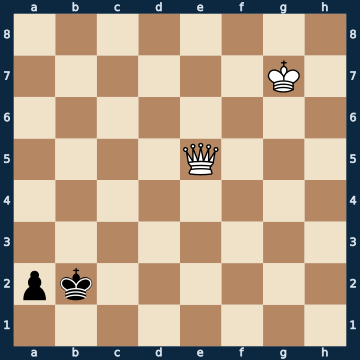
8/6K1/8/4Q3/8/8/pk6/8 b - - 0 1The plan
The second big draw case besides the bishop pawn, but for a different reason. With the rook pawn, the corner itself is the stalemate nest: if the king stands on the queening square, its own pawn can no longer move, and if the queen takes it away, Black has no move left at all. That is why the defender simply shuttles between the two squares at the edge of the board and never lets itself be lured out by any check. Whoever goes into the open with the king instead is lost — the queen pins or wins the pawn at once. And if the white king does manage to get close after all, there is the second rescue: then the pawn becomes a queen, and with check, because the queening square lies on the long diagonal. Queen against queen is a draw.
Rule of thumb: bishop and rook pawns hold a draw, centre and knight pawns lose — and with the rook pawn the rescue is: do not leave the corner.
Why this level: The rook pawn as the second exception
The solution, move by move
- 1… Kb1 The ONLY move. The king has to go back to the edge, to its pawn. Any excursion into the open costs the pawn and the game (first sideline).Sideline 1… Kc1 The king seeks the open. It thereby leaves the pawn alone, and without its king the pawn is worth nothing. 2. Qa1+ The queen places itself behind the pawn, on the queening square — 2… Kd2 3. Qxa2+ — and picks it up on the next move. Queen against bare king, won.
- 2. Qb5+ White tries to separate the king from its pawn with checks.
- 2… Ka1 And back into the corner again, onto the queening square. From there the queen cannot take the pawn: it would be stalemate.
- 3. Qd3
- 3… Kb2 The ONLY move — and the only legal one too. That is exactly why the corner is so safe: Black always still has something to move, but never anything to lose.
- 4. Qd2+
- 4… Kb1 Again the ONLY move. Back to the board and next to the pawn; any slide onto the c-files loses.
- 5. Kf6 Now the white king sets off. With that the task changes.
- 5… a1=Q+ The ONLY move — and this endgame's second rescue: the pawn becomes a queen WITH CHECK, because the queening square lies exactly on the diagonal the white king stands on. Waiting now would be immediate mate (second sideline).Sideline 5… Ka1 The reflex to go back into the corner. Now it is wrong: the white king is close enough, the stalemate motif no longer works. 6. Qc1# Mate. As soon as the enemy king gets close, the pawn must promote AT ONCE.
- 6. Kf5
- 6… Qb2 The new queen places itself next to its king — safe and defended.
- 7. Qd1+
- 7… Ka2 Queen against queen, dead drawn. The rook pawn has held.
Play it yourself
In the free app C&C Chess Club you step through the line move by move, tap the sidelines and play the position out against Stockfish — no account, no ads.
More in Queen endgames
- Queen against two rooks — cover each other or lose White wins
- Queen against pawn on the sixth — this is where the exceptions end White wins
- Queen against bishop pawn — where the king must stand White wins
- Queen against two connected pawns — the wall on the seventh Draw
- Queen against rook — zugzwang and fork White wins
- Queen against rook and knight — no way through Draw