 C&C Chess Club
Queen against two rooks — cover each other or lose
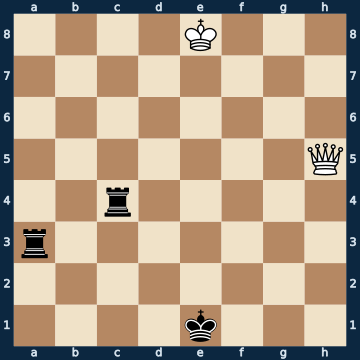
4K3/8/8/7Q/2r5/r7/8/4k3 w - - 0 1The plan
Two rooks are more material than a queen — but only if they cover each other. If they stand loose on different squares, the queen is stronger, and for a single reason: it can give check while attacking a rook at the other end of the same file or rank. The technique is always the same. The queen hunts the king with a check series along the diagonals towards the corner; every check is forced, because the king has no cover. At some point the king has to step onto a square that shares a file, rank or diagonal with one of the rooks — and on the next move the rook is gone. The rest is queen against rook, the already familiar endgame. Conversely: whoever has the two rooks places them next to each other so that one covers the other; then the queen can achieve nothing, and the side with the queen even has to watch out itself.
Rule of thumb: loose rooks die to the fork, covered rooks hold the queen off effortlessly.
Why this level: Cover each other or lose — fork motifs against two rooks
The solution, move by move
- 1. Qe5+ The ONLY winning move out of twenty-five. Not the most obvious check, but the one that steers the hunt into the correct corner — every other one gives Black time to connect the rooks (sidelines).Sideline 1. Qd5 The queen places itself nicely in the middle and attacks both rooks — and thereby throws the win away. 1… Rc8+ Because Black gets a move of time. The rook goes to the back rank with check, 2. Kf7 Rca8 and places itself next to the other. From now on they cover each other, and the queen can never get at them again: a draw.Sideline 1. Qh1+ The obvious check from behind also leads nowhere: it drives the king in the wrong direction. 1… Kf2 2. Kf8 Rc8+ Black uses every breathing space to bring the rooks together — 3. Kg7 Re8 — and as soon as they are together, the position is dead. In this endgame the first move decides everything.
- 1… Kf1 The king has no choice: it has to go where the queen sends it.
- 2. Qf6+ The queen follows square by square on the same diagonal — always a knight's move from the king, just as in the basic mate.
- 2… Kg1
- 3. Qg7+
- 3… Kh1
- 4. Qh8+ The king stands in the corner. Now the second part begins: the queen looks for the file or rank one of the rooks stands on.
- 4… Kg2
- 5. Qg8+ The key move. It forces the king onto a square on the diagonal at whose other end the rook stands.
- 5… Kh3
- 6. Qxc4 The fork is there: the rook falls. What remains is queen against rook — the previous lesson in this category.
- 6… Kg3
Play it yourself
In the free app C&C Chess Club you step through the line move by move, tap the sidelines and play the position out against Stockfish — no account, no ads.
More in Queen endgames
- Queen against bishop pawn — where the king must stand White wins
- Queen against rook pawn — the corner saves Draw
- Queen against rook — zugzwang and fork White wins
- Queen against pawn on the sixth — this is where the exceptions end White wins
- Queen against bishop pawn — the stalemate trap Draw
- Queen against two connected pawns — the wall on the seventh Draw