 C&C Chess Club
Queen against rook — zugzwang and fork
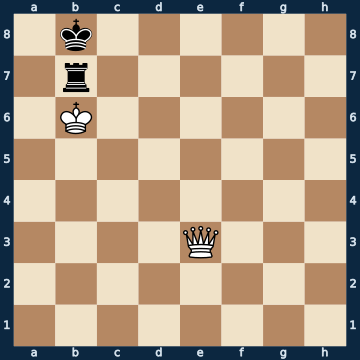
1k6/1r6/1K6/8/8/4Q3/8/8 w - - 0 1The plan
Queen against rook is won — but it is one of the hardest 'won' endgames in practice. The defender STICKS the rook to the king (the Philidor defence, as here on b7/b8): as long as the two stay together, there is no fork. The winning path goes through ZUGZWANG: a quiet move, and Black is left with only rook moves — the rook has to let go. Then a check series drives the king until rook and king stand on the same file, rank or diagonal, and the FORK wins the rook. The rest is the basic mate with the queen.
Why this level: Zugzwang and fork — technically demanding
The solution, move by move
- 1. Ka6 The quiet move — no check, no threat, just ZUGZWANG: every black move worsens the position, because the rook has to leave the king.
- 1… Rd7 The rook lets go — from now on it lives in constant danger of a fork.
- 2. Qc5Sideline 2. Qc3 A quiet move too — but the wrong one. The queen has to take the checking squares away from the rook, otherwise it has some of its own. 2… Ra7+ The PERPETUAL CHECK: the rook attaches itself to the white king and never lets go. White must never capture it, because then nothing would be left on the board. 3. Kb6 Rb7+ 4. Ka6 Ra7+ And again. A draw by repetition — the defender's second lifeline besides the trade.
- 2… Rd1
- 3. Kb6
- 3… Rb1+
- 4. Kc6Sideline 4. Qb5 The check is blocked with the queen — the most costly mistake in this endgame. 4… Rxb5+ The rook takes it at once. This is exactly what the defender has been waiting for the whole time: trade rook for queen once, and the point is halved. 5. Kxb5 Bare kings. That is why in the main line the king dodges the check instead of putting the queen in front of it.
- 4… Rb7
- 5. Qa5
- 5… Rb1
- 6. Qe5+ The check series begins: the queen drives the king and keeps the wandering rook in its sights the whole time.
- 6… Ka7
- 7. Qd4+
- 7… Ka8
- 8. Qh8+
- 8… Ka7
- 9. Qh7+ The FORK: check on h7 — and at the other end of the same diagonal stands the rook on b1. This motif is almost always the death of the rook.
- 9… Kb8
- 10. Qxb1+ The rook falls. The defender should have kept it with the king for as long as possible.
- 10… Kc8
- 11. Qb4
- 11… Kd8 No other square. Without the rook, the king on the back rank is immediately in the queen's mating zone — the piece it had kept separated from its own king for too long is now missing as cover.
- 12. Qf8# Mate — the captured rook has turned into the basic mate with the queen.
Play it yourself
In the free app C&C Chess Club you step through the line move by move, tap the sidelines and play the position out against Stockfish — no account, no ads.
More in Queen endgames
- Queen against bishop pawn — the stalemate trap Draw
- Queen against bishop pawn — where the king must stand White wins
- Queen against pawn — the zigzag wins White wins
- Queen against two rooks — cover each other or lose White wins
- Queen against rook pawn — the corner saves Draw
- Queen against pawn on the sixth — this is where the exceptions end White wins