 C&C Chess Club
Queen against bishop pawn — the stalemate trap
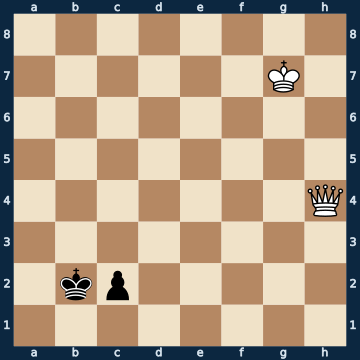
8/6K1/8/8/7Q/8/1kp5/8 w - - 0 1The plan
Queen against a pawn on the seventh rank is won — usually. The exception is not chance but geometry, and it can be counted: try the same set-up with the pawn on each of the eight files, and exactly four hold a draw — the two rook pawns and the two bishop pawns; knight and centre pawns all lose. The reason is the same: the defender goes into the corner and offers STALEMATE — with the bishop pawn in the corner next to the queening square, with the rook pawn the stalemate nest is built in from the start. The queen wins a tempo check by check, but as soon as it attacks the pawn itself, taking it would be stalemate — and if it leaves it alone, it promotes. That everything hangs on the attacking king's distance is shown by the counter-check: of the 54 squares it can be placed on here, only 8 make the win, from 46 it stays a draw — and consistent with that, in the starting position all 29 moves hold the draw, none wins. For the defender, though, it is razor-thin: at one point it has exactly ONE saving move out of five, and whoever promotes prematurely there loses the new queen along with the stalemate. The other lessons in this collection on queen against pawn show the other half of the rule.
Rule of thumb: rook and bishop pawns hold a draw, knight and centre pawns lose; the defender seeks the corner, not flight.
Why this level: The bishop pawn as the exception
The solution, move by move
- 1. Qb4+ The queen begins the same zigzag as against the centre pawn — but this time it runs into nothing. Measured: in this position all 29 moves hold the draw, there is simply no winning move.
- 1… Ka2
- 2. Qc3
- 2… Kb1 The ONLY move that holds, out of five — the other four are the promotions, and all four LOSE (sideline). The king covers the pawn and shuttles around its corner, the saving square.Sideline 2… c1=Q The temptation — and the loss. The pawn was not valuable as a future queen but as a STALEMATE HELPER: as long as it stands on the board and the king in the corner, taking is impossible. Promoted, it is merely a piece to be traded off. 3. Qxc1 The only winning move — but an easy one: the new queen stands undefended, and with it the whole defence falls. 3… Kb3 The only move Black has left at all. From here on it is the basic mate, queen against bare king. 4. Kf7 Kb4 5. Ke6 White brings up the king in complete calm. This is exactly the path the stalemate trap denied it in the main line.
- 3. Qb3+
- 3… Ka1 THE saving move: voluntarily into the corner, the pawn is offered. If the queen takes, it is stalemate; otherwise the pawn promotes and threatens on its own.
- 4. Qxc2 STALEMATE — the half point is saved. With the bishop pawn, the zigzag costs the queen its whole reward.Sideline 4. Qc3+ If the queen does NOT take the pawn, all that is left to it is perpetual check — the white king is too far away to arrive in the time won. 4… Kb1 Again the only move, and again Black finds it blindly: back to the pawn. 5. Qb3+ Ka1 As soon as the queen lets go of the king, the pawn promotes. A draw by repetition — either way.
Play it yourself
In the free app C&C Chess Club you step through the line move by move, tap the sidelines and play the position out against Stockfish — no account, no ads.
More in Queen endgames
- Queen against pawn — the zigzag wins White wins
- Queen against rook — zugzwang and fork White wins
- Queen against bishop pawn — where the king must stand White wins
- Queen against two rooks — cover each other or lose White wins
- Queen against rook pawn — the corner saves Draw
- Queen against pawn on the sixth — this is where the exceptions end White wins