 C&C Chess Club
Rook and pawn against the queen — the castled fortress
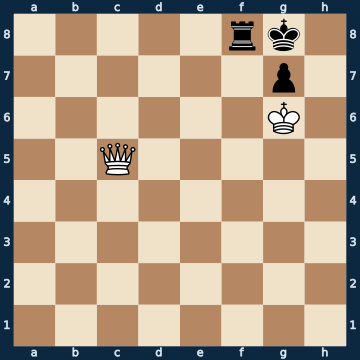
5rk1/6p1/6K1/2Q5/8/8/8/8 b - - 0 1The plan
A queen against rook and pawn looks like a safe win — and it is not, if the defender sits in the perfectly ordinary castled position. King in the corner, rook beside it, a pawn in front: these three cover each other so completely that the queen cannot break in anywhere. The key is the pawn. It guards the square diagonally in front of the rook, and that is exactly where the rook goes as soon as the white king comes close — with check, because the king then stands beside it, and untouchable, because the pawn defends it. The king has to go back, the rook returns home, and the game starts over. There are two things the defender must never do: place the rook on the square directly in front of the pawn, where it is undefended, and dodge with the king into the corner, where the rook suddenly stands alone. Whoever knows this picture never gives up such a position again — and, as the stronger side, never attacks it greedily either.
Rule of thumb: king, rook and pawn in the castled position are a fortress against the bare queen — the pawn covers the rook, the rook checks the king away.
Why this level: Recognising the fortress: it looks like an ordinary game position
The solution, move by move
- 1… Rf6+ The ONLY move that holds — twelve others lose. It looks reckless, because the rook places itself right next to the white king. That is exactly the point: the pawn covers this square, so the king may not capture, and because it is check, it has to move away.Sideline 1… Kh8 The seemingly safest move — the king goes into the corner. Except from there it no longer covers its own rook. 2. Qxf8# Mate in one. That is why the rook has to give check at once instead of waiting.Sideline 1… Rf7 The natural move: the rook places itself IN FRONT OF the pawn and looks solid. But there it is only defended by the king, not by the pawn. 2. Qd5 And now queen, rook and king stand on one diagonal — the rook is pinned and falls. 2… Kh8 3. Kxf7 The rook is gone. That is the difference between the square in front of the pawn and the square diagonally in front of it. 3… Kh7 4. Qh5#
- 2. Kg5 The king has two squares, both hold the draw — it cannot capture.
- 2… Rf8 The rook returns to the castled position. The fortress stands exactly as it did at the start.
- 3. Kg6 White tries the same advance a second time.
- 3… Rf6+ And again the only move — the same pattern. White can try this as often as it likes.
- 4. Kg5
- 4… Rf8
- 5. Qd6 Plan B: the queen wants to get behind via d8. Now mate on the back rank is threatened.
- 5… Rf6 Again only a single move, and again the same square — this time without check. The rook places itself in front of the queen while staying defended by the pawn.Sideline 5… Kh8 Here too, dodging into the corner loses at once: the rook then stands undefended. 6. Qxf8+ The queen takes it with check. After that White wins the pawn and mates. 6… Kh7 7. Qe8
- 6. Qd8+
- 6… Rf8 The rook goes back to its square. The queen check has achieved nothing.
- 7. Qd5+
- 7… Kh8 The king dodges into the corner — safe here, because the rook stays defended. White gets no further: a draw.
Play it yourself
In the free app C&C Chess Club you step through the line move by move, tap the sidelines and play the position out against Stockfish — no account, no ads.
More in Fortresses
- Bishop and pawn against knight — the fortress in front of the pawn Draw
- Rook against f- and h-pawns — the gap saves Draw
- Rook against doubled pawns — two pawns that are only one Draw
- Opposite-coloured bishops — one square holds both pawns Draw
- Opposite-coloured bishops — the pawn may even promote Draw