 C&C Chess Club
Rook against doubled pawns — two pawns that are only one
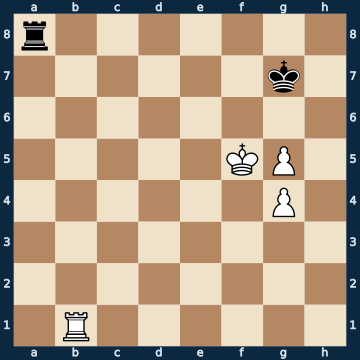
r7/6k1/8/5KP1/6P1/8/8/1R6 b - - 0 1The plan
Doubled pawns are two pawns that together only add up to one — and against a rook they therefore do not make a winning position, but a fortress for the other side. The reason is right there on the board: pawns only defend each other side by side, never one behind the other. The rear pawn cannot help the front one advance, so the king has to do all the work alone, and against king and rook that is not enough. The defender needs only two rules for this. First: its own king stays in front of the pawns and does not let itself be lured to the side. Second: the rook keeps its distance and checks from far away — if it gets too close to the enemy king, it gets driven off or traded, and the pawn endgame is lost. Of nineteen moves in the starting position, five lose; two of them simply hang the rook, the other three look completely harmless. Measured for comparison: if you move the rear pawn one file over, they are connected pawns — and the same position is won.
Rule of thumb: doubled pawns do not win; king in front, rook at a distance, and never run into the trade.
Why this level: The rule is simple and immediately applicable, but carrying it out already demands rook-endgame craft: keeping distance and avoiding the trade.
The solution, move by move
- 1… Ra5+ The rook takes its place far away from the action and checks from the side. The three quiet losing moves all lie right next door: the rook to the corner gets traded off (first sideline), the rook in front of the pawns gets locked in, and the king step to the side gives the white king the square next to the pawns (second sideline).Sideline 1… Rh8 The rook goes into the corner, to a square that looks safe — in truth right next to its own king. That costs the game. 2. Rb7+ Checks from the side drive the king towards its own rook. 2… Kg8 3. Rb8+ Kh7 4. Rxh8+ Rook trade with check. After that it is a pawn endgame with two extra pawns, and now the doubled pawns are quite enough indeed, because there is no longer a rook to stop them. 4… Kxh8 5. Kf6 The king marches in front of the pawns, and the matter is settled.Sideline 1… Kf8 A completely harmless-looking king step — and the heaviest mistake in the position. The king leaves the pawn's file. 2. Kg6 The ONLY winning move, and it says it all: the white king immediately takes the square in front of its pawn. From there it can no longer be driven off. 2… Ra6+ 3. Kh7 The ONLY move too: the king gets out of the way of the check into the corner instead of stepping back — it wants to keep the square. 3… Ra7+ 4. Kh6 Ra3 5. Rb8+ Kf7 6. g6+ The pawn comes through with check, because the black king stands on the wrong side. That was exactly the difference. 6… Ke7 7. Rb7+ White has a rook, two pawns and the better king — the rest is pure technique.
- 2. Kf4
- 2… Ra8 Back to the furthest corner of the rank. In a rook endgame a rook needs distance — up close the king can attack it, from far away never.
- 3. g6
- 3… Kg8 The king dodges backward but stays on the pawn's file. That is the king's whole job in this lesson: stand in front of the pawn.
- 4. Kg5
- 4… Ra3 Only two of fifteen moves still hold, and both are the same idea: the rook has to go to the third or second rank, that is, far enough from the white king. Any square closer loses.
- 5. Kh6
- 5… Rh3+ The ONLY move. The white king has stepped onto the edge file, and there the check from the side catches up with it — the rook stands outside its reach the whole time.
- 6. Kg5 White has no choice left at all: this is the only legal move that does not throw everything away at once. With that the winning attempt is over.
- 6… Ra3 The rook takes back its old place. The defence needs nothing more than that — waiting is a perfectly adequate occupation here.
- 7. g7 The last try: the front pawn goes right up to the queening square. But there it is undefended, because the rear pawn stands behind it instead of beside it.
- 7… Kxg7 And so it is simply captured. What remains is rook against rook and a pawn the black king already blockades — a clean draw.
Play it yourself
In the free app C&C Chess Club you step through the line move by move, tap the sidelines and play the position out against Stockfish — no account, no ads.
More in Fortresses
- Rook against f- and h-pawns — the gap saves Draw
- Opposite-coloured bishops — one square holds both pawns Draw
- Bishop and pawn against knight — the fortress in front of the pawn Draw
- Opposite-coloured bishops — the pawn may even promote Draw
- Rook and pawn against the queen — the castled fortress Draw