 C&C Chess Club
Opposite-coloured bishops — one square holds both pawns
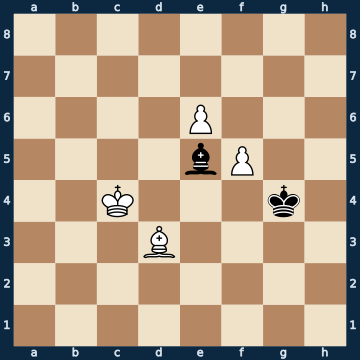
8/8/4P3/4bP2/2K3k1/3B4/8/8 b - - 0 1The plan
Opposite-coloured bishops are the endgame's greatest drawing weapon, and here you can see how far it carries: White has TWO extra connected passed pawns and still does not win. The reason is a square colour. Both pawns stand on light squares, so the squares they would have to advance over lie on dark ones — and dark is the colour of the defending bishop. It can plant itself there, and neither the white bishop nor a pawn can ever attack it. Better still: there is one square that holds up both pawns at once, because it blocks the one and guards the advance square of the other. The bishop has to go to exactly this square, and at once — of twenty moves only this one holds. After that the only task is not to leave the blockading post; if the rear pawn advances and attacks the bishop, it is simply captured, because the remaining pawn again stands on the wrong colour. Measured for comparison: place the same black bishop on a LIGHT square, and the same position is won — the colour alone makes a whole point's difference.
Rule of thumb: with opposite-coloured bishops, what counts is not how many pawns are missing, but which colour the squares in front of them are.
Why this level: The picture is quickly explained, but FINDING it demands calculating in square colours rather than material — and exactly one move out of twenty holds.
The solution, move by move
- 1… Bf6 The ONLY move out of twenty. This one square does two things at once: it blocks the rear pawn's path and guards the square the front pawn would have to advance over. And it is dark — the white bishop is light-squared and can never drive the blockader off. Every other bishop move loses at once, including the seemingly active one to the long diagonal (first sideline).Sideline 1… Bd4 The active move to the long diagonal looks good — the bishop seemingly keeps both pawns in view. In truth it places itself within the king's reach. 2. Kxd4 The king simply takes it. Two connected passed pawns against the bare king are no longer an endgame, just arithmetic. 2… Kh5 3. Ke5 Kh6 4. Kf6 Kh7 5. e7 The pawn goes through. A single bishop move has cost the game.
- 2. Kd5
- 2… Be7 Again the ONLY move. The white king has placed itself next to the front pawn, so the bishop has to go back a rank — to the next dark square on the same diagonal, where it still keeps both pawns in its grip. The natural retreat all the way back, by contrast, loses (second sideline).Sideline 2… Bd8 The bishop goes all the way back to guard the queening square from a distance. That is exactly one square too far. 3. Kd6 Now the white king stands next to the bishop, and it has no safe square left on its diagonal. 3… Be7+ 4. Kxe7 The bishop falls, and with it the fortress. Whoever blockades has to stay on the blockading square — guarding from a distance is not enough against two connected pawns. 4… Kh5 5. f6
- 3. Bc4
- 3… Kg5 The king comes closer. In this lesson it plays only a supporting role — the bishop does all the work — but nearby it does no harm.
- 4. f6 The last trick: the rear pawn attacks the blockading bishop and tries to drive it off.
- 4… Bxf6 And gets captured. This is not a loss of material but the whole point of the exercise: after this, the remaining pawn again stands on a light square and the bishop again on the dark one in front of it.
- 5. Ke4
- 5… Be7 The bishop takes up the same post as before. From here on the position is completely dead; White can move whatever it likes.
- 6. Bd5
- 6… Kf6
- 7. Kf4
- 7… Bd8
- 8. Kf3
- 8… Ke7 A draw. Two extra pawns, an extra bishop in terms of activity — and not a single way in, because everything essential lies on the wrong square colour.
Play it yourself
In the free app C&C Chess Club you step through the line move by move, tap the sidelines and play the position out against Stockfish — no account, no ads.
More in Fortresses
- Rook against doubled pawns — two pawns that are only one Draw
- Opposite-coloured bishops — the pawn may even promote Draw
- Rook against f- and h-pawns — the gap saves Draw
- Bishop and pawn against knight — the fortress in front of the pawn Draw
- Rook and pawn against the queen — the castled fortress Draw