 C&C Chess Club
Rook against f- and h-pawns — the gap saves
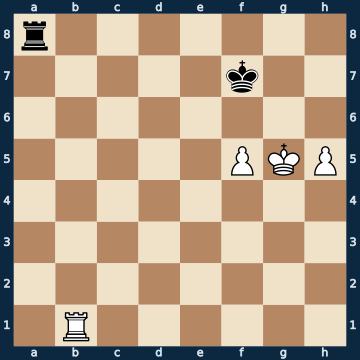
r7/5k2/8/5PKP/8/8/8/1R6 b - - 0 1The plan
Two extra pawns and still a draw — that is the best-known fortress of the rook endgame. It lives off the GAP between the pawns: the f- and h-pawns are the classic case, because an empty file lies between them. That very file is the door through which the attacking king would have to advance — and the defending rook plants itself right in it. That is why in the starting position a single move out of nineteen saves the game, and it is the rook move into the gap, with check, so that the king has to go straight back. After that the rook may keep checking from behind; its own king stays in front of the front pawn and does not budge from the spot. The second key moment comes when this pawn advances and offers itself: then the king has to grab it, and at once — a single rook pawn no longer wins, but waiting loses. Measured for comparison: if the two pawns move together, the fortress falls — the same position with connected pawns on f and g is won, and reckoned over random positions, pawns on f and h end in a draw thirty-six percent of the time, connected pawns on e and f only twenty-one percent.
Rule of thumb: king in front of the front pawn, rook into the gap — and when the pawn offers itself, it is taken.
Why this level: Wanting to hold two extra pawns in a rook endgame is a decision only made from club-player strength upward — and the saving move is the only one out of nineteen.
The solution, move by move
- 1… Rg8+ The ONLY move out of nineteen. The rook occupies the empty file BETWEEN the two pawns and drives the white king off with check at the same time. This was the square through which White would have come forward; from now on, never again. All the usual rook moves to the back rank or the second rank lose, and the hardest mistake is the move into the corner (first sideline).Sideline 1… Rh8 The natural move behind the pawn — and it loses. On the edge file the rook stands next to its own king, and White exploits exactly that. 2. Rb7+ Check from the side: the black king has to go next to its own rook, and on the next move it even ends up in front of it. 2… Kg8 3. Rb8+ Kh7 4. Rxh8+ Rook trade with check — that is the whole trick. Without the rook, what remains is a pawn endgame with two extra pawns. 4… Kxh8 5. Kf6 And that is won without any art at all: the king goes in front of the pawns, the f-pawn promotes.
- 2. Kh6
- 2… Rg2 From behind the rook works just as well: it keeps the gap in sight and stands far enough away not to be traded off.
- 3. Rb7+
- 3… Kf6 The king goes forward instead of sideways. Only two of four squares hold — whoever dodges backward loses contact with the f-pawn.
- 4. Rb6+
- 4… Kf7
- 5. f6 White pushes through and offers the pawn. This is exactly where the game is decided: the pawn is bait.
- 5… Rg8 Not grabbing it yet — the king stands on the wrong square, and the rook first returns to the gap. The obvious rook check from the front, on the other hand, would lose at once, because the h-pawn captures (second sideline).Sideline 5… Rg6+ This looks like the usual defence — rook check from the front, the rook seems untouchable. It is not. 6. hxg6+ The h-pawn captures it. Because the white king stands right beside it, it is even check, and Black has no time for anything. 6… Kg8 7. Rb8# Mate. That is the punishment for blocking the gap with the rook instead of occupying it.
- 6. Rb7+
- 6… Kxf6 Now the ONLY move: the king takes. If both pawns stay on the board, White gets through; with only one rook pawn left, the position is dead. Whoever waits here loses the game on the next move (third sideline).Sideline 6… Kf8 The king dodges instead of grabbing — and thereby loses the game. The pawn on the sixth rank is now defended and untouchable. 7. Rb8+ Kf7 8. Rxg8 The rook trade again. As soon as the rooks are off the board, the defender has nothing left to hold up the pawns with. 8… Kxg8 9. Kg6 Kh8 10. h6 Kg8 11. h7+ Kh8 12. Kf7 And here not the obvious king move to the edge, which would be stalemate, but the step towards the SECOND pawn. The h-pawn was only the bait; it is the f-pawn that wins. 12… Kxh7 The h-pawn falls — but that is completely irrelevant. The white king has long since stood next to the f-pawn and pushes it through. This is exactly what the black king should have grabbed two moves earlier, while the pawn was still there for the taking.
- 7. Rb6+
- 7… Kf7
- 8. Kh7 White tries it with the king on the edge file — this is the last winning attempt, and it fails on the same thing as everything before: the black king stands in front of the pawn and does not move away.
- 8… Rg5
- 9. h6 The pawn advances and is thereby finally nothing more than a rook pawn. Rook and king together hold it up with ease.
- 9… Rg1
- 10. Rb7+
- 10… Kf6 A draw. Black is two pawns down and does not have a single difficult move left ahead of it — the fortress stands.
Play it yourself
In the free app C&C Chess Club you step through the line move by move, tap the sidelines and play the position out against Stockfish — no account, no ads.
More in Fortresses
- Bishop and pawn against knight — the fortress in front of the pawn Draw
- Rook against doubled pawns — two pawns that are only one Draw
- Rook and pawn against the queen — the castled fortress Draw
- Opposite-coloured bishops — one square holds both pawns Draw
- Opposite-coloured bishops — the pawn may even promote Draw