 C&C Chess Club
The pawn too many
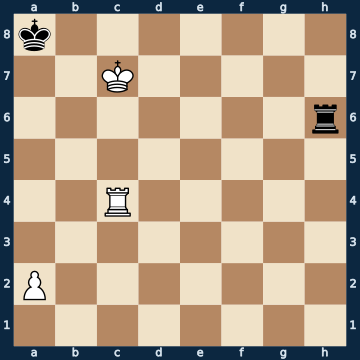
k7/2K5/7r/8/2R5/8/P7/8 w - - 0 1The plan
An extra pawn is almost always an advantage — here it is the difference between a full point and a half point, and in the wrong direction. The position is won with a single move: the rook goes to the a-file and gives check. The black king stands in the corner, its own rook is the only defence, and after the forced block on a6 it is simply captured — mate. Now the counter-test, measured: give White a SECOND pawn, of all places on the square the rook needs to check from, and the very same position is only a draw. The extra pawn takes away the square the rook's own piece needs to win, and no other move replaces it. You can even see this in the winning position itself: whoever moves the pawn instead of the rook and puts it on this square throws the point away on the spot.
Rule of thumb: don't just count material — check which SQUARES your own pawns occupy; a pawn on the wrong square is a piece taken out of play.
Why this level: An extra pawn that costs the win — pure judgement
The solution, move by move
- 1. Ra4+ The ONLY winning move out of seventeen. The rook builds the mating net with a single check, because the black king in the corner has no air: the white king covers b7 and b8, and the rook now takes a7 away from it. And this exact square, a4, would be occupied by a second white pawn — then this move would not exist, and the position would be a draw.Sideline 1. a4 The proof of the point: the pawn itself marches onto the square the rook would have needed. Win becomes draw in a single move — and all White did was push a pawn forward. 1… Rh7+ From now on the black rook checks from behind, and White never gets the chance to build the mating net. 2. Kb6 Rb7+ The king is driven away by its own pawn. This is exactly how the position with two pawns runs from the very start: a draw.Sideline 1. Rc6 Standing in for every other rook move: it looks active but gives the black rook time for checks from behind. 1… Rh7+ The rook gets behind the white king and drives it away. Without its king the white rook no longer has a mating net. 2. Kb6 Rb7+ 3. Ka5 Rb1 The rook keeps its distance and just keeps checking forever. A draw, even though White has an extra pawn.Sideline 1. Rh4 And for completeness, the one real catastrophe: the rook places itself in front of the enemy rook. 1… Rxh4 Rook gone. A single pawn no longer wins here.
- 1… Ra6 The only legal move. The king cannot go anywhere, so the rook has to throw itself onto the file.
- 2. Rxa6# Captured, mate. Two moves — with an extra pawn on a4 it would have taken infinitely many.
Play it yourself
In the free app C&C Chess Club you step through the line move by move, tap the sidelines and play the position out against Stockfish — no account, no ads.
More in Endgame principles
- Saavedra — the queen is too strong White wins
- Promotion with a fork Draw
- When to trade White wins
- The saving trade Draw
- The king has to come along White wins
- The bishop only sees half the world White wins