 C&C Chess Club
Same-coloured bishops — the short diagonal (Centurini)
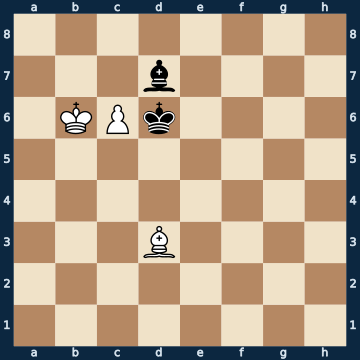
8/3b4/1KPk4/8/8/3B4/8/8 w - - 0 1The plan
The foundational lesson of the bishop endgame with same-coloured bishops, and the sharpest of this tier: out of eighteen possible moves exactly one wins, and it is the pawn advance. The pawn stands within reach of the enemy bishop; if White waits even one move, it is captured. Once the pawn reaches the seventh rank, the real work begins. The defender guards the queening square over two diagonals: a LONG one with four free squares and a SHORT one with only one. On the long one it cannot be caught — you can step into its way there, but it captures or side-steps. So the attacker occupies the long diagonal himself and leaves the opponent only the short one. Before that he places his king BEHIND his own pawn; that covers the one square of the short diagonal. Then the bishop steps exactly there: the defender has to capture, and the king recaptures.
Rule of thumb: first push the pawn through, then occupy the long diagonal and put the king behind the pawn — on the short diagonal every blockading bishop is lost.
Why this level: Centurini: the short diagonal, one move out of eighteen
The solution, move by move
- 1. c7 The ONLY winning move out of eighteen. The pawn is under attack right now, so it has to get past at once; any other move costs it on the spot (first sideline). That the pawn thereby moves to a square the opponent guards does not matter — it is not meant to promote yet, only to gain the rank.Sideline 1. Kb7 The king wants to secure the pawn first. There is no time for that. 1… Bxc6+ The ONLY move that holds, and it is the obvious one: the bishop captures the pawn, with check even. This is exactly why the pawn had to get past on the first move. Two same-coloured bishops with no pawns — a draw.
- 1… Bc8 The bishop places itself directly in front of the pawn. This is the most stubborn defence and at the same time the one that fails fastest.
- 2. Bb5 The bishop heads for the short diagonal — the one with the single free square. That is where the matter is decided later.
- 2… Be6
- 3. Kb7 With an attack on the blockading bishop. It has to give way, but must not lose sight of the queening square.
- 3… Bf5
- 4. Kb8 The most important king move of this lesson: BEHIND your own pawn. From there the king covers exactly the one square of the short diagonal, and only this makes the finishing blow possible.
- 4… Kc5
- 5. Ba6 The bishop occupies the short diagonal and threatens to go to the covered square.
- 5… Kb6
- 6. Bc8 A move that looks like a joke: the bishop places itself on its own queening square. It does this to reach the LONG diagonal from there — now Black no longer needs to guard the square at all, since it is occupied. Whoever promotes the pawn instead throws everything away (second sideline).Sideline 6. c8=Q The pawn is on the seventh rank, its own king stands right next to it — so why not? Because the queening square is still guarded. 6… Bxc8 The ONLY move that holds. The queen falls at once, and what remains are two bishops of the same colour: a draw. The right move was to occupy the square with your own BISHOP.
- 6… Bd3
- 7. Be6 And there it stands. The long diagonal is blocked, the defender has only the short one left. Going back onto the short diagonal now would be the mistake (third sideline).Sideline 7. Ba6 The bishop goes to the short diagonal instead of the long one. That looks like the same plan and is the opposite of it. 7… Bxa6 Because there it stands within reach. The defender simply captures it — and without a bishop there is no block and no win.
- 7… Ba6
- 8. Bd5 The bishop moves out of the way while covering the decisive square a second time. Black has no useful move left.
- 8… Kc5
- 9. Bb7 The final point: the bishop steps onto the one square of the short diagonal. It is protected by its own king, so looking away does not help — Black MUST capture.
- 9… Bxb7 Forced. Without capturing, the pawn promotes next move.
- 10. Kxb7 The ONLY winning move out of six. The king recaptures, and with that the last guard of the queening square is off the board.
- 10… Kd6
- 11. c8=Q Promoted. Eleven moves, in which the pawn moved exactly twice — everything else was work on the diagonals.
Play it yourself
In the free app C&C Chess Club you step through the line move by move, tap the sidelines and play the position out against Stockfish — no account, no ads.
More in Minor-piece endgames
- Same-coloured bishops — trading off the blockading bishop White wins
- Wrong bishop — the direction of capture decides everything White wins
- The minor piece for the last pawn Draw
- Knight and pawn against knight — the pawn has to get past White wins
- Same-coloured bishops — the king in front of the pawn holds Draw
- Knight and pawn against bishop — the sacrifice distance White wins