 C&C Chess Club
The minor piece for the last pawn
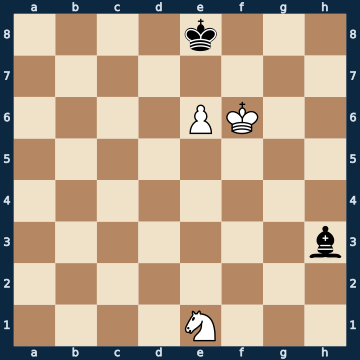
4k3/8/4PK2/8/8/7b/8/4N3 b - - 0 1The plan
The defender's most important drawing resource in the endgame: a minor piece may be given up for the opponent's last pawn at any time — with no pawn there is no mate. But that only works if the piece stands on a square from which it actually REACHES the pawn or its defender. Everything here hinges on exactly this: two bishop moves place the piece so that it is simply picked up, and the same plan loses. The king, meanwhile, makes life easy for itself — it plants itself in front of the pawn and stays there. Once the pawn reaches the seventh rank, the defender even has a second helper: stalemate, because his own pawn takes away the squares next to the enemy king from the attacker. The bishop has to find the one right diagonal for three moves in a row, then it may give itself up, and the game is over.
Rule of thumb: the piece is always worth the last pawn — just place it so that it actually catches up with it.
Why this level: Piece for the last pawn — the drawing resource par excellence
The solution, move by move
- 1… Kf8 The king steps aside and stays in front of the pawn. Five of seven moves hold here, but two bishop moves lose at once — they put the piece within capturing range of the king and knight (sidelines).Sideline 1… Bf5 The bishop attacks the pawn — the most active move, and the worst. 2. Kxf5 The king simply takes it. Whoever wants to give up his piece for the pawn must first make sure it is not given away beforehand. 2… Ke7 3. Ke5 Kd8 4. Kd6 Without the bishop it is the ordinary pawn endgame: the king wins the opposition. 4… Ke8 5. e7 And the pawn gets through. A single careless bishop move has turned the draw into a lost game.Sideline 1… Bg2 The bishop goes to the other long diagonal — far from the pawn and unfortunately also within the knight's reach. 2. Nxg2 And it is gone. The rule of thumb is not 'anywhere', but 'onto a square from which the piece reaches the pawn'. 2… Kf8 3. Nh4 Kg8 4. Ng6 The knight comes forward, the pawn gets through. The safe draw has become a lost game.
- 2. e7+ White puts the pawn on the seventh rank. That looks threatening and is in truth already the beginning of stalemate.
- 2… Ke8 The ONLY move that holds — out of two possible ones. The king has to go back in front of the pawn; going to the other side loses, because the pawn then promotes undisturbed.
- 3. Nd3 The knight looks for a way forward. Only it can still become dangerous for Black, since the king alone cannot get through.
- 3… Bc8 The bishop goes to the diagonal that aims at the square in front of the pawn. From here it reaches every square the knight might want to occupy.
- 4. Nf4
- 4… Bg4 The ONLY move that holds, out of eight. The knight threatens to jump to the square next to the pawn; the bishop has to go to the diagonal that crosses exactly this square. Every other bishop square misses the point.
- 5. Ne6 The knight comes anyway — and so it lands exactly where the bishop wanted it.
- 5… Bxe6 The ONLY move that holds, and the heart of the whole lesson: the piece is given up. What remains afterwards is a pawn Black blockades.
- 6. Kxe6 STALEMATE. The black king has no square left — the white pawn itself takes away both squares next to it. A draw.
Play it yourself
In the free app C&C Chess Club you step through the line move by move, tap the sidelines and play the position out against Stockfish — no account, no ads.
More in Minor-piece endgames
- Same-coloured bishops — the king in front of the pawn holds Draw
- Same-coloured bishops — trading off the blockading bishop White wins
- Knight and rook pawn — the pawn must not go to a7 White wins
- Same-coloured bishops — the short diagonal (Centurini) White wins
- The knight against two connected passed pawns Draw
- Wrong bishop — the direction of capture decides everything White wins