 C&C Chess Club
Knight and rook pawn — the pawn must not go to a7
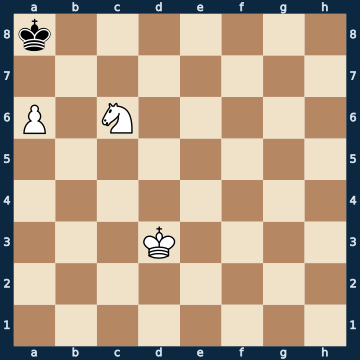
k7/8/P1N5/8/8/3K4/8/8 w - - 0 1The plan
Knight and rook pawn against the bare king are won — but only with a very precise hand, because stalemate lurks in the corner. Right now Black has no legal move at all: the knight takes both squares next to the corner away from it, the pawn the third. So every leisurely move with the white king is IMMEDIATE stalemate — and that alone applies to eight of the seventeen possible moves. The pawn advance is just as bad: it frees the square next to it for the enemy king, and from there it attacks both the pawn and the knight at once. Only one move helps, the one that gives the opponent air without handing anything away: the knight moves off and leaves the black king exactly one square. After that the white king approaches at its leisure, the knight comes back and covers the queening square, and only right at the end — once the enemy king has been driven out of the corner — may the pawn run.
Rule of thumb: with knight and rook pawn, first bring up the king and force the corner to be vacated — the pawn goes last, otherwise it is stalemate.
Why this level: The pawn must not go to a7 — eight stalemate moves lurk
The solution, move by move
- 1. Nb4 The ONLY winning move out of seventeen. Black has no move right now: the knight covers both squares next to the corner, the pawn the third. Eight white moves therefore give immediate STALEMATE (first sideline), and the pawn advance gives the point away in a different way (second sideline). The knight has to step aside — but onto a square from which it can find its way back.Sideline 1. Kc4 The king makes a perfectly ordinary approach move — and the game is immediately STALEMATE. Black has not a single square: the knight covers the two next to the corner, its own pawn the third. This is exactly how eight of the seventeen white moves give away the whole point here.Sideline 1. a7 The other reflex: the pawn should finally get through. That too is only a half point now. 1… Kb7 The ONLY move — and it is fully enough. On this square the king attacks both the pawn AND the knight, since the pawn no longer covers the square it itself was just standing on. 2. Nb4 The knight has to save itself, 2… Kxa7 and the pawn falls. King and knight against the bare king — there is no mate, a draw.
- 1… Ka7
- 2. Kd4 Now the king may set off. It takes the shortest route, and nothing more needs to be watched.
- 2… Kb8
- 3. Kc5
- 3… Ka7
- 4. Kc6 The king reaches the decisive diagonal. From here Black hardly has a choice left.
- 4… Ka8
- 5. Kb6 The king places itself in front of its own pawn and so covers the square in front of it — exactly what the hasty advance would have failed on.
- 5… Kb8 The ONLY move Black still has.
- 6. Nd5 And now the knight comes back. Its goal is the square from which it guards the corner itself.
- 6… Ka8
- 7. Nc7+ With check — and with that the corner is sealed off for the black king.
- 7… Kb8 Again the only move.
- 8. a7+ NOW the pawn may go forward: its own king covers the square, the knight covers the corner, and the black king no longer stands in front of it. This same move was still a mistake at the very first moment.
- 8… Kc8 The last forced move — the corner is occupied, everything else covered.
- 9. a8=Q+ The pawn promotes. With queen and knight the rest is a formality.
Play it yourself
In the free app C&C Chess Club you step through the line move by move, tap the sidelines and play the position out against Stockfish — no account, no ads.
More in Minor-piece endgames
- The knight against two connected passed pawns Draw
- Same-coloured bishops — the king in front of the pawn holds Draw
- The bishop against two connected passed pawns Draw
- The minor piece for the last pawn Draw
- The bishop against the rook pawn — one square on its path is enough Draw
- Same-coloured bishops — trading off the blockading bishop White wins