 C&C Chess Club
Same-coloured bishops — the sixth rank decides
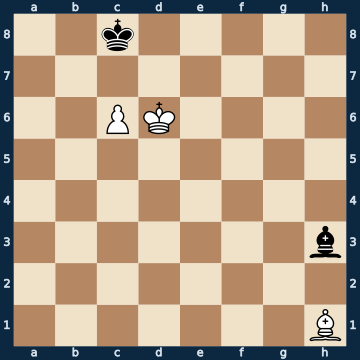
2k5/8/2PK4/8/8/7b/8/7B w - - 0 1The plan
Same-coloured bishops, an extra pawn on the sixth rank, your own king right next to it, and the defending king pushed back onto the queening square — this is won. Take the very same set-up and push pawn and kings back just a single rank, and the defending king stands in front of the pawn instead of behind it, and the position is dead drawn: there all eight moves hold, here exactly one out of nine wins. This one rank is the whole difference, and the sister lesson about the king in front of the pawn shows the other half of it. Even so, the win does not happen by itself, because the most obvious move is one of the eight that throw it away: push the pawn forward at once, and the defending king suddenly has no move left at all, while its bishop switches to the long diagonal, where it guards every square the attacker would have to cross. So the bishop first: it has to occupy the long diagonal IN FRONT OF the pawn, right up to one square from the pawn — one step less far, and the defending king slips away to the side and holds. Only after that does the pawn advance. Now the defender has only bishop moves left, because his king is pinned down and the bishop must not leave the diagonal to the queening square. Your own bishop therefore goes quite calmly onto that very diagonal, onto a square its own king covers. It has to be captured there, otherwise the pawn promotes — and with the capture, the guard on the queening square is gone.
Rule of thumb: first bring the bishop right up to the pawn, only then the pawn — and the last step is a bishop the opponent has to take.
Why this level: One rank separates draw from win — judgement, not calculation
The solution, move by move
- 1. Bd5 The ONLY winning move out of nine. The bishop occupies the long diagonal right up to one square from its own pawn. Both parts are necessary: the diagonal, so the black bishop cannot get it later (otherwise it would guard all the approach squares from there, third sideline), and the closeness to the pawn, so the bishop can move straight on the moment the pawn advances — one square further back and it is already a draw (second sideline). The pawn advance itself throws away the win (first sideline), and so do all four king moves.Sideline 1. c7 The move everyone would see first: the pawn goes to the seventh rank. It is one of eight moves that throw away the win. 1… Bg2 The ONLY move that holds, out of six — and it looks wrong, because the bishop leaves the diagonal to the queening square. It is allowed to, because the black king itself stands on the queening square and now has not a single move left: the pawn takes away both squares next to it, the white king the others. So it cannot be driven out, and if the bishop move were taken away from it as well, it would be stalemate. On the long diagonal, in return, the bishop guards every square the white king or the white bishop would have to cross to get close. 2. Ke6 White tries it with the king — there is no other plan, since his own bishop cannot get past the occupied long diagonal. 2… Bf3 The bishop simply stays on the diagonal and moves only one square. 3. Kd6 Bg2 And back again. White has an extra pawn on the seventh rank and still not a single way forward.Sideline 1. Be4 The right idea, but one step short. The bishop already stands on the long diagonal, just two squares from the pawn instead of one — and this one tempo is the whole win. 1… Kb8 The ONLY move that holds, out of eight. The king voluntarily vacates the queening square and goes into the corner. This works here because the white bishop now needs two moves to reach the black bishop's diagonal — and until then the queening square stays guarded. 2. c7+ White breaks through, with check to boot. 2… Ka7 The ONLY move that holds — further into the corner. Going back onto the queening square would now be lost: there the king would be stuck again, and the white bishop would have enough time for the route it was missing on the first move. 3. c8=Q Bxc8 The ONLY move that holds, and the reason for everything: the black bishop still guards the queening square from a distance. In the main line this was no longer the case, because there the white bishop could place itself on the defensive line in time.Sideline 1. Kd5 The king wants to help. All four king moves spoil the win, and for the same reason. 1… Kc7 The thematic equaliser: the king may finally go in front of the pawn. This is exactly the square the white king had taken away from it before — as long as the white king stood next to the pawn, the black king was locked onto the queening square. From here on it is the drawn fortress from the sister lesson. 2. Kc5 White tries to push the king aside. 2… Bg4 The bishop waits on its diagonal and does not let itself be traded off. 3. Bd5 Trading bishops does not achieve anything either: without a bishop the black king still stands in front of the pawn, and without a bishop it cannot be dislodged either. 3… Bf5 Just give way, never let the bishop be captured — and the pawn stands there for all eternity.
- 1… Bg4 Black waits. His bishop must not leave the diagonal to the queening square, otherwise the pawn simply runs through.Sideline 1… Kb8 Black clears the queening square at once and steps aside — the same idea that still saved the game one sideline earlier. 2. c7+ The ONLY winning move out of fourteen, and this time with check. 2… Ka7 The same route into the corner as in the earlier sideline — except here it no longer holds. Going back onto the queening square loses just as much, it just takes one move longer. 3. Be6 The ONLY winning move out of twenty-one, and the pure form of the whole lesson: the bishop places itself on the opponent's diagonal, covered by its own king. Because the bishop already stood one step from the pawn beforehand, it reaches this square in a single move. 3… Bxe6 Black has to capture, otherwise the pawn promotes. And with that the guard of the queening square is gone. 4. Kxe6 The ONLY winning move out of nine: recaptured. The rest is the simplest technique. 4… Kb7 5. Kd7 And this too is the only move that still wins — the king has to go next to the pawn, otherwise the black king still makes it back after all. 5… Ka6 6. c8=Q+ Promoted. The black king was always two squares too far away.
- 2. c7 Only now. The difference from the first move: the long diagonal is occupied, the black bishop can no longer escape onto it. And with the advance the pawn frees the square c6 for its own bishop, without which the whole plan would not work.
- 2… Bh3 From here Black has no king move left — the pawn takes away both squares next to it, the white king and the white bishop the other two. Eight bishop moves remain; four of them keep the queening square covered, and two of those four lose at once. All that is left is pure waiting.
- 3. Bc6 The square the pawn has just vacated — and the bishop's only route to b5, since b5 cannot be reached from d5. Incidentally the black king's last escape square stays covered: it still has not a single move.
- 3… Bg4
- 4. Bb5 The detour that decides everything: from here the bishop reaches the opponent's diagonal on a square its own king covers. That the black king gets some air again because of this is the price — and it is too cheap.
- 4… Kb7 The king comes out, because otherwise it has nothing left at all. But in doing so it moves away from the queening square.
- 5. Bd7 The move everything was building towards. The bishop places itself right in the middle of the defensive line, covered by its own king. Black has to capture, because otherwise the pawn promotes next move.
- 5… Bxd7
- 6. Kxd7 The ONLY winning move out of nine, and now the matter is clear: with the black bishop gone, the guard on the queening square has vanished, and the black king stands too far away.
- 6… Ka6 The last attempt to get close — one square too late.
- 7. c8=Q+ Promoted, with check. It took seven moves, and the first one was the hardest.
Play it yourself
In the free app C&C Chess Club you step through the line move by move, tap the sidelines and play the position out against Stockfish — no account, no ads.
More in Minor-piece endgames
- Knight and pawn against bishop — the sacrifice distance White wins
- Wrong bishop — two h-pawns are worth as much as one Draw
- Knight and pawn against knight — the pawn has to get past White wins
- Rook pawn with knights — the king has to reach the corner Draw
- Wrong bishop — the direction of capture decides everything White wins
- Knight against separated passed pawns — the double square Draw