 C&C Chess Club
Knight against separated passed pawns — the double square
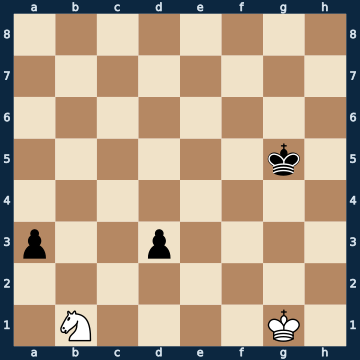
8/8/8/6k1/8/p2p4/8/1N4K1 w - - 0 1The plan
A knight alone against two passed pawns. As long as the kings do not have a say, the separation is a gift for the knight: with two pawns side by side, twenty-five of fifty-four knight squares hold the draw, with separated pawns forty-four. The bishop would like it exactly the other way round — it only guards one square colour and wants to see both pawns on the same diagonal; the knight looks for a square from which it reaches both queening squares at once. This does not hold without limit. Averaged over all king positions, ONE spacing is best: around sixty-one out of a hundred positions hold, against just under fifty with connected pawns. If the pawns stand three or four files apart, it is only thirty-six — that is, fewer than with connected pawns. Too far apart is worse for the knight than not separated at all, because it can no longer get from one queening square to the other in two jumps. This position stands exactly on that boundary, and it is only just enough: one of eight moves finds the right square, the other seven lose, including the greedy pawn grab. After that it proceeds in shuttle steps — picking off one pawn with check and using the tempo gained to jump back in front of the other. The second boundary is the rank: if both pawns advance just one step, not a single knight square holds any more.
Rule of thumb: separated pawns are the knight's territory — but only as long as it can get from one queening square to the other in two jumps.
Why this level: Shuttling instead of chasing: the basic technique of the knight against two passed pawns
The solution, move by move
- 1. Nc3 The ONLY move that holds, out of eight. From c3 the knight guards a2 and d1 at the same time — both pawns find their next target already occupied. This is the double square the whole lesson turns on. The obvious grab on a3 sends the knight to a square from which it can never reach d1 again (first sideline).Sideline 1. Nxa3 A pawn stands there for the taking — the most human move in the position and at the same time the decisive mistake. From the edge square a3, the knight reaches only b1, c2, c4 and b5 in one move; not a single one of these squares guards d1. 1… d2 The ONLY winning move out of nine, and a very simple one: the remaining pawn goes to the seventh rank. Everything else would still be a draw. 2. Nb1 The knight hurries back and even attacks the pawn — except it attacks the wrong square. From b1 it sees d2, but not d1, and a pawn on the seventh rank does not care whether it is attacked. 2… d1=Q+ Promoted, with check. Queen against knight is won — that costs the point.
- 1… d2 Black pushes the pawn past the knight all the way to the seventh rank. Even so it cannot promote: d1 is guarded. However, the pawn now stands so far forward that the knight can no longer just watch it from a distance.Sideline 1… a2 The other try: Black sends the rook pawn forward. That does not hold up the draw either, but it shows the shuttle in its purest form. 2. Nxa2 The ONLY move that holds, out of thirteen. The pawn has run onto a square the knight guards — so it is taken, at once and without ceremony. 2… d2 Now the other pawn, with the same claim. 3. Nc3 The ONLY move that holds, out of eight — the pendulum swings back to exactly the square it started from. From c3 the knight guards d1, and the pawn stays where it is. Two squares, one knight, both pawns dealt with: that is the whole content of the lesson.
- 2. Ne4+ The ONLY move that holds, out of thirteen — and the reason this position is a draw at all. The knight attacks the pawn on d2 and gives check at the same instant. Only because the black king stands on g5 is e4 a checking square; of the eight squares next to the king only one other works just as well, on the seven others the position is lost for White. Placing the knight on the queening square beforehand loses (second sideline).Sideline 2. Nd1 The second obvious idea: the knight sits down on the queening square itself and physically blocks the pawn. That holds up exactly this one pawn — and that is exactly why it loses. 2… a2 Because now the other one runs. The knight is stuck on d1: if it leaves, the pawn behind it promotes, if it stays, the pawn in front promotes. This is the difference between blocking and guarding — whoever blocks ties himself down, whoever guards stays mobile. 3. Ne3 The knight tries anyway and sets off. There is no square reachable from d1 that guards both a1 AND d1. 3… a1=Q+ The pawn nobody was watching queens.
- 2… Kf4 The king has to get out of check, and attacks the knight while doing so. That changes nothing — the half-move gained is already banked.
- 3. Nxd2 The ONLY move that holds, out of thirteen. The knight is attacked and captures at the same time; this is exactly what the check was for. If it retreats to its double square instead, it arrives half a move too late (third sideline).Sideline 3. Nc3 The knight goes back to its tried and tested double square instead of capturing. Two half-moves ago this was the only move that held — now it is the losing one. The difference is the black king, which stands closer by now. 3… Ke3 The king places itself next to the pawn. That makes the guarding worthless: the knight does cover d1, but if it captures there, the king recaptures it. 4. Nb1 The knight gives way. There is no salvation left; the tablebase gives White as lost in every line. 4… d1=Q+ And the pawn whose queening square was guarded the whole time queens. A guard the enemy king is allowed to capture guards nothing.
- 3… a2 Now the second pawn runs. The pendulum has to swing to the other side, and for that the knight again has only one square.
- 4. Nb3 The ONLY move that holds, out of eleven. From b3 the knight guards a1. The pawn already stands on the seventh rank, so it no longer matters whether the knight attacks it, only whether it sees its queening square.
- 4… Ke3 The black king comes closer and wants to get the pawn through. Too late — the knight already has its square.
- 5. Na1 The knight settles in front of the pawn. With a rook pawn this is the safest blockade there is: if the black king ever captures the knight on a1, it stands in its own corner, its own pawn takes away its last square, and the game ends in stalemate.
Play it yourself
In the free app C&C Chess Club you step through the line move by move, tap the sidelines and play the position out against Stockfish — no account, no ads.
More in Minor-piece endgames
- Rook pawn with knights — the king has to reach the corner Draw
- Opposite-coloured bishops — two extra pawns aren't enough Draw
- Wrong bishop — two h-pawns are worth as much as one Draw
- Opposite-coloured bishops — two separated passed pawns win White wins
- Same-coloured bishops — the sixth rank decides White wins
- Two knights against a pawn — won and still a draw White wins