 C&C Chess Club
Two knights against a pawn — won and still a draw
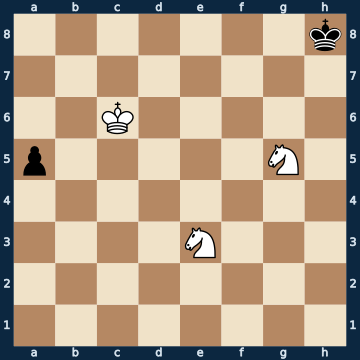
7k/8/2K5/p5N1/8/4N3/8/8 w - - 0 1The plan
Two knights do not mate a bare king. You can trap it in the corner, but the last move is missing: the defender would be stalemated before anything happens. A single enemy pawn cancels that out — it still has a move, so there is no more stalemate, and the position becomes theoretically winnable. The recipe for it is old and simple: one knight sets up IN FRONT OF the pawn and holds it fast, the other knight and the king drive the bare king into the corner, and only once the mating net is in place is the pawn released or picked up. Where the pawn stands decides everything: blocked on a4 or further back the position is won, one step further forward it is a dead draw — this is the Troitzky line, and it can be counted out on the board. Here only two moves out of twenty-two hold the win, namely precisely the two knight jumps that reach the blockade square on the next move; the other twenty are immediately a genuine draw. And yet you must not play for it at the board: it is a hundred and seventy-nine half-moves to mate, that is ninety moves, and to the pawn alone it is a hundred and six half-moves without a single capture and without a single pawn move — the fifty-move rule beats the win by three moves. Take the pawn off the board, and the same position reports a flat draw: the pawn you would so love to capture is the only reason there is anything to be had at all.
Rule of thumb: two knights against a pawn are won on paper and a draw at the board — don't play for it, and as the defender, never give up.
Why this level: Won and still a draw: the fifty-move rule as a lesson in its own right
The solution, move by move
- 1. Nc4 One of only two moves out of twenty-two that hold the win — the second is the jump to c2, and both share the same reason: only from c4 and from c2 does the knight reach the blockade square a3 on the next move. All the other twenty moves turn the position into a genuine draw on the spot, because the pawn then gets past the blockade (first sideline). Incidentally, the knight on c4 also attacks the pawn.Sideline 1. Kb5 The natural move: the king goes to fetch the pawn. One of twenty moves that throw the win away — and it throws it away before it has even got going. 1… a4 The ONLY move that holds for Black, and it is not a hard one to find: the pawn runs past the blockade. 2. Nc4 Now the knight comes — one move too late. It still wants to go to a3, but the square is about to be occupied. 2… a3 Again the ONLY move that holds, and again the obvious one: the pawn sets itself on the blockade square. From here on it cannot be stopped without capturing it. 3. Nxa3 Forced, and that settles it. King and two knights against the bare king is not a win: mate can be set up on the board, but it cannot be forced — the defender would be stalemated first.
- 1… Kg7
- 2. Ne6+Sideline 2. Nxa5 Capturing the pawn is the most instructive mistake in the whole endgame: it looks like a material gain and is in truth a draw offer. White is left with two knights against the bare king. 2… Kh8 3. Kd6 White may now do as he likes. The king can come in, the knights can take up their posts — the result no longer changes. 3… Kg8 4. Ke7 Kh8 5. Kf7 And so it ends: stalemate. The black king is locked in, every escape square is covered, it is not in check and cannot move. This very picture is the reason why two knights alone do not deliver mate — and why the pawn White has just captured was its life insurance.
- 2… Kg8
- 3. Nc5 The second knight joins in. Now the pawn is under fire and the square in front of it is covered too — it can neither stay nor go without being attacked. Black has six moves, and only one of them still saves the half point.
- 3… a4 The only move that keeps Black at a practical draw — and it looks like a capitulation, because the pawn voluntarily puts itself on a defended square. That is exactly the point: Black OFFERS the pawn, because capturing it would be a draw. The five king moves, by contrast, lose within the fifty moves, because the king drifts towards the corner in the process (third sideline). The pawn move also resets the fifty-move-rule clock and hands the defender the time White is short of.Sideline 3… Kh8 The defender holds his pawn back and heads for the corner with the king — both wrong. In the corner he voluntarily stands closer to the mating net, and the withheld pawn move is of no use later on. 4. Kd6 a4 Now the pawn has to move after all, all four moves lose. But the time gain is gone: out of the corner, White needs considerably fewer moves from here on, and the win is suddenly a real one. 5. Na3 The ONLY winning move out of twenty-two — the same blockade as in the main line. The only difference lies in the black king: because it stands in the corner, the table now needs only ninety-one half-moves from here instead of a hundred and nine — and so the win fits within the fifty-move rule. 5… Kg7 6. Ke6 Kg6 7. Ne4 Again the ONLY move that wins. The free knight takes away the king's squares towards the centre, and the rest is craftsmanship — this time in time. 7… Kh5 8. Kf5
- 4. Na3 The ONLY winning move out of twenty-three. The knight sets up in front of the pawn and does not stir from this square again until the end. All the other twenty-two moves are draws, including capturing the pawn — which is exactly why a3 is not an attacking square here but a prison.
- 4… Kg7
- 5. Kd5 From here on only the other half of the material does any work: the king and the free knight drive, the blockading knight looks on. That is why everything takes so long — White is effectively playing this endgame with one piece fewer.
- 5… Kf6
- 6. Ke4 Not a retreat, but a deliberate loss of tempo. The king takes a detour and afterwards faces the same opponent with the opposition. Knights cannot lose a tempo without giving up their post — only the king can carry out this manoeuvre, and it costs moves, of which there are too few here.
- 6… Ke7
- 7. Ke5
- 7… Kf7
- 8. Ne4 The free knight looks for a post from which it takes squares away from the black king. It is the only one that can do this; its partner on a3 has its own job.
- 8… Ke7
- 9. Nf6
- 9… Kf7
- 10. Nd5
- 10… Kg7 After ten moves the black king is still free, and the table needs ninety-six more half-moves from here to the next capture or pawn move. Fourteen half-moves have already been used since the pawn move — a hundred and ten together, and a hundred are allowed. This is exactly the cursed win: the method is right, the clock isn't.
Play it yourself
In the free app C&C Chess Club you step through the line move by move, tap the sidelines and play the position out against Stockfish — no account, no ads.
More in Minor-piece endgames
- Opposite-coloured bishops — two separated passed pawns win White wins
- Knight against bishop — the fixed chain on one colour White wins
- Opposite-coloured bishops — two extra pawns aren't enough Draw
- The bad bishop — pawns on your own colour White wins
- Knight against separated passed pawns — the double square Draw
- Rook pawn with knights — the king has to reach the corner Draw