 C&C Chess Club
Opposite-coloured bishops — two extra pawns aren't enough
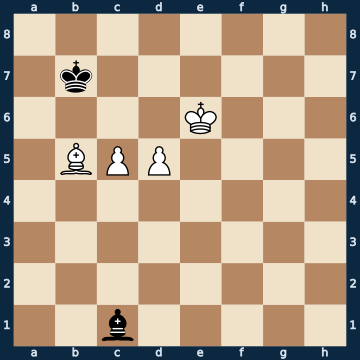
8/1k6/4K3/1BPP4/8/8/8/2b5 b - - 0 1The plan
Two connected extra pawns, a far-advanced king — and the position is still a draw, because the bishops are opposite-coloured. But only if the defender finds the right move at once: of twelve possible moves exactly one holds, the other eleven lose. The key is the diagonal that runs through BOTH squares in front of the pawns; the bishop takes up a position on it from behind, where the front pawn still blocks it itself — because the moment that pawn moves, the diagonal opens and the square it vacates is covered. The second square is the other colour, the bishop can never reach it, so the king takes it over; the blockade needs no more than that — one square for the bishop and one for the king. How narrow the margin is shows in two counter-tests on the same position: with the pawns one rank further forward it is lost, and with the defending king one square further out, in the corner instead of next to the pawns, it is lost too. That two extra pawns aren't enough at all is down to the bishops' colour alone: in a large random sample of this material, with opposite-coloured bishops almost two-thirds of all set-ups hold the draw, with same-coloured bishops barely two-fifths. The pawn structure matters too — if the two pawns stand four files apart instead of next to each other, the draw rate falls from two-thirds to under half, because then one bishop can no longer cover both; connected pawns are the most harmless form, widely separated passed pawns the dangerous one, and there is a separate lesson for that.
Rule of thumb: with opposite-coloured bishops, only count on winning once the material gap is large — and as the defender, guard not one square but the diagonal that runs through both pawn squares.
Why this level: The draw rule for opposite-coloured bishops, measured at the edge
The solution, move by move
- 1… Ba3 The ONLY move that holds, out of twelve; the other eleven all lose. The bishop goes to the diagonal that runs through both squares in front of the pawns. Right now the front pawn blocks it itself — and that is exactly why this square is right: the moment the pawn moves, the diagonal opens and the square behind it is covered. Whoever instead pushes the king in front of the pawns, or puts the bishop straight in front of the back pawn, loses (first and second sidelines).Sideline 1… Kc7 The natural move: the king places itself in front of the pawns. It loses, and the reason is simple — a king always covers only ONE square, and the bishop is not yet where it could cover the other. 2. d6+ With check, and that drives the king off the square it had just occupied. One tempo is already enough here. 2… Kd8 3. c6 Now both pawns run side by side. The bishop can no longer reach any diagonal that still stops anything. 3… Bf4 4. c7+ The pawn takes up a position next to the king and in doing so takes away its escape squares itself. 4… Kc8 5. Ba6# Mate — and on a LIGHT square, no less. The black bishop watches it all without being able to intervene; which is exactly why it has to go to the right diagonal from the very start.Sideline 1… Bf4 The second most natural move: the bishop places itself in front of the back pawn and guards the square ahead of it. This looks like a blockade and still loses — it covers only ONE of the two squares, and the square in front of the other pawn lies on a diagonal it can never reach from here. 2. d6 The pawn advances anyway and is untouchable because the white king stands beside it. That is the whole difference from the main line: there the bishop only captures once its OWN king defends it on the blockade square. 2… Kc8 3. c6 The second pawn follows. Two connected pawns on the sixth rank are too much even for opposite-coloured bishops — the random sample says: one rank further forward, the draw rate falls from two-thirds to two-fifths. 3… Kd8 4. c7+ Kc8 5. Ba6# The same mate as in the first sideline. Two different mistakes, one picture.
- 2. c6+ The sharpest try: the pawn advances with check and gains a tempo. Only it thereby opens precisely the diagonal the bishop has just taken up.
- 2… Kc7 Again the ONLY move that holds, this time out of six. The king occupies the square of the other colour — the bishop can never get there, and conversely the king cannot get to the bishop's square. Both pawns are thereby stopped, each by the piece that can do it.
- 3. d6+ The second pawn tries its luck. White cannot defend it: his bishop is the wrong colour for this square — that is the whole difference from same-coloured bishops.
- 3… Bxd6 The ONLY move that holds, out of five. The bishop takes the pawn on the blockade square and stands safe there because its own king defends it — which is exactly why the king had to go to the neighbouring square beforehand. Whoever sidesteps here instead of capturing is mated in two moves (third sideline).Sideline 3… Kd8 Instead of capturing, the king sidesteps — and the blockade is gone. Capturing was not a material gain but the only way to occupy the blockade square at all. 4. c7+ With check, and the king has only one square left. 4… Kc8 The only legal move. 5. Ba6# Mate. One half-move earlier Black still stood at a draw — that is how narrow the ridge is once two connected pawns have come this far.
- 4. Kd5 White tries to go round the blockade with the king and attack the bishop.
- 4… Bf8 The bishop sidesteps to the other end of the same diagonal. From there it is out of the king's reach and at the same time takes away the squares it wanted to come through. The last pawn never moves again: the square in front of it belongs to the black king, and the white bishop cannot even set foot on a dark square. Fortress, half a point.
Play it yourself
In the free app C&C Chess Club you step through the line move by move, tap the sidelines and play the position out against Stockfish — no account, no ads.
More in Minor-piece endgames
- Knight against separated passed pawns — the double square Draw
- Opposite-coloured bishops — two separated passed pawns win White wins
- Rook pawn with knights — the king has to reach the corner Draw
- Two knights against a pawn — won and still a draw White wins
- Wrong bishop — two h-pawns are worth as much as one Draw
- Knight against bishop — the fixed chain on one colour White wins